Before learning what you can deduct, you must understand what you cannot deduct.
🚫 Non-Deductible Expenses
Expense
Why Not Allowed
Commuting to work
Considered personal travel
Business clothing
Personal clothing
Haircuts or grooming
Personal expense
Gym memberships
Personal benefit
Meals during regular workday
Personal consumption
⚠️ Key Rule
If an expense is personal in nature, it cannot be deducted — even if it helps you perform your job better.
2️⃣ Who Can Claim Employment Expenses (Eligibility Rules)
Not every employee qualifies to deduct work expenses.
✅ You can claim employment expenses if:
Your employment contract requires you to pay for certain expenses
Your employer does not reimburse you
You have a signed T2200 form
Example
Situation
Deductible?
Using your own vehicle for work travel
✅ Yes
Driving to your regular office
❌ No
Receiving non-taxable vehicle allowance
❌ No
3️⃣ The T2200 Form – Declaration of Conditions of Employment
The T2200 form is one of the most important documents when claiming employment expenses.
📄 Purpose of T2200
It confirms:
The employee must pay certain expenses
Whether the employee travels for work
If the employee receives allowances or reimbursements
If the employee works from home
⚠️ Important
Rule
Explanation
Employer must complete the form
Employees cannot create it
Must be signed
Unsigned forms are invalid
Not filed with return
Keep it for CRA review
4️⃣ The T777 Form – Statement of Employment Expenses
Once eligibility is confirmed using T2200, expenses are calculated on Form T777.
🧾 Purpose
The T777 lists all deductible expenses such as:
Vehicle expenses
Home office expenses
Office supplies
Work phone costs
Advertising (for commission employees)
Flow of Forms
Form
Purpose
T2200
Confirms eligibility
T777
Calculates expenses
T1 Return
Reports deduction
5️⃣ Framework for Deducting Employment Expenses
Claiming employment expenses follows a clear process.
Step-by-Step Framework
1️⃣ Obtain signed T2200 2️⃣ Review allowed expenses 3️⃣ Collect receipts and records 4️⃣ Complete T777 5️⃣ Apply employment-use percentages 6️⃣ Exclude reimbursements 7️⃣ Enter deduction on Line 22900
6️⃣ Example: Vehicle Expense Deduction
Vehicle expenses are one of the most common employment deductions.
Example Scenario
Jason uses his personal truck for work.
Expense
Amount
Fuel
$6,000
Repairs
$2,500
Insurance
$2,200
Lease payments
$6,500
Other costs
$544
Total
$17,744
If 66% of driving is for work:
$17,744 × 66% = $11,771 deductible
7️⃣ Two Types of Vehicle Allowances
Employers may compensate employees for vehicle use in two ways.
🚗 Vehicle Allowance Types
Type
Tax Treatment
Flat monthly allowance
Taxable
Per-kilometre reimbursement
Usually non-taxable
Understanding this difference is essential for correct deductions.
8️⃣ When a Flat Vehicle Allowance Is Received
A flat allowance (example: $600/month) is always taxable.
How It Works
1️⃣ Allowance appears on the T4 slip 2️⃣ It increases employment income 3️⃣ Employee can claim actual vehicle expenses
9️⃣ When a Per-Kilometre Allowance Is Received
If the employer reimburses based on actual kilometres driven, the payment may be non-taxable.
Example
Jason drives 19,185 km for work.
Allowance:
19,185 × $0.46 = $8,825
Because the rate is reasonable:
Not included on T4
No tax payable
🔟 When Reimbursement Does Not Cover All Costs
Sometimes reimbursement is less than actual expenses.
Two Ways to Handle It
Method
Explanation
Add reimbursement to income
Deduct full expenses
Subtract reimbursement
Deduct only the difference
Both methods lead to the same result.
1️⃣1️⃣ Home Office Expenses – What Can Be Claimed
Employees working from home may deduct certain expenses.
Eligible Expenses
Expense
Deductible
Electricity
✅
Heating
✅
Water
✅
Internet (monthly fees)
✅
Rent (if renting)
✅
Commission employees may also claim:
Home insurance
Property taxes
1️⃣2️⃣ Home Office Expense Example
Example:
Expense
Annual Amount
Rent
$18,000
Utilities
$2,400
Internet
$600
Workspace = 10% of home
Deduction:
Expense
Deductible
Rent
$1,800
Utilities
$240
Internet
$60
Total deduction = $2,100
1️⃣3️⃣ Example of Other Employment Expenses
Employees may also claim work-related costs such as:
Parking
Office supplies
Cell phone usage
Postage
Small maintenance items
Example:
Expense
Amount
Cell phone
$750
Parking
$400
Supplies
$466
Total = $1,616
1️⃣4️⃣ Example with Reimbursed Expenses
If the employer reimburses certain expenses:
❌ Those expenses cannot be deducted.
Example:
Expense
Reimbursed
Deductible
Parking
Yes
❌
Office supplies
Yes
❌
Vehicle allowance
Taxable
✅
1️⃣5️⃣ Special Rules for Commission Employees
Employees paid by commission have additional deductions available.
They may claim:
Advertising expenses
Promotion costs
Property taxes (home office)
Home insurance
Certain travel expenses
But they must:
Earn commission income
Have T2200 confirming eligibility
1️⃣6️⃣ Example: Commission Employee Expenses
Example commission salesperson deductions:
Expense
Amount
Vehicle costs
$6,200
Advertising
$1,200
Home office
$1,400
Total employment expenses = $8,800
1️⃣7️⃣ Additional Expenses That Cannot Be Deducted
Even if work-related, some expenses remain non-deductible.
Examples include:
Mortgage payments
Furniture
Home renovations
Decorations
Personal phone usage
These are considered capital or personal expenses.
1️⃣8️⃣ Filing Requirements for Employment Expenses
When filing taxes with employment expenses:
Documents Required
Document
Purpose
T2200
Confirms eligibility
T777
Calculates deduction
Receipts
Proof of expenses
Mileage log
Proof of vehicle usage
⚠️ CRA may request these during a review.
1️⃣9️⃣ CRA Guide T4044
For full details on employment expenses, the CRA provides Guide T4044 – Employment Expenses.
This guide explains:
deductible expenses
eligibility rules
documentation requirements
examples for different professions
✅ Quick Recap – Deducting Employment Expenses
To claim employment expenses correctly:
✔ Get a signed T2200 from your employer ✔ Track expenses and keep receipts ✔ Separate personal vs employment use ✔ Calculate deductions using T777 ✔ Report total on Line 22900 of the T1
⭐ Final Tip for New Tax Preparers
Employment expenses are one of the most frequently reviewed deductions by the CRA.
Always verify:
Eligibility
Documentation
Accurate calculations
This helps ensure returns are accurate, compliant, and audit-proof.
When preparing Canadian tax returns, employment income is usually the foundation of the entire return. Understanding how it is reported, what slips are used, and which deductions or credits apply will help you prepare accurate returns and avoid CRA reassessments.
This guide summarizes the essential concepts every tax preparer should know.
1️⃣ 🧾 Introduction to Employment Income & Employment Expenses
Employment income refers to money or benefits received from working for an employer. It is one of the most common types of income reported on Canadian tax returns.
💰 What Counts as Employment Income
Typical examples include:
Salary or wages
Bonuses and commissions
Overtime pay
Vacation pay
Tips or gratuities
Taxable benefits from employers
📄 Most of this income is reported on a T4 slip (Statement of Remuneration Paid).
💸 What Are Employment Expenses?
Certain employees may deduct work-related expenses paid out of pocket, such as:
Vehicle expenses for work
Work supplies or tools
Home office expenses
Work-related phone or internet
Meals or lodging (specific professions)
⚠️ Important rule:
You can only claim employment expenses if your employer signs Form T2200 – Declaration of Conditions of Employment.
🔎 CRA Review Risk
Because employment expenses are often misused:
CRA may request receipts
Claims can be audited
Incorrect claims may lead to reassessment
✅ Best practice: keep receipts, logs, and supporting documents.
2️⃣ 💼 Employment Income – What Is Included
Employment income includes all money and benefits received because of employment.
Common Types of Employment Income
Type
Examples
Regular Pay
Salary, wages, commissions
Extra Pay
Overtime, bonuses
Leave Pay
Vacation pay
Exit Payments
Severance or retiring allowances
Employer Benefits
Company car, insurance premiums
Employer Contributions
RRSP contributions, stock options
💡 Good to know:
Employers calculate taxable benefits and include them on the T4 slip, so preparers normally do not calculate them manually.
3️⃣ 📝 Recording Employment Income on the T4 & T1
The T4 slip acts as a map for entering employment income into the T1 personal tax return.
Important T4 Boxes
T4 Box
Meaning
T1 Line
Box 14
Employment income
Line 10100
Box 16
CPP contributions
Tax credit
Box 18
EI premiums
Tax credit
Box 24
EI insurable earnings
Info only
Box 26
CPP pensionable earnings
Info only
Box 40
Taxable benefits
Included in Box 14
Union dues
Payroll deduction
Line 21200
Key Tips for Preparers
✔ Enter each T4 slip separately ✔ Verify every box on the slip ✔ Some boxes affect deductions or credits
⚠️ Mistakes in T4 entries can trigger CRA reassessments.
4️⃣ ⚠️ Common T4 Errors to Watch For
Even experienced preparers sometimes miss important details on a T4.
Most Common Mistakes
❌ Only entering Box 14 ❌ Missing deductions in lower sections ❌ Forgetting union dues or donations ❌ Ignoring health plan premiums ❌ Assuming everything is included in Box 14
Boxes That Often Get Missed
Box
Item
Impact
67
Severance / retiring allowance
Line 13000
85
Health plan premiums
Medical credit
Union dues
Payroll deduction
Line 21200
Payroll donations
Charitable credit
Schedule 9
✅ Pro Tip
Always review every box on the T4 — not just the top section.
5️⃣ 📄 Employment Amounts on T4A and T4PS Slips
Besides the T4, some employment-related income appears on other slips.
🟢 T4A Slip – Other Employment Income
Common items:
Research grants
Wage-loss replacement benefits
Medical benefits for former employees
Other special employment payments
📍 Usually reported on Line 10400 – Other Employment Income
🟢 T4PS Slip – Profit Sharing
Used when employees receive dividends from company profit-sharing plans.
Important facts:
Treated as dividend income
Reported on dividend lines of the T1
Dividends are grossed up before calculating taxable income
6️⃣ 💼 Casual Labour, Tips & Odd Jobs (No Slip)
Sometimes clients earn income without receiving a tax slip.
Examples:
Temporary labour
Babysitting
Tutoring
Cash tips
Small contract work
⚠️ CRA rule:
All income must be reported even if no slip was issued.
📍 Typically reported on Line 10400.
Good Practice
Encourage clients to keep:
Payment records
Logs of work performed
Tip tracking records
7️⃣ 💼 Reporting Tips & Casual Income on the T1
🍽 Tips and Gratuities
Tips are fully taxable, whether:
Cash tips
Electronic tips
Shared tip pools
📍 Report on Line 10400 – Other Employment Income
⚠️ Preparers should never estimate tips — use client records only.
🔧 Casual Work & Odd Jobs
Situation
How It Is Reported
Single employer
Employment income (Line 10400)
Multiple clients
Business income
If classified as business income, the client may deduct expenses such as:
Vehicle costs
Advertising
Phone expenses
8️⃣ 💼 Wage-Loss Replacement Plan Income
Wage-loss replacement plans provide income when employees cannot work due to illness or injury.
Examples include:
Disability benefits
Workplace injury insurance
Employer insurance plans
How It Is Reported
Source
Slip
Employer paid
T4
Insurance company
T4A
Taxable Amount
Only the portion not funded by employee contributions is taxable.
Example:
Item
Amount
Benefit received
$24,000
Employee contributions
$4,800
Taxable income
$19,200
9️⃣ 📊 CPP & EI Premiums and Tax Credits
Most employees contribute to two national programs:
Program
Purpose
CPP
Retirement income
EI
Temporary unemployment benefits
Where They Appear on T4
Box
Contribution
Box 16
CPP
Box 18
EI
Tax Return Credits
Credit
T1 Line
CPP
Line 30800
EI
Line 31200
💡 Since 2019, enhanced CPP contributions also create a small deduction (Line 22215).
Maximum Contribution Limits
Each year the government sets limits.
Once earnings exceed the limit:
CPP deductions stop
EI deductions stop
This means high-income workers still pay the same maximum as others above the threshold.
🔟 Schedule 8 & T2204 – CPP and EI Overpayments
Employees with multiple jobs often overpay CPP or EI.
Why?
Each employer deducts contributions independently.
Example
Job
Income
CPP
EI
Job 1
$60,000
$2,898
$856
Job 2
$18,700
$800
$296
Total CPP = $3,698 → Overpayment
How the Refund Works
Form
Purpose
Schedule 8
Calculates CPP contributions
T2204
Calculates EI overpayments
Refund Lines
Refund
T1 Line
CPP overpayment
Line 44800
EI overpayment
Line 45000
💰 Overpayments are refunded automatically when the tax return is filed.
✅ Quick Recap for Tax Preparers
✔ T4 slips report most employment income ✔ Other slips include T4A and T4PS ✔ Tips and cash income must still be reported ✔ CPP and EI contributions generate tax credits ✔ Multiple jobs may create refundable overpayments ✔ Schedule 8 and T2204 handle those refunds
⭐ Final Tip
The best tax preparers don’t just enter numbers — they understand where each amount comes from and why it appears on the tax return.
🧾 1️⃣ Employment Income: What It Really Means for You
Employment income is everything you earn from working for someone else.
That includes:
Salary or hourly wages
Overtime
Bonuses
Vacation pay
Tips
Some employer-paid benefits
Most of this appears on your T4 slip.
💡 Why this matters: Your employment income determines:
How much tax you owe
What credits you qualify for
Whether you get a refund
The higher your income, the more important it becomes to claim every eligible deduction and credit.
📄 2️⃣ Your T4 Slip: Don’t Just Look at Box 14
Most people only look at:
Box 14 – Employment Income
But that’s a mistake.
Your T4 contains several refund-boosting items.
Here’s what you should look for:
T4 Box
What It Means
How It Can Increase Your Refund
Box 16
CPP Contributions
Creates a tax credit
Box 18
EI Premiums
Creates a tax credit
Union Dues
Money paid to union
Deductible expense
Box 85
Health plan premiums
Eligible for medical credit
Box 67
Retiring allowance
Special reporting (may allow tax planning)
✨ Refund Tip: Union dues and private health plan premiums are commonly missed — and they directly increase your refund.
⚠️ 3️⃣ The Most Common T4 Mistakes That Cost People Money
Many people:
Ignore the bottom half of the T4
Miss union dues
Forget payroll donations
Overlook private health premiums
Miss retiring allowances
Even small missed amounts can reduce your refund.
Example:
Emma paid $1,200 in union dues. If she forgets to claim it, she loses hundreds in potential refund.
📌 Small detail. Real money.
💰 4️⃣ Worked More Than One Job? You Might Get CPP & EI Money Back
This is one of the biggest hidden refund boosters.
Canada sets yearly maximums for:
CPP (Canada Pension Plan)
EI (Employment Insurance)
If you worked two or more jobs:
Each employer deducted CPP and EI separately.
You may have overpaid.
Good news:
✔ The CRA automatically refunds the excess. ✔ It increases your refund directly. ✔ It’s dollar-for-dollar.
Example:
If you overpaid $600 in CPP and $250 in EI, Your refund increases by $850.
Many people don’t even realize this is happening.
💼 5️⃣ T4A & T4PS Slips: Income You Might Not Understand
🟢 T4A – Other Employment Income
This may include:
Wage-loss replacement benefits
Disability payments
Research grants
These are taxable.
But here’s the key 👇
If you contributed to the insurance plan yourself, your contributions reduce the taxable amount.
If you don’t deduct your contributions, you could overpay tax.
🟢 T4PS – Profit Sharing (Dividends)
This is different from salary.
It’s dividend income.
And dividends receive a special tax credit.
💡 This can reduce the tax you owe.
💵 6️⃣ Tips, Side Jobs & Cash Income (Yes, It Must Be Reported)
If you earned:
Cash tips
Babysitting income
Freelance or odd jobs
Cash payments without a T4
You must report it.
But here’s where refund strategy comes in 👇
One employer?
→ Report as employment income.
Multiple clients?
→ Report as business income.
Why does this matter?
Because business income allows you to deduct expenses.
📊 Example: How Classification Changes Your Refund
Sarah babysits for 5 families and earns $6,000.
If she reports it as employment income:
She pays tax on full $6,000.
If she reports it correctly as business income: She may deduct:
$800 vehicle use
$300 supplies
$200 phone use
Now she pays tax on only $4,700.
That reduces taxable income and increases her refund.
📌 Correct classification = real savings.
🏥 7️⃣ Wage-Loss or Disability Benefits: Avoid Overpaying Tax
If you received wage-loss replacement benefits:
They are taxable.
But if you paid into the plan (through payroll deductions), those contributions reduce what’s taxable.
Example:
You received $20,000 in benefits. You contributed $4,000 to the plan.
Taxable amount = $16,000.
If you forget the contribution deduction, you overpay tax on $4,000.
That could cost you hundreds.
🏠 8️⃣ Employment Expenses: The Big Refund Opportunity (If You Qualify)
Most employees cannot deduct work expenses.
But you may qualify if:
Your employer required you to pay work expenses
You were not reimbursed
You have a signed T2200 form
Eligible expenses may include:
Vehicle use for work
Home office expenses
Tools and supplies
Cell phone (work portion)
Internet (work portion)
⚠ CRA reviews these claims carefully.
But if legitimate, they can significantly reduce taxable income.
Example:
Jason earns $75,000. He qualifies for $4,000 in employment expenses.
Now he’s taxed on $71,000 instead.
That could increase his refund by over $1,000.
🧮 9️⃣ CPP & EI Credits: How They Reduce Your Tax
CPP and EI aren’t just deductions from your paycheck.
They create tax credits.
CPP → reduces federal tax
EI → reduces federal tax
There are annual maximums.
If you exceed them, you get refunded.
Also:
Since 2019, enhanced CPP contributions include:
A tax credit portion
A deduction portion
Tax software usually calculates this automatically — but it’s good to understand why your refund increases.
📑 🔟 Schedule 8 & T2204: The Hidden Refund Forms
If you worked multiple jobs:
Schedule 8 calculates CPP overpayment. T2204 calculates EI overpayment.
You don’t need to manually calculate these — but entering all T4 slips properly ensures:
✔ The refund happens ✔ You don’t leave money behind
🚨 The Top 10 Ways People Lose Refund Money
Forgetting a T4
Missing union dues
Ignoring medical premiums
Misclassifying side income
Not deducting wage-loss contributions
Forgetting business expenses
Not checking CPP/EI overpayment
Ignoring lower T4 boxes
Guessing tip amounts
Claiming expenses without documentation
🏆 Final Refund Maximization Checklist
Before filing, ask yourself:
✔ Did I enter every T4? ✔ Did I check every box? ✔ Did I claim union dues? ✔ Did I include medical premiums? ✔ Did I report tips properly? ✔ Did I classify side income correctly? ✔ Did I deduct insurance contributions? ✔ Did I check CPP/EI overpayment? ✔ Do I qualify for employment expenses?
If you answered “no” to even one — you might be leaving money behind.
💡 Final Thought
Maximizing your refund isn’t about aggressive tactics.
It’s about:
Understanding what reduces taxable income
Claiming eligible credits
Avoiding small mistakes
Paying attention to detail
Most refunds are won or lost in the fine print — not the headline numbers.
Whether you are learning to become a tax preparer or you simply want to file your own return using Intuit ProFile, this guide will show you—step by step—how a basic Canadian tax return is actually prepared.
We will use a typical real-life style example:
One T4 employment slip
RRSP contributions
Medical expenses
Charitable donations
No business income and no dependants
This is exactly the kind of client a new tax preparer will see every day—and it’s also the perfect situation for someone filing their own taxes for the first time.
1. Start With the Documents – Tax Preparation Is 90% Organization
Before opening any software, collect the paperwork. Good tax habits start here.
For our example client you need:
T4 slip from employer
RRSP receipts
$3,000 for March–December
$600 for January–February (first 60 days)
Notice of Assessment showing RRSP limit $88,700
Dental receipt $3,620
Donation receipts $420
Client facts:
Single, no dependants
Date of birth used for training: 1991-03-05
Employment income: $78,500
💡 Tip for new preparers: Always ask for the Notice of Assessment. Without the RRSP limit you can accidentally create an over-contribution.
2. Create the File in Intuit ProFile
Open Intuit ProFile T1 and choose:
New → T1 Return
Enter the identification:
Name and SIN
Address
Date of birth
Marital status: Single
For people filing their own return, this screen is simply your personal profile. For future tax preparers, this is where accuracy is critical—one wrong SIN can reject an entire filing.
3. Enter the T4 Slip – The Heart of Most Returns
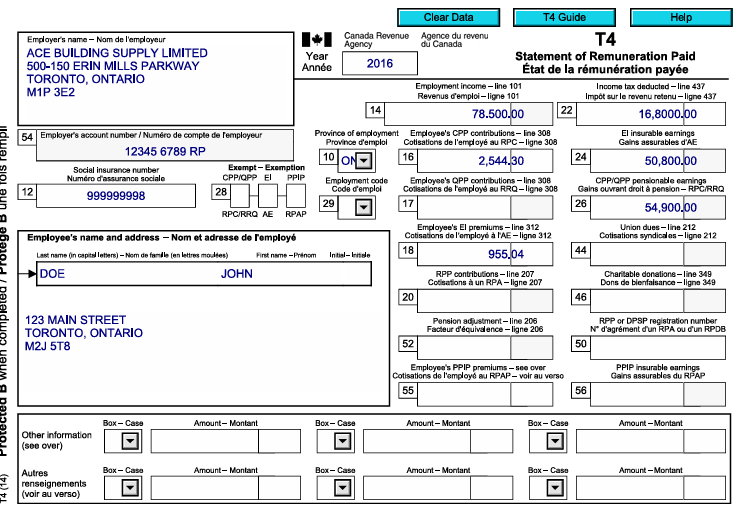
Open the T4 entry screen and type the main boxes exactly as shown on the slip:
Box 14 – Employment income: 78,500
Box 16 – CPP: 2,544.30 (Tax software will show the correct value; based on CRA formula)
Box 18 – EI: 955.04 (Tax software will show the correct value; based on CRA formula)
Box 22 – Tax deducted: 16,800
Let ProFile calculate the rest.
Professional Tip: Do not override CPP/EI insurable earnings unless you truly know why. The software follows CRA rules automatically.
After saving, check the T1 Summary:
Employment income appears on line 10100
CPP & EI credits are created
Canada Employment Amount shows automatically
This single step builds most of the return.
4. RRSP Contributions – Where Many Beginners Make Mistakes
Step 1 – Enter the RRSP Limit First
Go to the RRSP section and enter:
Limit from NOA: $88,700
If you skip this, ProFile assumes zero room and will refuse the deduction.
Step 2 – Enter the Receipts
On Schedule 7 record:
$3,000 (Mar–Dec)
$600 (Jan–Feb)
Total deduction = $3,600
Now line 20800 of the return shows the RRSP claim.
For self-filers: this is how you legally reduce your taxable income. For preparers: this is one of the biggest refund drivers.
5. Medical Expenses – Use the Worksheet
Open Medical Expenses Worksheet:
Patient: John
Type: Dental
Amount: $3,620
ProFile automatically applies the CRA rule:
Medical expenses – lesser of • 3% of income • CRA minimum threshold
The allowable amount flows to Schedule 1 without you doing math.
6. Charitable Donations
Open the Donations Worksheet:
United Way – $300
Make-A-Wish – $120
Total = $420
The software calculates:
First $200 at lower credit rate
Balance at higher rate
For new preparers: never add donations directly on the T1—always use the worksheet so carry-forwards are tracked.
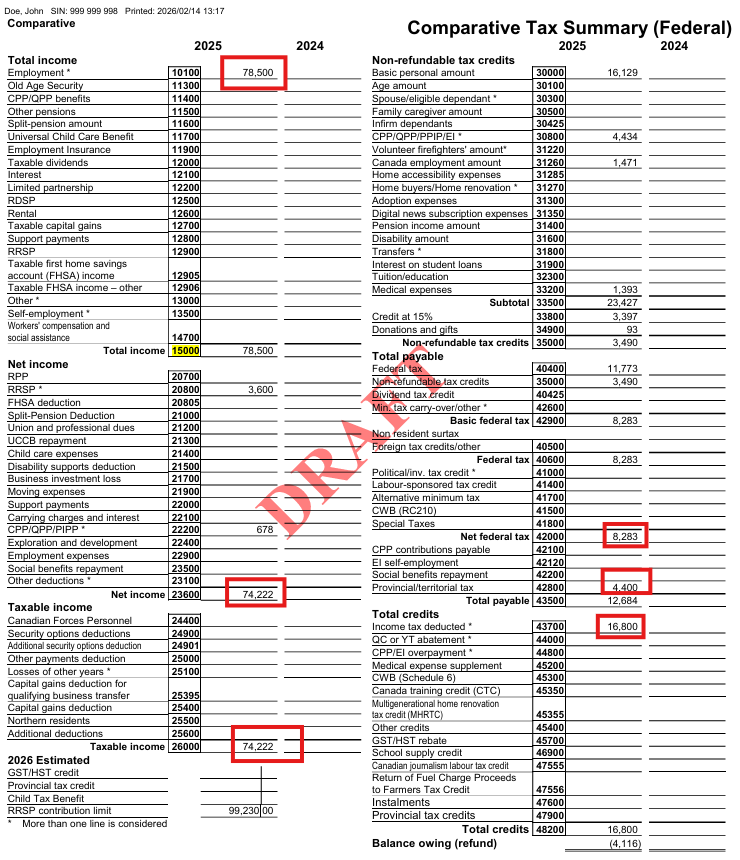
7. Review the Result
Open the Comparative Summary:
You should see:
Total income: $78,500
Net income after RRSP: $74,900
Credits for CPP, EI, employment amount
Medical and donations applied
➡ Refund: $1,543.16
This is the moment both preparers and self-filers love 😊.
8. Check Next Year RRSP Room
The RRSP worksheet shows:
New contribution limit: $99,230
A good preparer will always tell the client this number. A self-filer should keep it for next year’s planning.
9. Quality Check – Think Like a Professional
Before hitting EFILE:
Is the DOB correct?
RRSP limit entered?
Receipts listed properly?
Marital status accurate?
No duplicate entries?
Tax preparation is less about typing and more about reviewing like an auditor.
10. What This Teaches You
If You Are Training to Be a Tax Preparer
You just practiced:
Reading a T4 slip
Claiming RRSP correctly
Calculating medical credits
Entering donations
Navigating ProFile screens
Explaining results to a client
This is the foundation for 70% of real clients.
If You Are Filing for Yourself
You learned:
Where your refund actually comes from
How RRSP lowers tax
Why medical and donations matter
How ProFile mirrors CRA forms
Summary Review — Understanding the Forms ProFile Generated
At this point you have already entered the slips and receipts in Intuit ProFile and received a refund result.
But a real tax preparer must understand something deeper:
Where exactly did every number go — and why did the refund happen?
ProFile does not invent numbers. It simply places your entries into the CRA calculation system in a specific order:
Income → Deductions → Net Income → Tax → Credits → Refund
Below is a guided walk-through connecting what you typed to what CRA calculated.
1) Income — Where the Return Begins
You entered one T4 slip:
Employment income = $78,500
That single entry populated:
T1 Line 10100 → Employment income
Total income Line 15000 → 78,500
T1 Summary total income → 78,500
What CRA is doing: Before any planning or deductions, CRA asks:
“How much money did the taxpayer earn?”
Because there are no investments, business, or rental income, total income equals employment income.
2) Deductions — Reducing Taxable Income
Now we move to the first tax-planning stage.
RRSP deduction
$3,600 → Line 20800
CPP enhanced deduction
$678 → Line 22215
Net Income Calculation
Total income: 78,500 Minus deductions: 4,278
Net income = 74,222
Line 23600
This is one of the most important numbers in a tax return. It controls benefits, credits, and thresholds.
3) Taxable Income
There were no additional adjustments.
So:
Taxable income = Net income = 74,222
Line 26000
4) Federal Tax Before Credits
CRA now applies tax brackets to taxable income.
Result:
Federal tax = 11,773
This is the tax owed before applying credits.
5) Non-Refundable Credits — Reducing the Tax
Credits do NOT reduce income. They directly reduce the tax bill.
Automatic credits from employment
Basic personal amount → Line 30000
CPP contributions → Line 30800
EI contributions → Line 31200
Canada employment amount → Line 31260
Medical expenses (you entered $3,620)
CRA rule: subtract 3% of income
3% of 74,222 = 2,226.66 Eligible medical = 3,620 − 2,226.66 = 1,393.34
Line 33200
Donations (you entered $420)
Credit calculated automatically:
92.80
Total federal credits
3,489.70
6) Final Tax After Credits
Federal tax before credits: 11,773 Minus credits: 3,489
Net federal tax = 8,283
Add Ontario tax:
4,400
Total tax payable = 12,683
7) Refund Calculation — The Real Meaning of a Refund
Tax already deducted by employer (T4 Box 22):
16,800
Actual tax owing:
12,683
Refund:
4,116
8) Next Year RRSP Room
ProFile also calculated next year planning value:
New RRSP limit = 99,230
What These Three Forms Each Teach You
T1 Return The legal CRA calculation — how tax law works.
👨💼 Simple Employee With a T4 Slip – Understanding Employment Income & Key Tax Credits
📌 Starting With the Most Common Tax Situation
For most Canadians, the first tax return you will ever prepare is for an employee who receives a T4 slip. This is the foundation of personal tax preparation, and mastering it will make everything else easier.
A T4 employee return may look simple, but there are many details that can cause errors if you don’t understand:
what each box means
where amounts flow on the T1
which credits the taxpayer receives
how pensions and adjustments affect RRSP room
Let’s break it down step by step.
🧾 What a T4 Slip Tells You
A typical T4 includes:
Employment income (Box 14)
CPP contributions
EI premiums
Income tax deducted
RPP contributions
Pension adjustment
Other taxable benefits (Box 40)
👉 Your job is to transfer this information accurately into tax software and understand the tax effect behind each number.
🧩 Where T4 Amounts Appear on the Tax Return
1️⃣ Employment Income – Line 10100
Box 14 flows directly to employment income
This is the starting point for tax calculations
Includes wages, bonuses, commissions, and most benefits
2️⃣ CPP & EI – Non-Refundable Tax Credits
Employees receive a credit for:
CPP contributions
EI premiums
These appear on Schedule 1 – Federal Tax Credits and reduce tax payable.
3️⃣ Canada Employment Amount 💼
Every employee is eligible for the Canada Employment Credit, up to an annual maximum.
✔ This is automatic ✔ Only available to employees ✔ Helps reduce federal tax
4️⃣ Registered Pension Plan (RPP) Contributions
If the T4 shows RPP deductions:
The employee receives a deduction similar to RRSP
It reduces net income
It also creates a pension adjustment
⚠️ The Pension Adjustment – Why It Matters
The Pension Adjustment (PA) reduces how much RRSP room the person will get next year.
Think of it this way:
The government allows about 18% of earnings for retirement saving. If part is already saved in a work pension, RRSP room must shrink.
This is one of the most misunderstood parts of a T4.
🚨 Common Beginner Mistakes With T4s
❌ 1. Missing Boxes
Many preparers only enter:
Box 14
Tax deducted
But forget:
Box 40 – taxable benefits
RPP amounts
Pension adjustment
Union dues or other boxes
👉 Every box matters!
❌ 2. Overriding Calculated CPP/EI
Tax software automatically calculates:
CPP pensionable earnings
EI insurable earnings
Never override these unless you are 100% certain the T4 is wrong.
👉 Wrong overrides = CRA reassessments.
❌ 3. Ignoring Large Box 40 Amounts
If “Other Taxable Benefits” are high:
🔎 Investigate!
It could mean:
vehicle benefits
allowances
RRSP contributions through work
potential employment expense claims
🧮 How Professionals Review a T4 Return
A good preparer will:
Enter all boxes exactly
Follow the flow to:
Schedule 1
Provincial credits
Net income
Check RRSP limit impact
Ask follow-up questions about:
benefits
allowances
expenses
🗂 Practical Workflow for Beginners
Step 1 – Enter the Slip
Match every box
Don’t assume blanks
Verify names and SIN
Step 2 – Review Credits
CPP credit
EI credit
Canada Employment Amount
Step 3 – Analyze Pension Items
RPP deduction
Pension adjustment
RRSP room impact
Step 4 – Ask the Client
Any employment expenses?
Vehicle use?
RRSP through payroll?
💡 Key Takeaways
✔ A “simple T4” is not always simple ✔ Every box affects a different part of the return ✔ Pension adjustment controls future RRSP room ✔ Box 40 can hide valuable deductions ✔ Never override CPP/EI without proof
💼 Employee With Multiple T4 Slips – CPP & EI Overpayments + Smart Client Advice
🔍 What Happens When a Client Has More Than One Job?
It’s very common for Canadians to work:
a full-time job
plus a part-time or weekend job
or switch employers during the year
When this happens, the tax return becomes a little more interesting—especially for CPP and EI contributions.
👉 Each employer calculates deductions as if they are the only employer. 👉 But CPP and EI have annual maximum limits.
This usually leads to overpayments that must be refunded on the personal tax return.
🧮 Why CPP & EI Overpayments Occur
Let’s break this down in simple terms:
✔ Every worker pays CPP and EI through payroll ✔ There is a maximum yearly contribution ✔ Employers don’t talk to each other ✔ The second employer keeps deducting—even if the max was already reached
Result?
💰 The taxpayer gets money back when filing their T1 return.
📌 Where the Refund Shows on the Return
The tax software (or CRA forms) automatically calculates:
Schedule 8 – CPP overpayment
Form T2204 – EI overpayment
These amounts appear on the T1 as:
Line 44800 – CPP overpayment refund
Line 45000 – EI overpayment refund
👉 This becomes part of the client’s refund or reduces their balance owing.
⚠️ The BIG Surprise for Clients
Here’s the part many beginners don’t expect:
Even though the client gets CPP & EI back, they may still…
🚨 OWE TAX at the end of the year!
Why?
Because each employer withholds income tax based only on their own payroll, not the client’s total income.
📘 Example of the Real-World Problem
Imagine:
Job #1 pays $135,000
Job #2 pays $14,000
Employer #2 withholds tax as if the person only earns $14,000.
But CRA taxes the client on:
👉 $149,000 TOTAL income
This pushes the client into a higher tax bracket, creating a balance owing.
🗣 How to Advise Your Client
This is where you become more than a data entry person—you become an advisor.
You should explain:
“Your second employer didn’t know about your first job, so not enough tax was withheld.”
🛠 Practical Solutions You Can Suggest
Option 1 – Adjust Payroll Withholdings
The client can update their TD1 form with the employer and request:
extra tax deducted each pay
a fixed dollar amount per pay period
This spreads the tax over the year instead of a big bill in April.
Option 2 – Use RRSP Planning
Clients can reduce the problem by:
contributing to RRSPs
lowering taxable income
offsetting the extra tax from multiple jobs
Option 3 – Budget for Annual Payment
Some clients prefer to:
keep the cash during the year
pay once at filing time
👉 That’s okay—just make sure they understand the impact.
🧠 Key Lessons for New Tax Preparers
✔ Multiple T4s = likely CPP & EI refund ✔ Refund doesn’t mean no tax owing ✔ Always explain the “two-employer tax gap” ✔ Provide proactive payroll advice ✔ Don’t let clients be shocked in April
📋 Your Professional Checklist
When you see multiple T4 slips:
Confirm CPP/EI overpayments are calculated
Review total income bracket
Warn client about possible balance owing
Discuss TD1 adjustment
Explore RRSP options
🚀 Pro Tip
Clients judge you not by how fast you enter T4s—but by:
💬 how clearly you explain 💡 how well you prevent surprises 🤝 how proactive your advice is
Master this conversation and you’ll already be ahead of many tax preparers!
💰 RRSP Contributions – Overcontributions, Undeducted Amounts & Best Practices
📘 Why RRSPs Matter for Every Tax Preparer
RRSPs are one of the most powerful tools in Canadian tax planning—but also one of the most confusing for beginners.
As a tax preparer, you must understand:
how contributions are entered
what can be deducted this year
what must be carried forward
and what triggers penalties 🚨
Let’s break it down step-by-step in plain language.
🧾 Step 1 – Start With the Contribution Limit
Before entering ANY RRSP slip, always ask:
“Does the client actually have room?”
Where to Find the Limit
You can confirm the RRSP deduction limit from:
CRA Notice of Assessment
CRA My Account
Represent a Client portal
👉 Never rely on guesses—this number controls everything.
✏️ Entering RRSP Slips Correctly
Best Practice #1 – Enter Slips Individually
Don’t lump amounts together!
If a client has:
$8,000 contributed during the year
$1,600 in the first 60 days of next year
👉 Enter them as TWO separate slips.
Why?
✔ Easier review ✔ Matches CRA records ✔ Prevents double-claiming next year
Best Practice #2 – Track Receipt Numbers
Some clients (intentionally or not) try to:
reuse first-60-day slips next year
claim the same RRSP twice
Adding the receipt number in your file protects you.
🧠 Deduct Now or Later?
Just because a client contributed RRSPs does NOT mean they must deduct them this year.
Example:
Client contributed: $9,600 Wants to deduct: $8,000 only
👉 That is perfectly allowed.
The remaining $1,600 becomes:
✔ Undeducted RRSP contributions ✔ Carried forward automatically ✔ Available next year
🚨 Overcontribution vs Undeducted – BIG Difference
This is where new preparers get confused.
1. Undeducted Contribution (SAFE)
Happens when:
Client has enough RRSP room
Chooses not to deduct full amount
✅ No penalty ✅ Can keep funds in RRSP ✅ Deduct later
2. Overcontribution (DANGEROUS)
Happens when:
Client contributes MORE than their limit
Exceeds $2,000 lifetime cushion
❌ Subject to 1% PER MONTH penalty ❌ CRA form required ❌ Must usually withdraw funds
🧮 What Happens With an Overcontribution?
CRA Forms Involved
📄 T1-OVP – Overcontribution Tax
Calculates monthly 1% penalty
Depends on exact contribution dates
CRA often recalculates this
📄 T3012A – Tax Waiver on Withdrawal
Allows RRSP withdrawal
WITHOUT withholding tax
Prevents double taxation
👉 Critical step—otherwise the bank will withhold tax as if it were income!
🗓 First 60 Days Rule Explained
RRSPs contributed in:
📅 January & February
Can be:
reported on THIS year’s return
deducted THIS year or NEXT year
But they must still be reported now even if not deducted.
✅ Practical Workflow for Tax Preparers
Every RRSP file should include:
✔ Verified CRA limit ✔ All slips entered separately ✔ First-60-day amounts clearly shown ✔ Decision on deduction vs carryforward ✔ Check for overcontribution risk
🛑 Common Beginner Mistakes
❌ Entering one total instead of slips ❌ Forgetting first-60-day reporting ❌ Ignoring contribution limit ❌ Confusing overcontribution with undeducted ❌ Not warning client about penalties
💡 Client Advisory Tips
Tell clients:
Don’t overcontribute “just to save tax”
Wait for Notice of Assessment before large deposits
RRSPs don’t have to be deducted immediately
Penalties can grow fast
🧩 Key Takeaways
Contribution within limit → deduct now or carry forward
Over limit ≤ $2,000 → no penalty
Over limit > $2,000 → 1% monthly tax
First 60 days → must be reported in current return
🏠 Reporting the Home Buyers’ Plan (HBP) – Repayments, Missed Payments & Early Payoff
📌 What Is the Home Buyers’ Plan?
The Home Buyers’ Plan (HBP) allows Canadians to withdraw up to $35,000 (previously $25,000) from their RRSP to buy or build a qualifying home—without paying tax on the withdrawal.
But there’s a catch 👇 You must repay the amount to your RRSP over 15 years, starting usually in the second year after the withdrawal.
If you don’t repay? 👉 The required amount becomes taxable income for that year.
🧮 How HBP Repayments Work
Every year CRA calculates:
Your annual required repayment
Your remaining HBP balance
Whether you made enough RRSP contributions to cover it
Example: If someone withdrew $25,000, their yearly repayment is:
$25,000 ÷ 15 = $1,667 per year
This amount must be designated from RRSP contributions on the tax return.
✍️ Step-by-Step: Reporting HBP on a Tax Return
When preparing a return:
Enter all RRSP contributions as usual
Scroll to the HBP repayment section
Allocate part of the RRSP contributions to HBP
Important Concept
Total RRSP contributed ≠ RRSP deduction
👉 Part of the contribution may be used to repay HBP and cannot also be deducted.
🔍 Example Scenario
Client contributed to RRSP this year: $9,600 Required HBP repayment: $1,667
Result:
$1,667 → goes toward HBP
$7,933 → available as RRSP deduction
💡 This split is reported on Schedule 7 of the tax return.
🚨 What Happens If the Client Doesn’t Repay?
Two common situations:
1. Client contributed to RRSP but forgot to designate HBP
CRA will automatically:
Reassess the return
Allocate the required amount to HBP
Reduce the RRSP deduction
👉 The expected refund will be LOWER than originally calculated.
2. Client made NO RRSP contribution
This is more serious.
If required repayment = $1,667 and no RRSP deposit was made:
👉 $1,667 becomes taxable income on line 129 of the T1.
This can create an unexpected tax bill 💸.
⏩ Paying Off HBP Early – Is It Smart?
Clients are allowed to:
Repay more than the minimum
Even repay the FULL balance at once
But from a tax perspective:
❗ Paying early often gives no advantage
Why?
HBP repayment does not create a deduction
RRSP contributions used for HBP cannot reduce income
Better strategy is usually:
Pay minimum to HBP
Use remaining RRSPs for deductions
🧠 When Early Repayment Might Make Sense
Early payoff can help if the client:
Wants smaller future annual obligations
Plans lower income in future years
Prefers to clear debts psychologically
May stop contributing to RRSPs soon
But purely for tax savings? 👉 Usually not beneficial.
✅ Best Practices for Tax Preparers
Always verify:
✔ HBP balance from CRA account ✔ Required annual repayment ✔ RRSP slips for the year ✔ First-60-day contributions ✔ Whether client intends early repayment
❌ Common Mistakes to Avoid
Forgetting to ask about HBP status
Entering RRSP deduction without HBP allocation
Assuming CRA will “fix it later”
Not warning clients about taxable inclusion
Confusing HBP with Lifelong Learning Plan
🗣 Client Communication Tips
Tell clients clearly:
“Your RRSP deposit must be designated to HBP.”
“If you skip a year, CRA will add it to income.”
“Early payoff doesn’t usually save tax.”
A 2-minute conversation can prevent a nasty reassessment letter 📬.
📦 Key Takeaways
HBP requires 15 annual repayments
Repayment comes from RRSP contributions
Missed payment = taxable income
Early payoff allowed but rarely optimal
Schedule 7 is the core reporting form
💼 Employment Expenses, T2200 & Real-Life Examples Every Tax Preparer Must Know
Employment expenses are one of the most reviewed areas by CRA—and one of the easiest places for new tax preparers to make mistakes. Just because a client spent money for work does NOT mean it is deductible.
Everything revolves around one critical document → Form T2200.
Let’s break this down step-by-step like you’re sitting in front of your first real client 👇.
📄 What Is Form T2200 and Why It Matters
👉 T2200 = Declaration of Conditions of Employment
This form must be:
Completed by the EMPLOYER
Signed and dated
Kept on file by the taxpayer
Available if CRA asks for proof
❗ Without a valid T2200 → employment expenses are NOT allowed.
No signature = No deduction. Period.
🧾 Common Expenses Employees Try to Claim
Depending on the job and T2200 answers, employees may deduct:
🚗 Vehicle expenses
📱 Cell phone & internet (business portion only)
🖥 Home office costs
✈ Travel expenses
✉ Supplies
🍽 Meals (limited)
🧾 Accounting/legal (for commission employees)
But eligibility depends 100% on what the T2200 says.
🚗 Example 1 – Taxable Car Allowance
Situation
Client receives:
$600 per month car allowance
Included in T4 box 40 → $7,200 taxable
Must use own vehicle for work
Keeps a mileage log
Actual annual vehicle costs:
Gas, insurance, repairs
Lease payments
Total: $8,530
Business km: 11,480
Total km: 17,418
Result
Allowed deduction on T777:
✔ Business portion of vehicle = $8,530 ✔ Cell phone (2/3 business) = $856 ➡ Total employment expenses = $9,386
💡 Because the allowance was taxable, the employee can deduct actual costs.
🚫 Deducting without signed T2200 🚫 Claiming reimbursed expenses 🚫 Forgetting mileage log 🚫 Using 100% of cell phone 🚫 Mixing personal & business km 🚫 Not checking employment period dates
🧠 Best Practices for Tax Preparers
Always Ask Clients:
Do you have a signed T2200?
Were you reimbursed for ANY costs?
Do you keep a mileage log?
Is allowance on T4 box 40?
Commission or salary only?
Keep on File:
T2200 copy
Mileage log
Receipts
Lease agreements
Cell phone bills
💵 Applying for the GST/HST Rebate – Rules, CRA Reviews & Smart Client Advice
When employees claim employment expenses, there is one extra benefit many new preparers overlook — the GST/HST rebate. This rebate allows an employee to recover the sales tax paid on deductible employment expenses if certain conditions are met.
Let’s break this down in a beginner-friendly way so you know:
Who qualifies
How to calculate it
Where it appears on the return
The CRA risks involved
When it might NOT be worth claiming
🔎 What Is the GST/HST Rebate for Employees?
If an employee:
Is required to incur employment expenses, and
Has a valid T2200 from the employer, and
The employer is registered for GST/HST,
then the employee may claim back the GST or HST paid on those expenses.
👉 This is NOT automatic. 👉 It must be calculated and reported separately on the tax return.
✅ Which Expenses Qualify?
Only expenses that are already deductible on Form T777 can generate a rebate, such as:
🚗 Vehicle operating costs (gas, repairs, lease)
📱 Cell phone (business portion)
🖥 Home office expenses
✈ Travel costs
🧾 Supplies
❌ Expenses with no GST/HST do NOT qualify, for example:
Insurance
License & registration
Interest on car loans
🧮 How the Rebate Is Calculated
In an HST province (like Ontario), the rebate is based on:
HST portion = 13 ÷ 113 × eligible expense
Example:
Business vehicle costs: $8,530
Cell phone (business portion): $856
HST rebate ≈ $883
This amount becomes a refundable credit on the personal return.
📍 Where Does It Appear on the T1?
Reported on Line 45700 – GST/HST Rebate
Increases the client’s refund or reduces balance owing
BUT… there’s a catch ⬇
⚠️ The “Next Year Income” Trap
The rebate is not free money forever.
📌 The amount received must be included in income next year (Line 10400).
So:
Client gets $883 refund this year
Next year they might pay $300–$400 tax on it
This reduces the real benefit.
🚨 CRA Review Risk – Very Important
GST/HST rebates are a major CRA audit trigger.
Claiming the rebate often leads CRA to review:
The T2200
Mileage logs
Receipts
Entire T777 employment expenses
💥 A small rebate can open the door to a big reassessment.
🧠 Professional Judgment – When NOT to Claim
You should think twice if:
Rebate is only $200–$400
Client records are weak
Mileage log is incomplete
Some expenses are estimates
T2200 wording is vague
👉 Risking a $9,000 expense claim for a $300 rebate is often NOT smart.
🗣 How to Explain This to Clients
Tell them:
“Yes, you can get the GST back — but CRA often reviews these claims. If your records are perfect, we’ll claim it. If not, the rebate may not be worth the risk.”
This builds trust and protects you as the preparer.
🧩 Eligibility Checklist
Before claiming, confirm:
✔ Employer is GST/HST registrant
✔ Signed T2200 on file
✔ Expenses already allowed on T777
✔ Receipts kept
✔ Mileage log available
✔ No reimbursement from employer
If any box is NO → do NOT claim the rebate.
🛠 Best Practices for Tax Preparers
Keep copy of T2200 in file
Separate GST/HST amounts on worksheets
Never claim tax on insurance or license fees
Warn clients about next-year income inclusion
Document the decision to claim or not claim
📌 Final Takeaways
GST/HST rebate = nice bonus, but not risk-free
Must flow from valid employment expenses
Triggers CRA scrutiny
Included in income next year
Use professional judgment every time
⚠️ Other Employment Income Issues Every Tax Preparer Must Watch For
Employment income is more than just copying numbers from a T4. Real-life client files come with gray areas, missing slips, and tricky reporting rules that can easily trigger CRA reviews. Below are the most common problem areas you’ll face as a new tax preparer—and how to handle them like a pro 💼.
🍽️ Tips & Gratuities – Service Industry Income
Clients who work as:
waiters/waitresses
bartenders
delivery drivers
hotel staff
hair stylists
often earn cash and electronic tips on top of their wages.
Key Rule 👉 ALL tips are taxable income
Even if:
the employer doesn’t include them on the T4
they were paid in cash
the client thinks “everyone ignores them”
Tips are still employment income subject to tax and CPP.
Modern Reality
Most tips today are paid by:
credit card
debit machine
online apps
This means employers often have full electronic records and may include tips directly on the T4. But not all employers do!
💬 How to Handle Client Questions
Clients often ask:
“How much should I report? 10%? 15% of sales?”
🚫 WRONG approach!
✔ Correct answer:
“You must report the actual tips you received. I can’t choose a percentage for you.”
As a preparer, your role is to:
ASK the question
DOCUMENT the client’s answer
REPORT what they tell you
Never guess or create a number for them.
🛑 Employment Insurance (EI) Clawback
EI benefits are reported on a T4E slip and included in income. But there’s a hidden trap:
🔁 EI Repayment Rule
If total income exceeds roughly $65,000, part of EI may have to be repaid.
The tax software will calculate:
📌 Line 23500 – EI income deduction
📌 Line 42200 – Social benefits repayment
👉 Clients are often shocked when EI becomes repayable after they return to a high-paying job.
Your job is to:
warn them in advance
explain it’s normal
show the calculation clearly
🧩 Line 10400 – “Other Employment Income” Risks
Anything placed on Line 10400 can trigger CRA attention.
Common examples:
cash wages not on a T4
tips not included by employer
informal payments from an owner-managed corporation
bonuses paid outside payroll
🚨 CPP Problem
Income on Line 10400 usually does NOT automatically calculate CPP.
CRA runs a “Line 104 Project” to find cases where CPP should have been paid.
✔ Proper Fix – CPT20 Election
If the income should be pensionable, file:
📄 Form CPT20 – Election to Pay CPP on Pensionable Earnings
This ensures:
CPP is correctly calculated
CRA won’t reassess later
client avoids penalties & interest
💼 Severance & Termination Pay
Severance often confuses clients because:
net pay ≠ letter amount
payments may be split over 2 years
different T4 boxes are used
Reporting Basics
Severance normally appears in Box 66 / Box 67
Flows to Line 13000 – Other Income
Still fully taxable
Tax Planning Opportunity 🎯
Employers sometimes:
pay part in December
pay part in January
This can:
split income across two years
reduce marginal tax
help avoid EI clawback
👉 Always review severance letters and timing!
🧠 Practical Checklist for Preparers
Whenever you see employment income, ask:
✔ Is the client in the service industry?
✔ Are tips fully reported?
✔ Is there a T4E with possible clawback?
✔ Any Line 104 income that needs CPP via CPT20?
✔ Severance paid across two years?
✔ Missing slips or informal payments?
📦 Pro Tips to Stay CRA-Safe
Document client answers about tips
Never invent percentages
Watch for EI repayment above $65k
Use CPT20 when required
Don’t rely on severance letters—use T4 reporting
Add detailed file notes 📝
🎯 Final Thought
Employment income seems simple—but it’s one of the most reviewed areas by CRA. A careful interview + proper forms = happy client & stress-free practice.
🧩 Allowable Business Investment Losses (ABIL) — Why They’re Hard to Claim (Beginner-Friendly Guide)
Allowable Business Investment Losses—often called ABILs—are one of the most misunderstood and heavily challenged areas in Canadian personal tax. If you’re a new tax preparer, this topic may seem intimidating… and honestly, you’re not wrong! ABILs are complex, frequently audited, and often denied if not documented perfectly.
But this guide breaks everything down in simple terms, with practical examples and checklists. By the end, you’ll understand:
What an ABIL is
Why ABILs are so hard to claim
What CRA looks for
Why ABILs trigger audits
Common real-world scenarios you will see as a tax preparer
How to prepare clients properly so their claim doesn’t get denied
📌 What Is an ABIL (Allowable Business Investment Loss)?
An ABIL is a special type of capital loss that comes from:
👉 Investing in a small business corporation, either by
Buying shares, or
Lending money to the corporation
If that business fails, you may be able to claim an ABIL.
📘 Why “ABIL” Is Special
Most capital losses can only offset capital gains.
BUT an ABIL is different:
🟢 You can deduct it against all other kinds of income, including:
Employment income
Business income
Interest income
Rental income
🔵 Only 50% of the business investment loss is deductible — this is the “allowable” part.
🚨 Why Are ABILs So Challenging to Claim?
ABILs are one of the most heavily reviewed and litigated tax items in Canada. CRA audits almost every ABIL claim over $10,000.
Here’s why.
⚠️ 1. CRA Believes Most ABIL Claims Are Invalid
ABIL rules are strict. CRA wants proof that:
The corporation was a Small Business Corporation (SBC)
The investment was genuine, not a disguised gift or related-party favour
The business is actually insolvent, bankrupt, or has ceased operations
The loss is real and final, not temporary
The taxpayer expected to earn income from the investment (wasn’t just helping family)
CRA denies about 90% of doubtful claims because taxpayers lack proper evidence.
⚠️ 2. ABIL Requires Both Corporate & Personal Tax Knowledge
Although the loss is claimed on a personal tax return, determining whether it qualifies is actually a corporate law and corporate tax analysis.
New tax preparers often miss these requirements:
✔ Was the company really a Small Business Corporation? ✔ Were proper share certificates issued? ✔ Was the loan properly structured? ✔ Does documentation prove the investment was valid and enforceable?
⚠️ 3. High Risk of Abuse
Many people attempt ABIL claims in these situations:
Investor “lends” money to a child’s corporation
No promissory note exists
No expectation of repayment
Company was not a qualifying SBC
Records are incomplete
The “loan” was actually a gift
CRA sees these constantly — most get denied.
⚠️ 4. ABIL Is Final — It Can’t Be Undone Later
Once an ABIL is claimed, CRA wants solid proof because:
It becomes part of a taxpayer’s non-capital loss pool
It can reduce income for future tax years
It may affect estate planning and business planning
Because it has long-term tax impact, CRA examines it closely.
📂 What CRA Usually Asks For (Be Prepared!)
If your client claims an ABIL, expect CRA to request the following:
📄 For Shares
Share certificates
Subscription agreements
Corporate minute book records
Evidence business was a Small Business Corporation
Proof the shares became worthless
🧾 For Loans
Signed loan agreements/promissory notes
Repayment terms
Interest terms
Proof loaned funds were actually used in the business
Proof the corporation is bankrupt/insolvent
🏚️ To prove business failure
Bankruptcy documents
Asset sale records
Closure notices
CRA correspondence showing the business has ceased operations
Without these documents, the ABIL will almost always be denied.
📘 Why ABILs Trigger Audits Almost Automatically
CRA has publicly stated that ABILs are an “audit flag.” Claims over $10,000–$15,000 are almost guaranteed to be reviewed.
This is because:
ABILs reduce tax significantly
Many are incorrectly claimed
Many involve related-party transactions (parents → children, friends → business)
Expect 90% likelihood of CRA review for any meaningful ABIL.
💡 Real-World Scenarios You Will See as a Tax Preparer
These situations are very common—and often denied:
👪 1. Parents lending money to their child’s corporation
Example: Mom and Dad “lend” $100,000 to help their child start a restaurant.
👉 Problem:
No loan document
No repayment terms
Loan was not made for the purpose of earning income
CRA considers it a gift
❌ Most of these ABIL claims get denied.
🏢 2. Shareholder invests money in their own small corporation that later fails
This is a legitimate scenario if documented properly.
CRA still requires proof:
✔ SBC status ✔ Share certificates ✔ Evidence of insolvency ✔ Proof investment became worthless
💼 3. Business owners invest in another owner’s corporation
Example: Two entrepreneurs invest in each other’s companies.
These may qualify IF:
Money was invested for income purposes
Proper agreements were signed
Corporation meets SBC rules
⚰️ 4. The corporation simply “stopped operating” — but no bankruptcy
This is the trickiest.
CRA does not allow ABIL just because the business closed.
You must prove:
No assets left
No ongoing business activity
No reasonable chance of repayment
No share value remaining
🧠 Pro Tax Tip Box
💡 ABIL is not a simple deduction — it’s a legal argument. Every ABIL claim needs evidence, documentation, and ideally a tax practitioner who understands corporate structure.
📝 How an ABIL Is Reported on the Tax Return
If the investment meets all conditions:
The full loss goes on Schedule 3
Only 50% is allowed
It becomes an ABIL
It flows to line 21700
If unused, it becomes a non-capital loss carried forward/back
Reporting is easy — qualifying the loss is the hard part.
📚 Summary: What You MUST Remember as a New Tax Preparer
✔ ABILs are one of the most audited and denied claims in Canada ✔ Requires both personal and corporate tax knowledge ✔ CRA disallows most claims due to poor documentation ✔ Never file an ABIL without checking SBC status & documentation ✔ Expect CRA to contact you within months of filing ✔ Reporting is simple — proving eligibility is complex ✔ ABIL claims must be backed by strong, complete paperwork
⭐ Final Tip
Most ABIL claims fail because taxpayers treat business investments casually. Your job as a tax preparer is to ensure formality, evidence, and documentation at every step.
🌟 General Review of ABIL Rules — What Every Personal Tax Preparer Must Know
Allowable Business Investment Losses (ABILs) are one of the most powerful—yet most complicated—deductions in Canadian personal tax. As a tax preparer, understanding the core rules, qualifying criteria, and tax implications is essential. This guide breaks the topic down into simple, beginner-friendly language (with plenty of visuals) so you can confidently handle ABIL situations for clients.
🧠 What Exactly Is an ABIL?
An Allowable Business Investment Loss is a special type of capital loss that arises when a taxpayer invests in a Canadian small business corporation, and that investment becomes worthless.
🟦 It can come from:
❗ Selling shares of a small business corporation at a loss
❗ Lending money to a corporation and not getting it back
🟩 Why ABIL is special: Unlike normal capital losses (usable only against capital gains), an ABIL is 50% deductible against any type of income, including:
Employment income
Business income
Rental income
Interest income
This makes ABILs extremely valuable—if they qualify.
💰 How ABILs Are Calculated
ABILs follow the same structure as capital gains/losses:
Type
Inclusion Rate
Deductible Against
Capital Loss
50%
Only Capital Gains
Business Investment Loss
—
—
ABIL (50% of BIL)
50%
All income types
🔍 Formula: If you lose $40,000 on an investment in a qualifying corporation: ➡️ Only 50% = $20,000 ABIL ➡️ Deductible against all types of income
📆 Carryforward Rules for ABIL
ABILs have special time rules:
⏳ First 10 years
✔ Can be deducted against all sources of income ✔ If unused → remains an ABIL
⏩ After 10 years
🔁 The unused ABIL becomes a capital loss ✔ Capital losses carry forward indefinitely ✔ Usable only against capital gains
⚰️ In the year of death
Capital losses turn back into non-capital losses, usable against all income.
🔍 Important — ABIL Can Be Reduced by Capital Gains Exemption
If a taxpayer previously used the Lifetime Capital Gains Exemption (LCGE), it may reduce the ABIL they can claim.
📝 Why? Both benefits relate to small business corporation shares, and the law prevents taxpayers from stacking these incentives unfairly.
🧱 Where Do ABILs Come From?
Two main sources:
🆔 1. Shares of a Canadian-Controlled Private Corporation (CCPC)
This includes shares the taxpayer:
Originally purchased
Received when investing in the startup
Sold at a loss
Cannot sell because the corporation failed
💵 2. Debt Owing to the Taxpayer by a CCPC
If someone lends money to a corporation and can’t recover it, the unpaid loan may qualify as a Business Investment Loss.
🧩 Four Mandatory Qualifiers for ABIL
To claim an ABIL, the following four conditions MUST be met. CRA does not compromise on these.
🟦 1. The loss must come from shares or debt of a CCPC
A Canadian-Controlled Private Corporation is:
Privately owned
Controlled by Canadian residents
Not publicly listed
📘 Tax preparer tip: Always confirm CCPC status—look at shareholder registers, minutes, and tax filings.
🟦 2. The corporation must be a Small Business Corporation (SBC)
This means the business must earn active business income.
✔ Examples of active businesses:
Restaurants
Retail stores
Manufacturing
Trades
Professional practices
❌ Does not include corporations earning:
Rental income
Passive investment income
Portfolio income
Personal service business income
📉 Important: Share losses from real estate corporations do NOT qualify for ABIL.
🟦 3. If the investment was a loan, interest must have been charged
CRA requires proof that:
There was a real expectation of income, and
The loan was a real investment, not a gift
📌 Notes:
Interest does not need to be paid (company may be insolvent)
But the loan agreement must show interest was owed
🟥 Exception: If the lender is a shareholder, interest is not mandatory because shareholders can earn income through dividends instead.
🟦 4. The shares or debt must be disposed of — or deemed disposed of
You cannot claim an ABIL unless the investment is:
Sold
Written off
Proven worthless
OR deemed disposed of using special tax elections
📝 The most common tool: 🔹 Section 50(1) Election This allows taxpayers to claim a loss even when the corporation is insolvent and shares cannot be sold.
🔒 CRA’s Two-Part Test: Qualify + Prove It
CRA requires:
1️⃣ The ABIL must meet all four qualifiers
AND
2️⃣ You must prove it with documentation
Clients often meet the rules but fail to document them properly, leading CRA to deny the ABIL.
📦 What Documentation Does CRA Expect?
📄 For Share Investments
Share purchase agreements
Share certificates
Corporate minute book
Proof of CCPC status
Evidence shares became worthless
🧾 For Loans
Signed loan agreement
Interest terms
Promissory notes
Evidence business used the loan
Evidence of insolvency
🏚️ For Business Failure
Bankruptcy documents
Final tax returns
Letters showing the business ceased operations
Proof of asset liquidation
Without documentation, CRA will almost always deny the claim.
🔥 Special Notes for New Tax Preparers
🟣 ABILs are high-risk audit items
Expect CRA review for any ABIL over $10,000–$15,000.
🟠 ABILs are heavily litigated
Over 240+ tax court cases exist on this topic.
🟡 ABIL reporting is simple — qualifying is complex
Most of your work involves gathering and verifying proof.
📘 Quick Reference Box — The Four ABIL Qualifiers
💼 Must be CCPC shares or loans 🏭 Must be active business (not rental/investment) 💲 Loan must charge interest (except shareholders) 📉 Investment must be disposed of or deemed disposed of
👍 Final Thoughts for New Tax Preparers
ABILs are one of the most valuable deductions in the tax system but also one of the most difficult to claim correctly. Your job is not just completing the tax form—it’s ensuring the investment truly qualifies and is properly documented.
A skilled tax preparer can save clients thousands, but only with a strong understanding of these rules.
💼 Common Scenarios Where an ABIL Can Be Claimed — Beginner’s Guide for Tax Preparers
Allowable Business Investment Losses (ABILs) are one of the most valuable personal tax deductions, but also one of the most complex. As a tax preparer, it’s important to know where ABILs typically arise, so you can spot opportunities for your clients—and avoid costly mistakes. This guide explains the most common real-world scenarios where ABILs may be claimed, with practical tips, examples, and documentation considerations.
🟢 1. Investments in Corporations That Become Insolvent
One of the most frequent ABIL scenarios involves:
Buying shares in a corporation
Lending money to a corporation
When the corporation fails or becomes insolvent, the investor may claim an ABIL for the lost investment.
Example:
A client invests $50,000 as an angel investor in a small startup.
The startup closes after two years, and the shares are now worthless.
The client may be eligible to claim 50% of the loss against all types of income, provided the investment qualifies as a CCPC share or shareholder loan.
💡 Pro Tip: Always confirm CCPC status and that the business was actively operating (not a passive investment) before claiming ABIL.
🟢 2. Investments in Family or Friends’ Small Businesses
Many small businesses are funded by family or friends through:
Share purchases
Loans to the business
If the business fails and repayment is impossible, these losses can qualify as an ABIL.
Example:
Parents invest $20,000 in their child’s small business.
The business closes and cannot repay the investment.
Parents may claim an ABIL—but only if:
The business qualifies as a CCPC
The investment meets all ABIL qualifiers
Proper documentation exists
💡 Note: Investments in family businesses are heavily scrutinized by CRA. Documentation and proof of intent to earn income are essential.
🟢 3. Owner-Manager Investments in Their Own Corporation
Perhaps the most common ABIL scenario for small practitioners involves owner-managers:
They invest personal funds to start or maintain a corporation
They may purchase shares or lend personal money to the business
The business ultimately fails and funds cannot be recovered
Key Points:
The investment must be in a CCPC with active business income
Loans must document interest owed (even if unpaid)
Shares or loans must be disposed of or deemed disposed of via a Section 50(1) election
📝 Tax preparer tip: Owner-managers often overlook ABIL claims, but with proper guidance and documentation, this is an opportunity to save significant taxes.
🟢 4. Victims of Scams or Fraudulent Businesses
If a client invests in a corporation that turns out to be fraudulent, it may be possible to claim an ABIL—if proof exists:
Police or legal reports verifying the fraud
Bank statements showing the investment
Correspondence with the company confirming the loss
⚠️ Caution: Documentation is crucial. Without it, CRA will likely deny the ABIL. Fraud cases are technically allowed, but proving them is challenging.
🟢 5. Investment Clubs or Corporations That Invest in Small Businesses
Some clients invest indirectly through investment corporations or clubs:
The corporation collects funds from multiple investors
It invests in various small businesses (e.g., tech startups, restaurants, cafes)
If one of those businesses fails, investors may be eligible for ABIL
❌ Note: ABILs do not apply to investments in:
Publicly traded securities
Real estate companies
Passive portfolio investments
💡 Tip: Always trace the investment to a qualifying small business to determine ABIL eligibility.
🟢 6. Payments Made to Cover CRA Liabilities of a Corporation
In some cases, shareholders may pay corporation liabilities such as:
GST/HST
Payroll taxes
Other CRA obligations
If these payments are made because the corporation cannot pay, they may be considered an ABIL, because funds were directly used to support the business.
Example:
A director pays $15,000 in unpaid payroll taxes for a corporation.
The corporation becomes insolvent and cannot repay.
The director may claim an ABIL for the amount paid, with proper documentation.
⚠️ Important: These situations are complex and may require a tax lawyer or senior review.
📦 Documentation Checklist for Common ABIL Scenarios
For any ABIL claim, ensure the following is available:
✅ Proof of investment (share certificates, loan agreements) ✅ Corporate status (CCPC confirmation, minute books) ✅ Evidence of active business operations ✅ Proof of insolvency or failed business ✅ Interest terms for loans (if applicable) ✅ Section 50(1) elections for deemed dispositions ✅ Any additional correspondence, legal, or CRA documentation
💡 Pro Tip: Keep a separate folder for each client’s ABIL documentation—it’s your best defense during a CRA audit.
💡 Key Takeaways for Tax Preparers
ABILs arise in specific, common scenarios:
Corporate insolvency
Family or friends’ businesses
Owner-manager losses
Fraudulent investments
Investment clubs investing in small businesses
Payment of corporate liabilities
Documentation is everything—without proof, CRA will deny the claim.
ABILs can provide significant tax savings, but require careful verification.
Always confirm CCPC status, active business, and qualifying loss before claiming.
⭐ Pro Tip Box: “ABILs are often overlooked by taxpayers, but as a tax preparer, you can become a hero for your clients by spotting these opportunities—provided you gather and verify the proper documentation!”
📝 Claiming ABIL on the T1 Return & Electing Under Section 50-1 of the ITA
Claiming an Allowable Business Investment Loss (ABIL) on a personal tax return may seem straightforward, but there are critical nuances that every tax preparer must understand—especially when dealing with owner-managed businesses or investments that cannot be sold. This section breaks it down step-by-step with examples, practical tips, and guidance on the Section 50-1 (subsection 51) election, so you can confidently prepare ABIL claims for clients.
💼 1. How ABIL Is Claimed on the T1 Return
An ABIL is claimed much like a capital loss, but with the key difference that it can offset all sources of income, not just capital gains.
Step-by-Step Process:
Calculate the Loss
Determine the original investment amount (shares purchased or loaned)
Deduct any amount recovered (sale proceeds, partial repayment)
Include related expenses, e.g., legal fees or consulting fees directly linked to the investment
Example:
Share purchase: $125,000
Amount recovered: $10,000
Legal & consulting fees: $2,985
Total ABIL: $117,985
50% deductible: $58,993
Enter on the T1 Return
Line 21700: Enter the allowable portion of the ABIL (50% of total loss)
Box 21699: Enter the gross loss (full amount before 50% deduction)
Software Assistance Most tax preparation software includes an ABIL worksheet, which calculates the loss and generates the appropriate entries for the T1 return automatically.
💡 Pro Tip: ABILs can reduce net income, which affects other credits and deductions, so accuracy is essential.
⚠️ 2. When the Shares or Loans Cannot Be Sold
In some cases, such as sole shareholder situations or insolvent corporations, the investment cannot be sold to a third party. In these cases, a special election is needed to claim the ABIL.
Section 50-1 Election (Subsection 51 Election)
This election is a deemed disposition that allows the taxpayer to claim a loss even if the shares or debt are unsellable.
How It Works:
Deem the proceeds to be zero
The shares or loans are treated as sold for $0
Immediately reacquire the property for $0
If the corporation revives in the future, the taxpayer can realize a capital gain based on this new cost base
Example:
Shareholder Enzo invests:
$1,000 in shares
$125,000 as shareholder loan
Corporation fails; shares and loan cannot be sold
Section 50-1 election:
Disposition proceeds = $0
Cost base reset to $0
ABIL can now be claimed for $63,000 (50% of combined loss)
💡 Key Point: Without this election, CRA may deny the ABIL or challenge the claim.
🕒 3. Timing and Filing of the Election
Must be filed in the year the loss occurs
If the election is missed, CRA may accept a late election, but penalties could apply
Election is not on a prescribed form—it is a free-form letter submitted to your local Tax Services Office
Contents of a Section 50-1 Election Letter:
Taxpayer’s SIN and address
Description of shares or debt
Cost base of shares or loan
Election statement: “I hereby elect under Section 51 of the Income Tax Act to dispose of my shares/debt in [Corporation Name] for proceeds of $0.”
Signature and date
📌 Pro Tip: Keep a copy of the letter for your client’s files in case CRA audits the return.
🧾 4. Documentation Required
Even after filing the election, CRA may request documentation to verify the ABIL:
✅ Purchase documents for shares or loans ✅ Evidence of corporation insolvency or cessation ✅ Legal or consulting fees associated with the investment ✅ Evidence of inability to sell or collect the debt ✅ Proof that the investment was in a CCPC and qualified as an active business
💡 Tip: Good documentation is often the difference between a successful ABIL claim and a denial during an audit.
📌 5. Best Practices for Personal Tax Preparers
Always confirm CCPC status and active business income
Calculate the gross loss first, then determine the allowable 50% deduction
File the Section 50-1 election for unsellable shares or loans
Keep meticulous documentation of all transactions, legal fees, and communications
Check timing carefully—claims must be made in the year the loss is realized
🌟 Quick ABIL T1 Claim Checklist
Step
Action
1
Calculate total loss (investment + fees – proceeds recovered)
2
Determine 50% allowable deduction
3
Enter gross and allowable amounts on T1 (Lines 21699 & 21700)
4
Make Section 50-1 election if shares/debt cannot be sold
💡 Final Tip: Claiming an ABIL is straightforward if the investment was sold, but Section 50-1 elections are essential when shares or loans are unsellable. Proper planning, careful calculation, and complete documentation will protect your clients and ensure their ABIL claim survives CRA scrutiny.
🛡️ Surviving a CRA Audit & Best Practices When Claiming an ABIL
Claiming an Allowable Business Investment Loss (ABIL) can be a powerful way to reduce your client’s taxable income, but it is also one of the most scrutinized areas by the Canada Revenue Agency (CRA). Proper preparation, meticulous documentation, and understanding the CRA’s expectations are critical for success. This section is your ultimate guide to avoiding audit pitfalls and ensuring your client’s ABIL claim is accepted.
📑 1. Documentation: The Foundation of a Successful ABIL Claim
The CRA will ask for proof of every transaction related to the ABIL. Here’s what you need to prepare:
✅ For Shares
Share certificates showing ownership
Proof of payment: canceled checks, bank transfers, or receipts
Purchase & Sale Agreements if transactions occurred between shareholders
Contracts of acquisition if applicable
✅ For Loans or Debts
Loan agreements outlining principal and interest
Proof of funds transferred into the corporation
Bank statements or canceled checks confirming deposits
💡 Pro Tip: For owner-managers who invest over multiple transactions or years, a general ledger of the shareholder account is essential to demonstrate net contributions and repayments.
🏢 2. Dealing with Bankrupt or Dissolved Corporations
When a corporation has failed or ceased operations, ABIL claims require extra diligence:
Lawyer or accountant documentation from the corporation
List of creditors and proof of claims submitted to the trustee
Final balance sheet showing shareholder account balances
General ledger showing all transactions leading to the final balance
Certificate of dissolution and director resolutions to formally cease operations
💡 Tip: Filing ABIL documentation early—ideally during the operation of the corporation—makes it easier to assemble proof if the company later fails.
👪 3. Special Considerations: Family Loans
Loans from family members can be tricky:
Must have a formal loan agreement
Should include interest payable, even if unpaid due to insolvency
Non-interest bearing loans to family often result in ABIL being disallowed
⚠️ Note: Unlike loans to owner-managers, the CRA requires a clear income-earning connection for family loans. Proper documentation is non-negotiable.
🔑 4. Best Practices to Avoid CRA Issues
Organize Documentation Early
Maintain records of shares purchased, loans advanced, and all related expenses
Keep copies of all canceled checks, bank transfers, and agreements
Track Shareholder Accounts Continuously
Regularly update general ledger and account balances
Track repayments, drawings, and other transactions
Formalize Family Loans
Use written agreements and include interest terms
Have a lawyer draft or review documents
Follow Proper Corporate Wind-Up Procedures
Dissolve the corporation formally
Maintain final balance sheet and financial statements
Retain articles of dissolution and final corporate tax return
Prepare a Permanent File
Keep all records organized in one location
Ensure you can produce evidence quickly if CRA audits the ABIL
📝 5. CRA Review Process: What to Expect
During an audit, CRA will typically request:
Share certificates and proof of share purchases
Loan agreements and evidence of funds transferred
Corporate general ledgers for owner-managed businesses
Documentation from legal or accounting professionals for bankrupt corporations
Proof of corporate dissolution and final financial statements
💡 Pro Tip: Well-prepared documentation often allows smooth approval at the first review level, reducing audit stress and the chance of disputes.
📌 6. Quick ABIL Audit Survival Checklist
Step
Documentation / Action
1
Share certificates and proof of purchase
2
Loan agreements and proof of funds transferred
3
General ledger and shareholder account balances
4
Corporate final balance sheet and financial statements
5
Articles of dissolution and director resolutions
6
Evidence of interest payable on loans, if applicable
7
Organize all records in a permanent file
🌟 Key Takeaways
Early preparation saves headaches later—start documenting investments from day one.
Interest-bearing loans are essential for family or non-arm’s length transactions.
Dissolution and wind-up procedures strengthen the ABIL claim.
Complete documentation is the single most important factor in surviving CRA scrutiny.
By following these best practices, you ensure your client’s ABIL claim is audit-ready, minimizing the risk of disallowance and maximizing the tax benefit.
Claiming employment expenses is one of the most misunderstood areas of Canadian personal tax. Many taxpayers—and even some preparers—incorrectly assume that having job-related costs automatically qualifies them for deductions. This is not true. The CRA audits this area heavily, so as a tax preparer, you must follow the rules precisely.
This section will guide you through EVERYTHING you need to know to prepare these claims safely and correctly.
🔑 What Are Employment Expenses?
Employment expenses are costs an employee pays out-of-pocket because their employer requires them to do their job, and the employer does not fully reimburse them.
These expenses are claimed on Form T777 – Statement of Employment Expenses. But a taxpayer can ONLY claim these if their employer completes the T2200 – Declaration of Conditions of Employment.
📝 Understanding Form T2200 (THE GATEKEEPER)
Think of the T2200 as the permission slip that allows a taxpayer to claim employment expenses.
📌 Key Purpose of T2200
The T2200 certifies that the employee was:
Required to pay specific employment expenses as a condition of employment
Not fully reimbursed for those expenses
Required to maintain a workspace, travel, buy supplies, etc., depending on the job
👉 Without a properly completed and signed T2200, the CRA will deny the employment expense claim.
📘 What the T2200 is NOT
❌ It is NOT:
A claim form
A guarantee the CRA will approve the deductions
Proof of the amount spent
✔️ It only confirms the conditions of employment, not the costs.
🔍 How to Review a T2200 Like a Pro
When a client hands you a T2200, check these items carefully:
1️⃣ Does it clearly state the employee must pay the expenses?
Look for “YES” under the required conditions. If employer selects “NO” → no claim allowed.
2️⃣ Does it specify the correct type of expenses?
There are several categories:
Vehicle expenses 🚗
Workspace in home 🏠
Supplies 📦
Cell phone & communication (if applicable) 📱
Special clothing ⚒️
Salesperson expenses 🤝
Each category enables different deductions.
3️⃣ Is the employee reimbursed?
⚠️ If employer reimburses the employee (and does NOT include reimbursement in income), the expense cannot be claimed.
4️⃣ Signed & dated?
No signature = invalid = CRA will deny.
📌 Note Box – CRA Audit Alert 🚨 CRA frequently reviews T2200-based claims. Even small deductions ($2,000–$3,000) can trigger a review.
Make sure your client’s form is complete, accurate, and matches their T777 claim.
🧮 Understanding Form T777 – Claiming the Expenses
Once a valid T2200 is completed, the employee uses T777 to calculate the deductible amounts.
📂 Common Categories of Claimable Employment Expenses
🚗 1. Motor Vehicle Expenses
Employees required to use their personal vehicle for work may deduct:
Gas
Insurance
Repairs & maintenance
Leasing costs
Depreciation (CCA)
Parking fees
❗ NOT claimable: commuting between home and office. Only work-related travel qualifies.
👉 Mileage logbook is critical.
🏠 2. Workspace-in-Home Expenses
Allowed only when:
Workspace is the employee’s principal work location OR
Employee uses it regularly to meet clients
Possible deductions:
Utilities 💡
Rent 🏠
Internet (employment portion only) 🌐
Maintenance 🛠️
❌ Cannot claim
Mortgage payments
Capital expenses
Furniture purchase
📦 3. Supplies
Examples of deductible supplies:
Stationery
Postage
Professional tools
Cleaning materials (if required)
📱 4. Cell Phone & Internet
Only the employment-use percentage is deductible. CRA expects a reasonable calculation (e.g., call logs or usage charts).
🤝 5. Commissioned Sales Employees
They can claim all regular employee expenses PLUS:
📌 Receipts – detailed, not credit card slips 📌 Logbooks – especially for vehicle claims 📌 Reasonable percentages – for shared expenses 📌 A matching T2200 – that supports the claim
💡 Pro Tip: If CRA reviews the return, they will compare the T2200 line-by-line with the T777 details. Any inconsistencies = automatic denial.
🚨 Top Mistakes That Get Clients Reassessed
Here are the most common—and dangerous—errors:
❌ Claiming without a T2200
#1 reason CRA denies the claim.
❌ Claiming commuting costs as vehicle expenses
Driving to work is NOT deductible.
❌ Claiming home office expenses when the employee is office-based
Workspace must meet CRA conditions.
❌ Claiming expenses that employer reimbursed
No double dipping.
❌ Incorrectly prorating vehicle expenses
Claim must be based on use percentage, not random amounts.
📦 Example: Reviewing a T2200 Correctly
Scenario: Client says they use their car for work. You look at the T2200 and:
Employer selected “NO” for required motor vehicle use.
Client still wants to claim gas and insurance.
✔️ Your job: Explain that the claim is not allowed. Even if the client believes they “use the car for work,” CRA only follows what the employer certifies.
⭐ Best Practices for Tax Preparers
🔹 Always request T2200 AND receipts before preparing T777 🔹 Read every line of T2200 — do NOT assume 🔹 Explain CRA audit trends to clients 🔹 Double-check for reimbursements 🔹 Maintain consistent documentation 🔹 Keep explanations simple and accurate
🧠 Summary – Mastering T2200 & T777
To claim employment expenses:
✔️ Employee must have a valid T2200
✔️ Only allowable expenses can be claimed on T777
✔️ Documentation must support every claim
✔️ CRA audits this area heavily—accuracy matters
With these steps, you’ll confidently handle employment expense claims while protecting your clients from reassessments.
Issues With the T2200 and Common Mistakes Made 📄⚠️
The T2200 – Declaration of Conditions of Employment is the starting point for ALL employment expense claims. If this form is wrong, incomplete, or misunderstood, the entire employment expense deduction can fall apart. This section will help you master the T2200 so you avoid CRA reassessments and protect your clients.
🔑 Why the T2200 Matters So Much
The T2200 is the permission slip that allows an employee to claim expenses using Form T777. But the presence of a T2200 does NOT guarantee that expenses are deductible.
This is where many new tax preparers make mistakes.
🖊️ 1. The T2200 MUST Be Legitimately Signed
Before reviewing anything else, scroll directly to the bottom of the form and check:
✔️ Employer’s name ✔️ Authorized individual’s name (HR, finance, supervisor, bookkeeper, etc.) ✔️ Signature ✔️ Date ✔️ Employer’s phone number
📌 Important Note: CRA often calls the person listed on the T2200 to verify the information.
🚨 Missing employer signature or contact information = automatic denial of all employment expenses.
🚫 2. Clients Sometimes Sign Their Own T2200 (Big Problem!)
Some taxpayers assume the T2200 is a personal form they can fill out themselves. This is invalid, and CRA will deny the claim instantly.
As a tax preparer, you must reject:
Client-signed T2200s
T2200s filled out by unauthorized individuals
T2200s with unclear or fake information
⚠️ Never accept a T2200 unless it is signed by the employer or someone authorized by the employer.
📝 3. Tax Preparers Should NEVER Fill Out the T2200 for Clients
Many clients try to pressure tax preparers to complete the T2200 for them, based on what the client tells you.
Do NOT do this.
Reasons:
CRA prohibits accountants from completing T2200s on behalf of employees
You cannot know the employer’s policies
You cannot confirm reimbursements, allowances, or required conditions
False information may create legal issues for both preparer and client
❌ Never provide a pre-filled template ❌ Never complete the T2200 using client statements
✔️ Tell the client they must get it filled out by HR, their supervisor, or payroll.
🧑💼 4. Exception for Owner-Managers (But With Caution) 🏢
There is one exception where a tax preparer may complete a T2200:
When the employee is also the owner-manager of the corporation and you do the company’s books.
In this case:
You understand their reimbursement policy
You know their allowances, mileage logs, and corporate expenses
You are handling both sides—corporate and personal
BUT ⚠️
CRA has a complicated history with owner-manager employment expenses.
🔍 What CRA Did:
A few years ago, CRA tried to deny all owner-manager employment expenses, arguing that employees cannot “enter into a contract of employment with themselves.”
📣 What Happened:
Accounting community pushed back
CRA reversed the restriction
Owner-managers are currently allowed to claim employment expenses
📌 Warning Box: CRA may revisit this rule in the future. Stay updated with legislation changes.
🚫 5. Assuming T2200 = Full Access to All Deductions
One of the BIGGEST mistakes new tax preparers make:
❌ Thinking that once a T2200 is signed, the client can claim EVERYTHING on T777.
This is wrong.
A T2200 only confirms:
Which employment conditions apply
What categories of expenses are allowed
What was reimbursed and what was not
❗ The tax preparer must still evaluate:
Eligibility
Reimbursements
Reasonableness
Applicable portions
CRA rules for home office, vehicle, supplies, etc.
📌 The T2200 is a road map, not a blank cheque.
🧭 6. T2200s That Allow ZERO Expenses (Yes, This Happens)
Some employers issue T2200s only to satisfy employee requests—but they mark “NO” to every relevant condition.
This means:
The employee still has a valid-looking form
But they cannot deduct ANY employment expenses
Example:
T2200 says employee “is NOT required to use a vehicle”
But client insists they “drive all the time for work”
You must follow the T2200—not the client’s opinion.
🕵️♂️ 7. CRA Checks for Fraud or “Funny Business”
CRA specifically monitors:
Blank T2200s signed by employers
T2200s with vague or contradictory answers
T2200s prepared by accountants
Employees providing fraudulent information to employers
🔒 Protect yourself: Always keep a copy of the original T2200. Never alter or complete it. Compare every line to the T777 before filing.
📂 8. What CRA Looks For During Reviews
CRA frequently performs post-assessment reviews on employment expenses. During these reviews, they check:
✔️ T2200 authenticity ✔️ Proper employer contact info ✔️ Alignment between T2200 answers and T777 claims ✔️ Proof of non-reimbursement ✔️ Logs, receipts, and usage percentages ✔️ Reasonableness of expenses
🚨 If the claim on T777 contradicts the employer’s answers on T2200, the CRA will deny the deduction—often with no option to appeal.
💡 Pro Tax Tips for Handling T2200s
⭐ Tip 1: Always start at the bottom → signature & contact
If it’s not signed, stop immediately.
⭐ Tip 2: Never trust what the client says—trust the T2200.
⭐ Tip 3: Compare line-by-line with the T777
You cannot claim what the T2200 does not authorize.
⭐ Tip 4: Check reimbursements carefully
If the employer reimbursed the employee for something, it cannot be claimed again.
⭐ Tip 5: Keep documentation
Receipts, logs, calculations, and copies of all forms.
🧠 Summary – Key Mistakes You Must Avoid
Here’s a quick recap of the most critical points:
❌ Clients signing their own T2200
❌ Accountants completing T2200s
❌ Incorrect or missing employer signature
❌ Missing employer phone number
❌ Assuming T2200 = automatic approval of all expenses
❌ Not verifying what the employer reimburses
❌ Claiming expenses even when T2200 indicates “NO”
❌ Not comparing T2200 to the T777 carefully
Doing a Critical Overview of the T2200 Before Claiming Expenses 🔍📄
The T2200 – Declaration of Conditions of Employment is the single most important document when preparing employment expense claims. Before you enter a single dollar on Form T777, you MUST analyze the T2200 with a sharp, critical eye.
This section teaches you exactly how to review the T2200 line-by-line so you can determine: ✔️ If the client is entitled to employment expenses ✔️ What types of expenses can be deducted ✔️ How much can be deducted ✔️ What must be prorated ✔️ Whether adjustments are needed ✔️ Whether CRA may challenge the claim
If you master this section, you will avoid 90% of the mistakes tax preparers commonly make.
🧠 Why a Critical Review Is Required
A T2200 is not a generic permission slip. Every Yes/No box directly affects whether an expense is allowed.
A tax preparer MUST:
Read every section
Compare the T2200 answers with the T777
Consider employment dates
Validate reimbursements
Check for allowances
Understand which employment category applies
After reviewing, you should know precisely what can and cannot be claimed.
🚨 Step 1: Question 1 – The “Dealbreaker” Question
❗ If Question 1 = NO → STOP. No employment expenses can be claimed.
This is the most critical part of the entire form.
📌 The form itself states:
“If NO, the employee is not entitled to claim employment expenses.”
This question confirms whether the employee was required to pay their own expenses to earn employment income.
✔️ If Yes
Continue reviewing the form.
❗ If No
The T2200 is essentially worthless for tax purposes.
🗓️ Step 2: Check Employment Period (Question 4)
Do NOT assume the employee worked January–December.
This box reveals whether the employment was:
Full-year
Partial-year
Examples where this matters:
The employee started mid-year
Maternity/parental leave
Medical leave
Seasonal work
Job change within the year
Why this matters for deductions:
You can only deduct expenses during the months the person was employed.
Example
Employee worked April–December → Only 9 months eligible. If claiming vehicle expenses:
Either prorate the total expenses
Or only calculate the expenses for the eligible months
💡 Pro Tip: For vehicle claims, using a prorated method (e.g., 9/12 of expenses) is acceptable when records are annual.
This section lists expenses the employee was required to pay without reimbursement.
Examples:
Using personal cell phone for business calls
Buying required office supplies
Paying for parking when visiting clients
If this box is “YES,” it supports legitimate expense claims. If it is “NO,” even if the client believes they paid for supplies, you cannot claim them.
💼 Step 6: Commission Employees (Question 8)
Commission employees (e.g., salespeople) can deduct extra categories of expenses compared to regular employees.
But ONLY IF:
This box is marked “YES”
Commission income appears on T4 in the “Commission” box
The employer confirms they are required to pay those expenses
Commission employees can claim additional deductions such as:
Promotion costs
Client meals (restricted)
Certain business-related supplies
💡 Important: Commission employees CANNOT claim more than their commission income unless they qualify under special rules.
🏢 Step 7: Special Employment Situations (Questions 9 & 10)
These boxes apply to employees such as:
Investment advisors
Remote employees renting space
Employees required to maintain an office outside the employer’s premises
Question 9: Renting Office Space
If “YES,” the employee may be able to deduct rent and related costs.
Question 10: Home Office (Very Important!)
This box controls eligibility for home office deductions.
It must include:
“YES” checkbox
Percentage of workspace
Details on any reimbursements or allowances
🏠 Home office claims will be denied if:
This box is marked “NO”
The workspace percentage is missing
Reimbursements are not disclosed
🔧 Step 8: Tradespersons and Specialized Employees (Questions 11–13)
These apply to:
Tradespersons
Apprentice mechanics
Forestry workers
These boxes unlock special expense categories available only to specific occupations.
If your client is in one of these fields, review these carefully.
📌 Summary: What You Must Determine From the T2200
Before claiming expenses, ask yourself these key questions:
✔️ Is Question 1 “YES”?
If NO → All expenses are denied.
✔️ Did the employee work all year or part of the year?
✔️ Was the employee reimbursed for any expenses?
✔️ Did the employee receive an allowance? Is it reasonable and included on the T4?
✔️ Is the employee using their own vehicle or a company vehicle?
✔️ Are they a regular employee or commission employee?
✔️ Are home office details complete and clearly noted?
✔️ Are there any special occupation rules?
🏆 Ultimate Pro Tip Box
⭐ A T2200 must always be treated like a contract. Every Yes/No checkbox legally restricts what can be claimed.
⭐ Never rely on what the client says. Always rely on what the employer declared.
⭐ If a checkbox is missing, unclear, or contradictory → request a corrected T2200 before filing.
🚗 Vehicle Expenses When an Employee Is Allowed a Deduction (T2200 + T777 Guide)
Understanding vehicle-related employment expenses is one of the most important things a new tax preparer must master. Many tax returns get reviewed by the CRA because of mistakes in this area — but with the right approach, you can confidently prepare accurate and audit-proof claims for your clients.
This section is your ultimate beginner-friendly guide to correctly interpreting the T2200 and completing the T777 (Employment Expenses) for clients who use their personal vehicle for work.
🔍 What This Section Covers
How to identify when a client can deduct vehicle expenses
How to read the T2200 for vehicle-related permissions
How to connect the T2200 with the numbers on a T4
How to calculate deductible vehicle expenses
How allowances and reimbursements determine eligibility
How cell phone expenses often tie in
A complete workflow to ensure you never miss anything
🧩 Understanding When Vehicle Expenses Are Allowed
The T2200 (Declaration of Conditions of Employment) is the key to everything. A client cannot claim vehicle expenses unless the employer certifies certain conditions on the T2200.
Here’s the logic:
✔️ Vehicle expenses may be deducted if:
The employee must use their own vehicle for work duties
They are required to travel to meet clients, visit sites, or move between locations
They do not receive full reimbursement for the expenses
They receive a taxable allowance (non-reasonable or flat monthly allowance) → often found in Box 40 of the T4
T2200 Question 1 = YES (mandatory)
❌ Vehicle expenses CANNOT be deducted if:
T2200 Question 1 = NO
The employee is reimbursed for all travel costs
The employer provides a company vehicle (unless they repay certain costs)
The allowance received is reasonable per-km → then the allowance is non-taxable and vehicle expense claims usually cannot be made
📝 Pro Tip Box
💡 Always check T4 Box 40
When you see a high amount in Box 40, it’s often a signal that the employee received a monthly or flat vehicle allowance. This amount is taxable, and therefore the employee may qualify to deduct vehicle expenses.
Large Box 40 = breadcrumb leading you to check for a T2200.
🏁 Step 1 — Examine the T2200 (Vehicle-related sections)
Here are the sections that matter most:
1️⃣ Question 1 – The Deal-Breaker
👉 Must be YES If “No,” stop — no expenses allowed.
2️⃣ Employment Period (Question 4)
Check if the employee worked:
The full year, or
Part of the year
⏳ If part-year: You must prorate vehicle expenses based only on the months the employee was actively employed.
3️⃣ Vehicle-specific sections (Questions 5 & 6)
🚘 Question 5 — Vehicle Allowances
Here’s where you discover:
How much the employer paid per month
Whether the allowance was included on the T4
Whether the allowance was per-km or flat
👉 Flat allowance → always taxable → deductible expenses allowed 👉 Reasonable per-km allowance → usually not taxable → expenses NOT allowed
This is where your T4 cross-check happens.
🗂️ Special Note Box
🟦 Reasonable per-km rates (CRA standard)
If the allowance is per kilometre and within CRA limits, it will be non-taxable and employees generally cannot deduct additional vehicle expenses.
Example:
First 5,000 km → $0.70/km
After 5,000 km → $0.64/km (Amounts change annually)
4️⃣ Cell Phone Expenses (Question 7)
If the employer requires the employee to use their personal phone:
Cell phone bills can be deducted in proportion to business use
E.g., 2/3 business use → 66% of phone bill deductible
You will include this on the T777 under “Other expenses.”
🚗 Step 2 — Gather Vehicle Expense Proof
Your client must provide:
Gas receipts
Repairs & maintenance
Insurance
Licensing
Lease payments OR capital cost allowance (if purchased)
🔑 A detailed mileage log (THIS IS CRITICAL)
🛑 CRA Audit Risk Warning
❗ If there is no mileage log, CRA can deny the entire deduction.
🧾 Step 5 — Complete the T777 (Employment Expenses)
T777 includes:
Motor vehicle expenses (from the worksheet)
Cell phone
Other allowed expenses
The final total goes to:
👉 Line 22900 – Employment Expenses
This reduces taxable income and increases refund eligibility.
🎯 Summary Table — Always Follow This Workflow
Step
What to Check
Why It Matters
1
T2200 Question 1
Must be YES or stop
2
Employment period
Proration required
3
Vehicle allowance details
Determines eligibility
4
Company car vs. personal car
Different deduction rules
5
Reimbursed expenses
Cannot double-claim
6
Mileage log
Mandatory for vehicle claims
7
Calculate business-use %
Required for proration
8
Fill out T777
Final step for claim
🌟 Final Takeaway for Tax Preparers
Vehicle expense claims can be audit-heavy, but they are fully manageable when:
You read the T2200 carefully
You understand what Box 40 is telling you
You collect proper documentation
You prorate everything correctly
You maintain a mileage log
Mastering this area ensures your clients get the deductions they’re entitled to—without CRA headaches.
🚫 Example of a T2200 Where No Employment Expenses Are Allowed (Beginner-Friendly Guide)
Not every T2200 automatically means your client can claim employment expenses. One of the biggest mistakes new tax preparers make is assuming that “T2200 = deduction.” In reality, many T2200 forms lead to $0 in deductible expenses—and CRA reviews often target cases where deductions were claimed incorrectly.
This section explains exactly why a T2200 might result in no allowable employment expenses, how to identify these cases instantly, and how to handle optional choices when reimbursement rates are too low.
🧠 Why This Scenario Matters
Understanding this will help you:
Avoid double-dipping errors ❌
Protect your clients from CRA reassessments 🔍
Interpret T2200 forms accurately
Decide whether a client should claim employment expenses even when they technically could
📌 When a T2200 Produces No Deductible Employment Expenses
A T2200 may still be issued even when no employment expenses are deductible. Employers may issue the form to show the CRA that:
The employee incurred expenses, and
The employer reimbursed those expenses, or
The employee received a reasonable per-km allowance
Below is the exact logic you must follow.
🚗 1. Reasonable Per-Kilometre Reimbursement = No Vehicle Expense Claim
✔️ If the employer pays a reasonable, per-km allowance, it is:
Non-taxable
Excluded from Box 40
NOT added to employment income
NOT eligible for expense claims
🔍 CRA considers an allowance “reasonable” when:
It is paid only based on actual kilometres driven
It is at or below CRA prescribed rates
💡 For example:
First 5,000 km: ~56¢/km
After 5,000 km: ~49¢/km (Values vary each year)
If the employer pays 40¢/km, and this is below the CRA limit, the reimbursement is non-taxable, and no deduction is allowed.
📱 2. Reimbursed Expenses = No Claim Allowed
If the employee submits:
Gas receipts
Repairs
Cell phone bills
Meals/entertainment (for salespeople)
Other supplies
…and the employer reimburses them, then:
👉 They cannot claim any employment expenses on T777.
Why?
❗ Because the employee is not out-of-pocket.
Claiming reimbursed expenses is double-dipping—a major CRA audit trigger.
🟥 ⚠️ RED FLAG BOX — Common Beginner Mistake
Never enter reimbursed expenses on the T777. Even if the T2200 lists the categories of expenses, a reimbursement negates the deduction.
✏️ Example Summary — Why No Expenses Are Allowed
Your client might have:
A valid T2200
Travel requirements
A vehicle used for work
Supplies purchased for the job
…but if BOTH conditions below apply:
1️⃣ They received a reasonable per-km allowance
AND
2️⃣ All other expenses were reimbursed
👉 There is $0 allowed on T777. 👉 End of calculation.
🔍 “But what if the reimbursement is too low?” — Important Exception
Sometimes the client might say:
“I only got 40¢ per km, but my real expenses were much higher!”
In this case, the client has two optional approaches to claim the difference.
Option A — Add the allowance to income (line 10400)
Add the per-km reimbursement as taxable income
Claim full vehicle expenses through T777
Net deduction is the difference between true costs and reimbursement
Option B — Keep the allowance as non-taxable
DO NOT add reimbursement to income
Deduct business-use vehicle expenses
Subtract the reimbursement amount on the T777 worksheet
Claim only the unreimbursed portion
📌 Both options produce the same net claim amount.
The choice depends on:
Whether the client prefers a bigger deduction
Whether adding income pushes them into a higher tax bracket
How large the vehicle expenses actually are
🟦 Quick Comparison Table
Scenario
Allowable Expense Claim
Why
Reasonable per-km allowance
❌ No
Employer already compensated travel; allowance is non-taxable
Employee reimbursed for all expenses
❌ No
Not out-of-pocket → cannot claim
Allowance too low but employee wants to claim difference
✔️ Yes
Must add allowance to income OR deduct reimbursement on T777
Commissioned salespeople enjoy a unique tax advantage in Canada—they can deduct more employment expenses than regular salaried employees. But these rules can be confusing, especially if you’re new to tax preparation. This guide breaks everything down step-by-step so you understand exactly what they can deduct, how the T2200 works, and how it flows to the T777.
🚀 Who Counts as a Commissioned Employee?
A commissioned salesperson is an employee who:
Earns income wholly or partly from commissions, AND
Has a T2200 declaring they are required to pay employment expenses, AND
Has commission income reported in Box 42 of the T4.
If Box 42 has an amount → you’re dealing with a commissioned employee.
📌 What Makes Commission Employees Different?
Unlike regular employees, commissioned employees can deduct additional expenses, as long as they: ✔ are required for work, ✔ are not reimbursed, ✔ are listed on a properly completed T2200, and ✔ do not exceed their commission income.
🧩 Understanding the T2200 for Commission Employees
The T2200 is the key to determining what expenses are allowed.
🔍 Key Areas to Review
1️⃣ Vehicle Allowance / Reimbursement
Box 40 may show a taxable allowance (e.g., $600/month).
If the allowance is included in income, the employee can claim vehicle expenses on T777.
2️⃣ Employer Reimbursements
📌 Critical rule: If an employee is reimbursed for an expense → no deduction allowed. The T2200 question “Did you require them to pay expenses for which they did NOT receive reimbursement?” must say YES for a deduction.
3️⃣ Commission Income (Box 42)
This sets the maximum amount of commission-related expenses the employee can deduct.
💼 What Commission Salespeople Can Deduct (Beyond Regular Employees)
Commission employees can deduct everything regular employees can, plus special additional expenses.
🎯 Expenses Regular Employees Can’t Deduct — But Commission Employees Can
Expense Type
Allowed for Commission Employees?
Notes
✔ Advertising & Promotion
Yes
Flyers, online ads, business cards, sponsorships
✔ Meals & Entertainment
Yes (50%)
Must be client-related
✔ Accounting & Legal Fees
Yes
Only if related to earning commission income
✔ Promotional Events
Yes
Conferences, networking functions
✔ Special Supplies
Yes
If used to earn commissions
📌 These expenses can be claimed up to the amount of commission income (Box 42).
📘 Flow to T777: How It Works
The T777 Employment Expenses form divides expenses into two sections:
1️⃣ Section A — Regular Employment Expenses
Examples:
Vehicle expenses
Cell phone
Supplies
Parking
Home office (if allowed)
2️⃣ Section B — Additional Commission-Deductible Expenses
Examples:
Advertising
Promotion
Meals & entertainment
Accounting/legal fees
⚠️ Total of Section B expenses + Section A (if applicable) cannot exceed commission income in Box 42.
📉 Example of the Limitation Rule
If total eligible expenses = $13,500, and commission income = $12,000,
👉 Only $12,000 can be claimed. No carryforward is allowed.
📝 Practical Tips for Tax Preparers
✔ Tip 1 — Check Reimbursements Carefully
If reimbursed → no deduction. Reimbursed expenses must be removed from T777 entirely.
✔ Tip 2 — Confirm Commission Income
Box 42 must match the amount written on the T2200.
✔ Tip 3 — Review Reasonableness
CRA examines commission employees closely because these claims are often large.
✔ Tip 4 — Separate Personal vs Business Expenses
Only the business-use portion is deductible (e.g., cell phone, vehicle).
📦 SEO-Optimized Knowledge Box: Allowed vs Not Allowed
✅ Allowed for Commission Salespeople
Vehicle expenses 🚗
Cell phone 📱
Supplies 📦
Home office (if required) 🏠
Advertising 💬
Meals & entertainment 🍽️
Accounting and legal fees 📑
Promotion and client networking ⭐
❌ Not Allowed
Expenses reimbursed by employer
Personal expenses
Clothing (unless safety-required)
Capital property (e.g., laptops)
💡 Pro Tip Box
👉 Commission employees sometimes think they can deduct unlimited expenses — but CRA strictly limits deductions to the amount of commission income. Make this one of your first checks when reviewing their claim.
🎯 Summary
Commissioned employees have special tax deduction privileges, but they also come with strict rules:
As long as you follow the T2200 carefully and ensure no reimbursed expenses are claimed, you can confidently prepare employment expense claims for commissioned salespeople.
🧩 Dealing With Specific Employment Expenses (CCA, Vehicle, Home Office & More)
Employment expenses can get complicated—especially when you deal with depreciation (CCA), vehicle claims, home office deductions, and special rules for employees vs. commission earners. This section breaks everything down so even a new tax preparer can confidently understand and apply the rules.
🏗️ Capital Cost Allowance (CCA) & Depreciation
CCA allows employees (in limited situations) to deduct the depreciation of certain assets they purchased to earn employment income.
⚠️ Important Warnings
CCA for employees is high-risk and often reviewed by CRA.
❌ High-risk CCA items:
Laptops & computers
Office furniture
Home office equipment
Because these items are usually used both personally and professionally, CRA often questions the deduction, reduces it, or disallows it.
👉 General advice: Avoid claiming CCA for employees unless it is clearly necessary, well-supported, and the T2200 confirms the employee must supply their own equipment.
🚗 CCA on Vehicles (When Allowed)
If an employee purchases their vehicle (instead of receiving an allowance or using mileage reimbursement), they may claim CCA only for the business-use portion.
Vehicle Classes
Vehicle Type
Class
Rule
Passenger vehicle
10.1
CCA capped at $30,000 + GST/HST/PST
Non–passenger vehicle
10
No cap; CCA based on actual cost
📘 Additional Vehicle Rules
CCA must be prorated based on business km ÷ total km.
Terminal losses are not allowed for employment expenses.
Recapture applies only to Class 10 (not 10.1) when the vehicle is sold or traded.
💲 Vehicle Loan Interest (Special Rule)
Employees may deduct up to $300 per month of interest on a loan used to purchase the vehicle.
🚘 Vehicle Expenses Rules (Quick Summary Box)
📌 Employees may claim:
Fuel
Repairs
Insurance
Licence & registration
Leasing costs (up to CRA limits)
CCA (with restrictions)
Loan interest (max $300/month)
📌 ONLY if:
Required by employer (T2200 signed)
Not reimbursed
Used for employment (business km only)
🏠 Home Office Expenses for Employees
Home office rules for employees are similar to those for self-employed individuals—but with stricter limits.
✔ Eligibility Requirements
Home office expenses are allowed only if the employee:
1️⃣ Mainly works from home (more than 50% of the time) OR 2️⃣ Uses the workspace exclusively to meet customers or clients on a regular basis
🧾 What Each Employee Type Can Deduct
👨💼 Salaried Employees (Non-Commission)
Allowed:
Heat
Electricity
Water
Maintenance
Not Allowed:
❌ Mortgage interest
❌ Property taxes
❌ Home insurance
🧑💼 Commission Employees (Box 42 on T4)
They may deduct everything salaried employees can, plus:
✔ Property taxes
✔ Home insurance
Still not allowed:
❌ Mortgage interest
🏡 Special Home Office Rules You MUST Know
❌ Home Office Cannot Create a Loss
If employment expenses fully offset employment income, home office expenses cannot reduce income below zero.
This prevents employees from using home office expenses to offset:
rental income
employment income from a second job
investment income
business income
CRA strictly disallows this.
🔎 Example
If a taxpayer earns $10,000 employment income, and all other allowed expenses = $10,000, 👉 Home office expenses = $0 allowed (because they would create a loss).
📘 Common CRA Review Triggers (Must Know!)
CRA often reviews home office and employment expense claims for:
🚩 Large CCA on computers or furniture 🚩 High vehicle expenses with low employment income 🚩 No T2200 or T2200 with vague answers 🚩 Full-year home office claims for employees who normally work on-site 🚩 Claims made despite employer reimbursements
As a preparer, always keep receipts and mileage logs and ensure expenses match the T2200.
🧰 Handy CRA Resource
CRA’s guide T4044 – Employment Expenses provides official rules and examples for all allowable and disallowed expenses.
💡 Quick Tips for New Tax Preparers
✨ Always check if the employer reimbursed the expense—if yes → NO deduction ✨ Review the T2200 carefully; it dictates what is allowed ✨ For vehicles, prioritize actual km records ✨ Avoid claiming CCA unless absolutely necessary ✨ Home office deductions are usually small—don’t expect large savings ✨ Commission employees have more generous rules, but still no mortgage interest
🏁 Final Summary
Specific employment expenses require careful handling. As a tax preparer, you should:
✔ Understand CCA limits ✔ Know the difference between Class 10 vs. 10.1 vehicles ✔ Apply the $300/month interest limit ✔ Follow strict home office rules ✔ Use T2200 as your primary source of truth ✔ Ensure nothing reimbursed is ever claimed
Mastering these rules ensures accurate returns—and protects clients from unnecessary CRA reviews.
🧾 GST/HST Rebates for Employment Expenses: The Ultimate Beginner-Friendly Guide
Understanding the GST/HST rebate is a must for any tax preparer working with employment expenses. This section breaks everything down in simple language, with practical examples, warnings, tips, and SEO-friendly formatting. If you master this section, you’ll be ahead of most beginner preparers.
💡 What Is the GST/HST Rebate for Employees?
Employees who incur employment expenses (vehicle, cell phone, supplies, etc.) may be entitled to recover the GST/HST they paid on those expenses.
Think of it like a mini input tax credit, but for employees—not businesses.
✔ Claimed using Form T777 – Statement of Employment Expenses ✔ Automatically calculated by tax software when expenses are entered correctly
🧩 When Does an Employee Qualify for the GST/HST Rebate?
Parking (HST may or may not apply depending on provider)
✅ 2. Employer is registered for GST/HST
Most businesses in Canada ARE registered except:
❌ Financial institutions
❌ Certain exempt organizations (e.g., insurance businesses)
❌ Businesses that supply only exempt services
If the employer is not registered → rebate is not allowed.
🗂️ How the Rebate Is Calculated (The Simple Version)
You do not manually separate the GST/HST portion. You simply:
1️⃣ Enter the full amounts of the GST/HST-paid expenses 2️⃣ Put them in the GST or HST columns of the worksheet 3️⃣ Software calculates the rebate for you 4️⃣ The rebate appears on line 45700 of the T1 return
💵 Example:
If the employee paid:
$9,386 in eligible expenses
With applicable GST/HST
Their rebate might look like:
$883 in Ontario (HST province)
$693 in Alberta (GST-only province)
The rebate amount changes based on:
The total expenses
The province
The business-use percentage
📍 Where the Rebate Shows on the Tax Return
On the T1 return, the rebate appears as a:
⭐ Refundable credit → Line 45700 – Employee and partner GST/HST Rebate
This increases the refund or reduces taxes owing.
🔁 IMPORTANT: GST/HST Rebate Is Taxable Next Year
This is where beginners get confused.
👉 The rebate must be added to income in the following tax year It goes into employment income, typically line 10400.
Example:
If the rebate this year is: $883
Next year, you add: +$883 to taxable income
This means the client may pay tax on a portion of that rebate later.
Claiming the GST/HST rebate automatically increases CRA scrutiny.
📌 Why? Because employees who claim a rebate almost always claim:
Vehicle expenses
Cell phone
Supplies
Home office
Commission expenses
These are ALL areas CRA examines closely.
Expect a CRA review letter asking for:
📑 All vehicle expense receipts 📑 Mileage log 📑 Gas & repairs invoices 📑 Cell phone bills 📑 Supply receipts 📑 Proof of business-use percentages
📦 ⚠ Risk Management Box: Should You Claim the Rebate?
Sometimes claiming the rebate costs the client more in the long run or triggers an audit that reduces larger deductions.
❗ When Claiming the Rebate is NOT Worth It:
Client has poor receipts
Vehicle logbook is incomplete
Employment expenses were estimated
Rebate is small (e.g., under $500)
Client is in a high tax bracket (since rebate is taxable next year)
Example: Rebate = $883 Tax next year (approx.) = $350 Net benefit = ~$533 Risk = CRA reduces $9,000 of expenses → could cost the client thousands
✔ When You SHOULD Claim It:
Client keeps perfect receipts
Mileage logbook is strong
Employer is GST/HST registered
Expenses are large & well-documented
Client demands the rebate
Commission employees with high expenses
🧮 GST vs. HST — Which Column to Use?
📍 HST Provinces
Use HST column for:
ON
NS
NB
NL
PEI
📍 GST-Only Provinces
Use GST column for:
AB
BC
SK
MB
QC (uses QST + GST; only GST portion is eligible)
📝 What Types of Expenses Are Eligible for Rebate?
🚗 Vehicle expenses (business-use portion):
Gas ⛽
Maintenance 🔧
Leasing payments
CCA (special handling)
Car washes
Parking (if GST/HST charged)
📱 Cell phone bills:
Only the portion used for employment
GST/HST automatically included in bill
🛒 Supplies:
Stationery
Professional supplies
Tools (where applicable)
📘 Special Note Box: No Rebate on These Items
❌ Insurance (vehicle insurance does NOT have HST) ❌ Vehicle licence & registration ❌ Meal & entertainment expenses ❌ Home office utilities if GST/HST was not charged ❌ Employer-reimbursed amounts
🧑💼 Checklist for Tax Preparers (Must Use!)
Before claiming the GST/HST rebate, confirm:
✔ Employer is GST/HST registered
✔ Client has complete receipts
✔ Mileage log exists
✔ T2200 is properly filled
✔ Expenses are reasonable for their job
✔ Client understands next year’s taxable income increase
💬 Client Conversation Script (Super Helpful!)
“You qualify for the GST/HST rebate, which can increase your refund this year. However, CRA often reviews these claims and may ask for receipts for all employment expenses. The rebate will also be added to your income next year. Your total benefit is likely around $___ after tax. Would you like to proceed or avoid the additional review risk?”
This script helps set expectations and avoids problems.
🏁 Final Summary
The GST/HST rebate is powerful but comes with risks. As a tax preparer, your job is to:
✔ Enter expenses in the right HST/GST columns ✔ Ensure the employer is registered ✔ Know which expenses qualify ✔ Understand that the rebate is taxable next year ✔ Use professional judgment before claiming ✔ Prepare your clients for possible CRA review
Mastering this will immediately elevate your tax-preparer skills—especially with clients who have employment or commission-based expenses.
🧾 Introduction to the Caplans — Marcus & Doreen (Employee + Self-Employed)
This is a practical, beginner-friendly knowledgebase for tax preparers handling a household where one spouse is self-employed (Doreen) and the other is an employee with employment expenses (Marcus). You’ll learn what to collect, how to enter key items into Intuit ProFile, and which client conversations to have — all explained step-by-step for someone who’s never used tax software before. ✨
🔎 Quick snapshot of the case
Doreen: self-employed consultant / graphic designer (Bespoke Marketing). Prepares own bookkeeping; has business statement and prior UCC closing balances (Classes 8, 10, 50). Opted into self-employed EI in prior year. Wants to repay Home Buyers’ Plan (HBP) and made a $10,000 RRSP contribution. Made four quarterly instalments.
Marcus: employee (sales associate at engineering firm). Hybrid work (2 days home, 3 days office). Has a signed T2200 and a list of employment expenses to claim on form T777.
Family: one child (Christopher, age 15) with orthodontic payments split across tax years. Donations to claim. No major medical coverage for braces.
📦 What you must collect before preparing the returns
Doreen’s business statement / bookkeeping spreadsheet (expense list + invoices)
Prior year tax return (to pick up closing UCC balances for Classes 8, 10, 50)
Doreen’s RRSP receipt(s) and HBP balance/NOA showing required minimum repayment
Marcus’s signed T2200 and his employment-expense supporting details (mileage, home-office %, supplies, parking, etc.)
Receipts for orthodontics (dates & amounts), donations, and installments paid (Doreen’s $11,000 ×4)
Any EI self-employed election confirmation (if available)
🚀 Step-by-step: Entering the Caplans’ data in Intuit ProFile (for absolute beginners)
1) Start with client setup
Open ProFile → create new client or open existing client file.
Enter personal info (names, SIN, DOB, address). Double-check DOB for dependants (affects credits).
2) Doreen — Self-Employed (T2125)
Goal: Enter business revenue & expenses, plus CCA/UCC and HBP/RRSP items.
A. Business income & expenses (T2125)
Open the client → choose T2125 (Statement of Business or Professional Activities).
Copy Doreen’s bookkeeping totals into the relevant T2125 fields:
Gross revenue (sales) → “Gross business income”
COGS if any → “Cost of goods sold”
List expenses under the correct categories (advertising, supplies, subcontractors, travel, meals & entertainment (half deductible rules), motor vehicle, rent, utilities, etc.).
Use the Business Statement spreadsheet as your mapping guide — match each row to the T2125 category.
B. Enter UCC / CCA (depreciation)
In ProFile, on the T2125 page find “CCA / UCC” link (often a button or blue field). Click to open the CCA worksheet.
Enter the opening UCC balances for the asset classes from last year (Classes 8, 10, 50). These are the closing balances on last year’s return.
Add any capital purchases during the year in the correct class (cost, date). Enter proceeds on sale if any.
Let ProFile calculate allowable CCA and resulting UCC and any recapture on sale.
C. EI self-employed premium election
In ProFile, look for the self-employment registration options or checkboxes (often under “Other Info” or CPP/EI area on the T2125 or T1).
Enter that Doreen has elected to pay EI premiums — and enter the amount actually paid (if a slip or confirmation exists). ProFile will flow the proper calculation.
D. RRSP contribution + HBP repayment handling
Enter the $10,000 RRSP contribution in the RRSP contributions area (T1 > RRSP section). The RRSP receipt amount should be entered exactly from the slip.
Designate part of that contribution as an HBP repayment:
In ProFile, after entering the RRSP contribution, open the Home Buyers’ Plan (HBP) / HBP repayment worksheet.
Enter the outstanding HBP balance (e.g., $6,600). You may designate up to the required HBP repayment from RRSP contributions.
Example: From the $10,000 contribution, designate $6,600 as HBP repayment — this reduces the outstanding HBP balance and the remaining $3,400 is treated as an ordinary RRSP contribution (eligible for deduction subject to contribution room).
ProFile will show: HBP repaid amount vs. RRSP deduction available. Confirm with client which portion they want as HBP repayment vs. deductible RRSP.
🔔 Important note: You must explicitly designate RRSP contributions as HBP repayments in the software (and via CRA form/process). Otherwise contributions will be treated as regular RRSP contributions.
E. Enter Doreen’s instalments
On the summary/last page of the T1 there’s a field for tax installments paid — enter the four $11,000 instalments (15 Mar, 15 Jun, 15 Sep, 15 Dec). ProFile will net these against tax owing to compute refund/balance.
3) Marcus — Employee with employment expenses (T777)
Goal: Claim allowable employment expenses using T777, relying on a signed T2200.
A. Enter T2200 info
In ProFile, open the T2200 or employment section and attach the T2200 details (employer name, period, and check the boxes for what he was required to pay/perform).
Ensure the T2200 is “signed” (assume signed per case).
B. Enter expenses into T777
Open T777 (Statement of Employment Expenses) in ProFile.
Key categories to enter: motor vehicle (kilometers, business km), supplies, home office (if eligible), parking, travel, meals (50% rules), cell phone (proportion used for employment), uniforms, etc.
For home office: since Marcus works two days a week from home, determine home-office eligibility:
Confirm T2200 indicates required home workspace AND expenses. If the home office was used regularly and continuously over a signifcant period (or is the principal place of work), you can claim a portion of home expenses (utilities, rent, internet, portion of mortgage interest not eligible) — ProFile has fields to compute percentage based on square footage or hours.
Enter total household expenses and the percentage used for business.
C. Why childcare didn’t go to Marcus
Important teaching point: Dividends are not earned income for child care deduction purposes. If Marcus only received dividends (no salary/self-employment income), childcare deduction cannot be claimed by him — explain to client and recommend future compensation restructuring if they want childcare deduction eligibility (see Discussion section below).
4) Orthodontics & medical expenses timing (Christopher)
Issue: Three payments for braces: Sept (2022), Dec (2022), Mar 10 (2023). Total $6,750.
A. Medical expense rules to use strategically
CRA allows medical expenses claimed in a tax return for any 12-month period ending in the tax year. This gives flexibility to include payments across year-end to maximize the total claim in one year.
In ProFile:
Go to Medical Expenses area → add each payment with the date paid and amount.
For the claim, pick the 12-month period that captures the largest total (for example, if March 10, 2023 payment helps reach a higher aggregate within a 12-month window ending in 2023, you might claim the 12-month period Mar 11, 2022–Mar 10, 2023 on the 2023 return, or Sept 1, 2022–Aug 31, 2023 depending on amounts). Choose the period that yields the largest deductible amount.
ProFile will compute the eligible medical expense amount and apply the lower of the threshold (3% of net income or the fixed amount) for the non-refundable credit.
B. Practical beginner tip
Always ask for dates of service and dates of payment. If clinic gives installment schedule, attribute payments to the exact payment dates when entering into ProFile.
5) Donations & other credits
Enter charitable donation receipts in the donation section. ProFile computes federal+provincial donation credit rates and carries forward any unused donation amounts.
✅ Common issues & client discussion points (what to explain to Marcus & Doreen)
HBP repayment & RRSP designation
Explain that Doreen can designate part of her $10,000 RRSP contribution to repay HBP ($6,600 required). The remainder becomes a regular RRSP contribution and may be deductible (subject to contribution room).
EI self-employed election
She elected EI coverage in the past; confirm she still wants it. Paying EI premiums gives access to special benefits but increases current contributions.
Installments
Doreen made $44,000 in instalments. Explain how ProFile nets instalments and may produce refund/amount owing. Keep instalment history for next year planning.
Childcare deduction eligibility
Explain to Scott & Doreen that only the lower-income spouse with earned income can normally claim childcare expenses. Dividends don’t count as earned income. If they want to claim childcare in future years, discuss paying part salary to Scott from the corporation (or a mix of salary + dividends) so he has earned income to claim childcare against.
Marcus’s home-office
Confirm eligibility and documentation for home-office (T2200 supports it). If approved, Marcus can claim a portion of utilities, internet, office supplies. Keep receipts and a simple log of days/hours worked from home.
Orthodontics & medical timing
Explain the 12-month window rule and show how you picked the period that maximizes the medical credit.
🧩 Special Boxes & Pro Tips (copyable checklist)
📌 Quick Checklist before filing
Prior year UCC closing balances entered for Classes 8, 10, 50
Business revenue/expense mapping verified against Doreen’s spreadsheet
RRSP slip entered and HBP repayment designated in the HBP worksheet
EI self-employed election status entered (and premiums)
Marcus’s T2200 entered and T777 fully documented (km log, receipts)
Medical payments entered with exact dates — chosen 12-month period optimized
Donations & instalments entered correctly
💡 Pro Prep Tip: Save a PDF of the T2125 and T777 worksheets before finalizing — those are the pages clients most often want to keep for bookkeeping.
🚨 Common Pitfall: Don’t treat dividends as salary. If client expects benefits tied to “earned income” (childcare deduction, RRSP contribution room for some plans), dividends won’t help. Discuss salary vs dividend split with corporate accountant.
Closing: What to document & next steps with clients
Provide Doreen with a short memo showing:
HBP repayment designated amount and remaining balance
How much of the RRSP contribution is deductible vs. designated HBP repayment
Summary of instalments & expected refund/amount owing
Advise Marcus to keep a daily log of work-from-home days and business km — critical evidence for T2200/T777 claims.
Recommend a simple compensation plan meeting with the corporate accountant if they want to restructure salary/dividend mix (to access childcare deduction/CPP credits).
🧾 Marcus Caplan — Preparing His Tax Return & Reviewing Employment Expenses (Beginner’s Guide)
This section explains, step-by-step, how to prepare Marcus’s T1 return and enter his employment-expense information in Intuit ProFile — written for someone with zero tax software experience. It covers the right/allowed claims, common CRA red flags, practical documentation checks, and the exact ProFile places to enter each item. ✅
🧭 Quick case snapshot (what matters for Marcus)
Marcus = employee (sales associate), hybrid work (3 office days / 2 home days).
Has a signed T2200 (employer form authorizing certain expenses).
Claimed items: vehicle expenses (new 2023 Toyota Camry), parking, stationery, cell phone bills, lunches, small equipment (MacBook/printer/furniture), payment to son for admin.
Important tax issues: home office rules, what employees can/cannot deduct, reimbursements, vehicle CCA rules for class 10.1, and GST/HST rebate eligibility for employment expenses.
✅ High-level rules you MUST remember (short checklist)
Home-office deduction for an employee is allowed only if home is the primary place of work (≥50%) OR the employee has no fixed workplace and must work from home to earn employment income.
Dividends ≠ earned income (relevant for childcare, not Marcus here).
If an employer reimbursed an expense (directly or via allowance that matches receipts), the employee cannot claim it again (unless reimbursed less than actual out-of-pocket).
Employees cannot claim CCA (capital cost) for items unless the T2200 specifically requires them to purchase and use that equipment and no reimbursement exists — even then CRA is strict. Immediate expensing rules for businesses do not apply to employees.
Payments to family members (minors) are highly scrutinized — must be reasonable, documented, and arms-length comparable.
🔎 Read the T2200 with a “fine tooth comb”
Before entering anything into ProFile: open the client’s T2200 and check every question that controls eligibility:
Q10 – Home workspace required?
If box says “Yes” but Marcus only worked at home 40%, home office is NOT allowed (must be ≥50% to be primary place).
Q6 – Will employee be reimbursed?
If “Yes”, the reimbursed categories cannot be claimed (or only the unreimbursed portion).
Q9 – Is an assistant required?
If “No”, then paying an assistant (e.g., son) is difficult to justify as an employment expense.
Write short notes on T2200 fields — these drive what ProFile will allow/should allow.
🖥️ Where to enter items in Intuit ProFile (step-by-step)
A. Personal & Slip data
Open Marcus’s client file.
Enter T4 slip(s): employer, boxes 14, 40, 42, etc. (Box 40 often shows allowances which hint at vehicle/auto allowances.)
B. T2200 / Employment expenses (T777)
In client workspace, add Form T777 (Statement of Employment Expenses).
Click the T2200 link area and attach/enter T2200 answers (this lets ProFile know which categories are allowed).
Fill out T777 sections:
Motor vehicle expenses → opens Auto Worksheet. Enter total km and business km (or best estimate), purchase/lease, insurance, interest paid on car loan, fuel, repairs, parking.
Parking → enter parking fees (allowed if required by employer).
Office supplies / stationery → enter totals with supporting receipts.
Meals / lunches → only allowable when directly related to earning employment income and supported by T2200 — CRA is strict; generally 50% rule applies for business meals.
Cell phone / telecoms → only enter the unreimbursed business portion. If T2200 shows reimbursement happened, leave it out or enter only the shortfall and explain in case notes.
C. Vehicle specifics (Auto worksheet)
Enter: purchase date, total cost ($54,990), business km, total km, interest on loan ($418.30), lease payments (if applicable).
Select vehicle class in worksheet (Class 10.1). ProFile will apply CCA rules and half-year rule where applicable.
Note: For employees, immediate expensing (full write-off) is not available — only allowed for businesses. Marcus as employee gets AIIP (accelerated deduction where applicable) but subject to employee limits. ProFile will show allowable CCA; do not manually override without documenting reason.
D. Home office
If T2200 supports home office AND Marcus meets the “primary place” test, open Business-use-of-home section in T777 and enter area used, total house area, utilities, rent portion, etc. If not primary (e.g., 40% of time), do not enter home office items — ProFile will still let you, but that’s risky. Add a case note why you excluded it.
E. Equipment (MacBook/printer/furniture)
For employees, these are generally NOT deductible (CCA not allowed). Do not put as CCA on his personal return unless T2200 explicitly requires purchase and there is no reimbursement. If in doubt, add detailed explanation in file and confirm with client.
F. Payments to family (son Christopher)
If you enter amounts paid to Christopher, be prepared to:
Create a T4A or include on Christopher’s return as self-employment (if he received a T4A or had to file).
Document the work, hours, rates, and reasonableness (compare to market rates). CRA often disallows payments to minors if not credible.
G. GST/HST rebate (line 457 & form GST370)
If T2200 and job facts make Marcus eligible for the GST/HST rebate for employees, in ProFile set the GST/HST rebate flag to Yes on T777; ProFile fills line 457 and auto-populates Form GST370 fields.
If prior years didn’t claim it, mention possible adjustments/refiles.
📌 Common red flags CRA will review (and how to document to survive audit)
Large payments to minors or family → get signed timesheets, job descriptions, bank transfers, invoices.
Home office < 50% but still claimed → keep daily/weekly logs and employer confirmation if claiming exceptional circumstances.
Cell phone full bills claimed while employer reimbursed → keep itemized call logs and reimbursement receipts showing amounts reimbursed.
MacBook/printer claimed by employee → keep T2200 text requiring purchase and proof employer requires employee to provide own equipment.
Meals/lunches with colleagues — get meeting agendas, attendees, client names, business purpose.
🧾 Practical examples & explanation (so it clicks)
Home office rule applied: Marcus works 3 days in office, 2 days at home ⇒ 40% at home. Tax law requires ≥50% for primary place of work. So home office = not allowable on his T777 (unless exceptional).
Vehicle purchase and class 10.1: Car cost $54,990 ⇒ CCA class limit rules cap deductible portion (e.g., only $34,000 might be eligible for UCC). Employees cannot use new-business immediate expensing; they use AIIP where eligible. ProFile computes allowed CCA automatically when you enter cost and class.
Cell phone: Total $1,866; company reimbursed $788 for business portion ⇒ Marcus can only claim legitimate unreimbursed business portion (if any). If reimbursed in full for the business portion, claim nothing.
✍️ What to put in your client file (must-have documentation)
Signed T2200 (scan and save).
Vehicle km log (or signed declaration of estimate plus supporting trip lists).
Receipts for parking, supplies, small-value purchases.
Proof of equipment purchase, and any written employer requirement for equipment.
Records of any reimbursements (payroll reimbursements, expense reports).
Written job description/reference from employer supporting the need for the expenses (helps in disputes).
🧰 Client conversation points (what to tell Marcus)
Home-office expenses aren’t allowed unless he works >50% at home — consider asking employer to change duties if he wants to qualify.
The MacBook/printer/furniture are unlikely to be deductible as an employee — consider asking employer to reimburse or equip him directly.
Payments to children must be reasonable and documented — otherwise CRA will disallow.
He may be eligible for the GST/HST rebate; ask if prior years should be reviewed for missed claims.
🛡️ Audit-ready final checklist (before filing Marcus’s return)
T4 and T2200 entries match employer documents.
Auto worksheet: total km and business km documented.
Reimbursements recorded and netted from claimed amounts.
No CCA entered for employee equipment unless backed by T2200 and no reimbursement.
Notes in file explaining professional judgements (home office exclusion, family payments).
GST370 / line 457 entries filled if eligible.
✨ Quick pro tips for new preparers
Always capture T2200 answers in ProFile first — they gate what’s allowable.
When in doubt, leave it out and add a client note asking for clarification.
Use ProFile’s worksheet PDFs (Auto, T777) as checklists to ask clients for missing receipts.
Keep a short memo saved in the file explaining any aggressive but defensible position (e.g., reasonableness of a family subcontractor).
Welcome to one of the most practical real-world tax preparation cases — Doreen Caplan, a sole proprietor running Bespoke Marketing. In this case, we’ll explore how to prepare her tax return, accurately complete the T2125 Statement of Business or Professional Activities, and handle common problem areas every tax preparer must learn to identify.
Whether you’re a beginner tax preparer or a small business owner, this guide walks you through the entire process — step-by-step — including how to complete everything in Intuit ProFile Tax Software.
🧾 Step 1: Understanding the Business Income Source
Doreen’s only source of income is from her business, Bespoke Marketing, which means her income and expenses are reported on Form T2125.
In Intuit ProFile, here’s how you start:
Open the taxpayer’s file (Doreen’s return).
Go to the Form Explorer (F4) and search for T2125 – Statement of Business or Professional Activities.
Enter the business name (Bespoke Marketing) and the industry code (for marketing or advertising services).
Input the gross income (total sales or revenue).
💡 Tip: Make sure all income includes any taxable HST/GST if Doreen is registered.
💰 Step 2: Entering Business Expenses (T2125)
Each expense category on the T2125 represents a deductible cost related to operating the business. Here’s a breakdown of how Doreen’s expenses should be entered and reviewed.
📦 Cost of Goods Sold (COGS)
Includes purchases, subcontracts, and materials.
Enter these in the Cost of Sales section in ProFile.
Doreen’s marketing business includes subcontractors and promotional material costs.
🧠 Quick Tip: CRA expects expenses to be reasonable. For example, subcontracting expenses that seem unusually high or paid to family members may be reviewed.
🖇️ Step 3: Office & Administrative Expenses
There are two often-confused categories:
Office Expenses (line 8810) → items like paper, pens, small supplies.
Office Stationery & Supplies (line 8811) → similar items, but CRA allows combining both.
✅ In ProFile: You can merge them into one entry under “Office Expenses” — it’s perfectly acceptable.
💡 Note: “Office expenses” can include small equipment such as computer peripherals, not just stationery.
✈️ Step 4: Reviewing Travel Expenses
Doreen claimed $14,000 in travel, which may sound high. However, since she attends trade shows and marketing events, this is justifiable.
In ProFile, enter this under Travel (line 9200).
⚠️ Red Flag for CRA Review: If travel seems excessive, document the purpose of each trip (e.g., trade show locations, booth rentals, client meetings).
📋 Tax Preparer Tip: Always keep receipts for flights, hotels, meals, and taxis. CRA may ask for proof of business purpose.
🚗 Step 5: Vehicle Expenses & Business Use
Doreen leases a 2021 Kia Forte, paying $585/month. To claim business-use vehicle expenses:
In ProFile:
Go to T2125 → Motor Vehicle Expenses Worksheet.
Enter all actual annual expenses: lease payments, gas, insurance, maintenance, parking, etc.
Enter total km driven and business-use km.
ProFile automatically calculates the business-use percentage.
📊 Example:
Total expenses: $15,465
Business-use: 65%
Deductible portion: $10,052.61
💡 Tip: Always maintain a mileage logbook to justify business-use percentage.
👩👦 Step 6: Payments to Family Members (Subcontracting Issue)
Doreen paid:
$12,000 to her 15-year-old son, Chris.
$9,600 to her husband, Marcus.
⚠️ CRA Caution Zone:
Payments to minors are heavily scrutinized. CRA asks: “Would you pay a non-family 15-year-old the same rate for this work?” Usually, the answer is no — therefore, this expense could be disallowed.
Payments to spouses (like Marcus) may be valid if reasonable and properly documented.
Marcus would need to report the income on his own T2125.
However, since both are in similar tax brackets, there’s no real tax savings.
💬 Pro Advice: Avoid claiming subcontracting payments to family members unless you can justify the amount and show proof of work (e.g., invoices, e-transfers).
💵 Step 7: Owner’s Salary or “Drawings”
Doreen listed a “salary” of $91,000 — but here’s the key fact:
Sole proprietors cannot pay themselves a salary.
Withdrawals from a sole proprietorship are called owner’s draws, not deductible salaries.
In ProFile:
Do not enter this $91,000 as an expense.
You may enter it under Owner’s Drawings (Statement of Capital) — informational only.
Doreen pays tax on the entire business profit, not just what she withdrew.
🧮 Example:
Business profit: $132,806
Amount withdrawn: $91,000
Doreen still pays tax on the full $132,806.
💡 Strategic Note: If she incorporated, she could pay herself a real salary and leave profits inside the corporation taxed at a lower small business rate (about 10–12% in Nova Scotia).
🏠 Step 8: Home Office Expenses
Since Doreen works primarily from home, she qualifies for business-use-of-home expenses.
In ProFile:
Open T2125 → Business Use of Home Worksheet.
Enter the total home area and area used for business.
Streaming services (Netflix, Crave, Disney+) – Not business-related.
Home phone – Generally considered personal unless exclusively used for business.
📦 CRA Audit Tip: Only claim what you can clearly link to earning business income.
🔍 Step 9: Reconciling Profit & Final Review
After entering all allowable expenses, ProFile will automatically calculate net business income (Line 13500).
🧮 Example Summary:
Gross Income: $300,000 (example)
Allowable Expenses: $167,194
Taxable Income: $132,806
This is the amount that transfers directly to Line 13500 of the T1 Return.
📚 Step 10: Final Checks in Intuit ProFile
Before filing: ✅ Verify all entries on T2125. ✅ Review the Business Use of Home Worksheet and Motor Vehicle Worksheet. ✅ Ensure no personal or unsubstantiated expenses are included. ✅ Double-check income transfers correctly to Line 13500.
💡 Pro Tip: Use ProFile’s Review tab to identify CRA red flags, unlinked forms, or missing entries.
💬 Expert Insights for Tax Preparers
🚩 Common Issue
💡 Correct Approach
Paying minor children
Disallowed unless reasonable and provable.
Paying spouse
Must report income; no real tax benefit if in same bracket.
Owner “salary”
Not deductible; record as draw only.
High travel expenses
Keep logs & receipts; CRA reviews reasonability.
Home office costs
Only claim business-use portion.
📦 Quick Reference: CRA’s Reasonableness Rule
“Would you pay the same amount to a non-family person for the same work?”
If the answer is no, it’s usually not deductible.
🧠 Key Takeaways
Always question reasonability of each expense.
Proprietor’s withdrawals are not deductible salaries.
Document everything — CRA focuses on proof and purpose.
Use Intuit ProFile worksheets to calculate business-use portions automatically.
For large profits, consider incorporation for tax deferral and planning flexibility.
🌟 Final Thought
Preparing Doreen’s return teaches one of the most valuable lessons for any tax preparer:
Understanding what’s deductible isn’t just data entry — it’s professional judgment.
Using Intuit ProFile efficiently means not just entering numbers, but knowing why and how they’re reported.
Mastering these steps will help you confidently prepare any self-employed tax return with accuracy, professionalism, and CRA compliance.
💻 Mastering Capital Cost Allowance (CCA) for Small Business Owners | Complete Guide for Beginners
If you’re preparing taxes for a small business owner or self-employed client like Doreen, understanding Capital Cost Allowance (CCA) is non-negotiable! This is one of the most misunderstood — yet powerful — deductions available to reduce taxable business income in Canada.
Let’s break it down in the simplest possible way — and then see how to enter everything step-by-step in Intuit ProFile, Canada’s most common tax software.
🧩 What is Capital Cost Allowance (CCA)?
When a business buys a long-term asset (like a computer, printer, or office furniture), it can’t deduct the full cost in one year. Instead, the CRA allows businesses to claim a portion each year — that’s called CCA.
👉 Think of CCA as tax depreciation — spreading the cost of an asset over several years.
💡 The Concept of “CCA Classes”
Every asset belongs to a class, and each class has its own rate of depreciation.
Common CCA Classes
Description
Rate
Class 8
Office furniture, fixtures
20%
Class 10
Computer processing & electronic equipment
30%
Class 50
Computer equipment and software
55%
Each class is a pool — you don’t track each asset separately. You just keep one total (called UCC, or Undepreciated Capital Cost) per class.
🧾 Example: Doreen’s Business Assets
Doreen has three classes of assets in her business:
💺 Class 8 – Office furniture
💻 Class 50 – Computer equipment
🖨️ Class 10 – Printers and electronic devices
She also bought new assets during the year and sold or replaced a few older ones. Let’s see how a tax preparer handles this in Intuit ProFile.
⚙️ Step-by-Step: Entering CCA in Intuit ProFile
🧮 Step 1: Go to the T2125 Form
In ProFile:
Open the taxpayer’s return.
Navigate to Form T2125 (Statement of Business or Professional Activities).
This is where you’ll record all business income, expenses, and capital assets.
Scroll down until you find the CCA section near the bottom. You’ll see a total CCA amount automatically calculated once the asset info is entered.
💼 Step 2: Open the CCA Worksheet
There are two key worksheets in ProFile for CCA:
T2125 CCA Worksheet – for entering opening balances (the UCC at the start of the year).
T2125 Asset Worksheet – for recording additions (new purchases) and disposals (sales or scrapped assets).
📝 Tip: Opening balances are essential when you take over a new client. You’ll find them on last year’s return in the “Closing UCC” column — that number becomes this year’s Opening UCC.
🪑 Step 3: Enter Opening Balances
For Doreen’s case:
Class 8 (Office Furniture) – Enter the UCC balance carried from last year.
Class 50 (Computers) – Enter the UCC from last year.
Class 10 (Electronic Equipment) – Enter the UCC balance here too.
Once you input these, ProFile automatically populates the corresponding CCA schedule for each class.
🛒 Step 4: Record New Asset Purchases
Example: Doreen purchased new office furniture on June 1 for $6,285.25.
✅ This purchase qualifies as Designated Immediate Expensing Property (DIEP) and Accelerated Investment Incentive Property (AIIP).
That means — Doreen can claim the entire $6,285.25 as CCA this year!
💡 Quick Reminder: DIEP allows immediate write-off for eligible business assets up to a limit ($1.5M shared among associated businesses).
💰 Step 5: Record Disposals (If Any)
Doreen also sold her old desk and chair for $150.
In ProFile:
Go to the T2125 Asset Worksheet under Class 8.
In the “Proceeds of Disposition” column, enter $150.
The CRA rule says:
Report the lower of original cost, proceeds, or fair market value.
Since $150 is clearly lower than the original cost, that’s what we use.
📘 Note: Because Doreen still owns other furniture in Class 8 (like a bookshelf), we don’t calculate recapture or terminal loss. The pool continues.
🖨️ Step 6: Enter Other Asset Classes
Doreen also bought new printers (Class 10) for $1,013.38. Same process:
Add the total purchase in Class 10 as an addition.
No disposals here.
Since this also qualifies for immediate expensing, the full $1,013.38 can be claimed this year.
Then her computer equipment (Class 50) cost $4,298.25.
Record as an addition.
The old laptop was given away (proceeds = $0).
Since there are still other computers in the class, the pool continues normally.
🧾 Step 7: Review the CCA Summary
Now, go to the T2125 CCA Summary screen.
Here you’ll see:
Opening balances
Additions (new purchases)
Disposals
CCA rates
CCA claimed for the year
ProFile automatically applies:
Full write-off for immediate expensing property
Regular depreciation rate for existing balances
Doreen’s total CCA claimed = $13,539, combining all three classes. 🎉
📦 Understanding Pool System & Recapture
📚 Pool System Rule: As long as there’s at least one asset remaining in the class, you don’t calculate recapture or terminal loss when something is sold or scrapped.
📦 Recapture: If the sale proceeds > remaining UCC → you have to add the excess back to income.
💔 Terminal Loss: If all assets in the class are sold → you can claim any remaining UCC as a deduction.
🧠 Key Takeaways for Tax Preparers
✅ Always carry forward last year’s closing UCC as this year’s opening balance ✅ Enter new additions and disposals accurately ✅ Identify whether purchases qualify for Immediate Expensing ✅ Don’t worry about tracking each asset — focus on the class pool ✅ Let ProFile handle the math — just ensure correct data entry!
⚠️ Common Mistakes to Avoid
🚫 Forgetting to enter opening UCC balances when importing new clients 🚫 Claiming immediate expensing on assets that don’t qualify 🚫 Mixing up asset classes (Class 8 vs Class 50) 🚫 Entering proceeds higher than cost
💬 Final Thoughts
Capital Cost Allowance can seem intimidating at first, but once you understand the pool system and how Intuit ProFile handles entries, it becomes second nature.
When preparing a business return like Doreen’s:
Always start with the prior year’s UCC.
Use the Asset Worksheet for new purchases/disposals.
Confirm the total CCA on the T2125 summary before filing.
Done right, CCA can significantly lower taxable business income — giving your client the best tax advantage possible! 💼✨
⭐ Overview of Other Tax Credits & Finalizing the Returns for Doreen & Marcus (Beginner-Friendly Case Study)
Welcome to this comprehensive guide on completing the final steps of Doreen and Marcus’s tax returns! This section covers RRSP & Home Buyers’ Plan (HBP) repayments, donations, medical expenses, CPP/EI for self-employed individuals, and key ProFile software steps — all explained in a simple, practical way for beginners.
🏡 RRSP & Home Buyers’ Plan (HBP) Repayment
The Home Buyers’ Plan allows individuals to borrow from their RRSP to buy their first home. Each year, a minimum repayment is required — but taxpayers can choose to repay more.
✔ Scenario
Doreen contributed $10,000 to her RRSP and wants to apply $6,600 of that toward repaying her outstanding HBP balance.
🔧 How to Enter This in Intuit ProFile
Follow these steps carefully:
Go to “RRSP / PRPP” worksheet
Enter her RRSP contribution: $10,000
Enter her RRSP deduction limit shown on her Notice of Assessment.
Go to “Schedule 7 – RRSP/HBP/LPP”
Enter the minimum HBP repayment (e.g., $1,100).
In the line called “Designated HBP Repayment”, enter $6,600 (the amount she wants applied to her HBP).
ProFile will automatically:
Apply the repayment to the HBP balance.
Deduct the remaining RRSP amount ($10,000 – $6,600 = $3,400) as an RRSP deduction.
📌 Important Note Box
💡 You don’t contact the bank to “repay” the HBP. Repayment is done entirely through Schedule 7 when filing the return.
🎁 Charitable Donations: Who Should Claim Them?
Both spouses can decide who claims family donations — the key is to maximize tax savings.
✔ What to Know
Only donations to Canadian registered charities qualify.
US or foreign donations do not generate tax credits unless specific tax treaty rules apply.
Donations on an employee’s T4 (Box 46)also count.
🔧 ProFile Steps
Open Donations Worksheet under Tax & Credits.
Enter all eligible donation receipts.
Add donation amounts from Marcus’s T4 Box 46 (e.g., $520).
Allocate all donations to Doreen (the spouse with a balance owing) for maximum impact.
❗ Donation Optimization Tip
🟦 Combine all donations under one spouse to benefit from:
Higher credit rate above the first $200
Avoid losing small credits split between spouses
🚫 Not Eligible
GoFundMe contributions
Foreign donations not made to a registered Canadian charity
The US charity amount (ProFile helps by showing a separate box for foreign donations)
🏥 Medical Expenses: Timing Is Everything
Medical expenses are one of the most misunderstood credits.
✔ Key Rule
You can claim medical expenses for any 12-month period ending in the tax year, NOT just January 1 to December 31.
Doreen & Marcus’s Situation
Their child Chris has orthodontic payments:
Payment Date
Amount
Year
Eligible for 2022 claim?
2022
$2,250
2022
✔ Yes
2022
$2,250
2022
✔ Yes
2023
$2,250
2023
❌ No (unless extending the 12-month period into 2023)
🔧 ProFile Steps
Open Medical Expense Worksheet.
Enter expenses for dependants:
Because Chris is under 18, use line 33099 (not 33199).
Choose the 12-month period in the worksheet.
Only enter medical expenses paid within that period.
💡 Strategy Tip
Use this rule to your advantage:
🟩 If next year has more medical expenses, consider NOT claiming them this year → Claiming all 3 orthodontic payments next year may produce a much higher credit.
💼 CPP & EI for Self-Employed Individuals
Self-employed individuals pay both the employee + employer portions of CPP. This is often confusing for beginners — so let’s break it down.
✔ For Doreen (Self-employed)
Total CPP payable: $7,000
½ (≈$3,500) = deductible expense → goes to line 22200
½ (≈$3,500) = non-refundable tax credit
Additional CPP enhancement also generates a tax credit
🔧 ProFile Steps
ProFile calculates CPP automatically based on the self-employment income worksheet.
The deductible portion appears on line 22200.
Credits appear automatically on Schedule 8 / CPP worksheet.
🧾 EI for Self-Employment
Most self-employed taxpayers do not have to contribute to EI. However, if they voluntarily registered for EI benefits in the past, they must continue paying EI premiums.
✔ In Doreen’s case: She previously used a self-employed EI program → she must continue paying.
🔧 ProFile Steps
Go to Schedule 13 – Employment Insurance for Self-Employed Individuals:
Check the box confirming she is registered for EI
EI premiums (e.g., $952.74) will populate automatically
📘 Before filing: Use ProFile’s “Review” button to catch:
Missing amounts
Slips entered twice
Credit optimization suggestions
🎉 Final Thoughts
This case study ties together several important tax skills:
Allocating deductions between spouses
Optimizing credits
Knowing when timing affects eligibility
Understanding self-employed CPP/EI
Navigating ProFile confidently
🏡 Should Doreen Pay Off Her Home Buyers’ Plan (HBP)? Is It Worth It — And What If She Files Late?
Understanding the Home Buyers’ Plan (HBP) is essential for any tax preparer. This section breaks down a real-world scenario involving Doreen, a taxpayer who used the HBP and is now deciding how much to repay — all while dealing with the possibility of a late tax filing.
This guide will help you master: ✨ How HBP repayments actually work ✨ How to advise clients strategically ✨ How Intuit ProFile handles HBP entries ✨ What happens when a return is filed late ✨ How to avoid penalties through smart allocation
Perfect for beginners and those who want to think like a professional tax preparer!
🧩 Understanding the HBP: Repayment Basics
The Home Buyers’ Plan lets a taxpayer withdraw money from their RRSP to buy a home, and then repay it over 15 years.
✔ Key Rules
Each year, the taxpayer must repay a minimum amount (1/15th of the borrowed amount).
If they don’t repay, the required amount is added to taxable income — NOT a penalty or fee.
You can repay more than the minimum, but it’s optional.
Repaying HBP is paying yourself, not the CRA.
💡 Case Study Context
Doreen:
Made a $10,000 RRSP contribution this year
Minimum HBP repayment required: $1,100
Her remaining HBP balance: $6,600
She wanted to repay the full $6,600 this year
She owes taxes if she does this
And she might file late, resulting in penalties
This is where tax planning becomes extremely valuable!
🧠 Should She Repay the Full HBP?
Many taxpayers assume HBP is a debt they must aggressively pay down. But smart tax preparers know: 👉 Sometimes repaying less results in more tax savings and avoids penalties.
Let’s break it down.
⚠️ What Happens If She Repays the Full $6,600?
💥 RRSP Contribution: $10,000
$6,600 allocated to HBP repayment
Only $3,400 left as a tax-deductible RRSP contribution
💥 Result
➡️ She owes $1,069 in taxes ➡️ Because she owes tax, if the return is filed late, she may face:
Late-filing penalties (5% + 1% per month)
Interest on the balance
Possible instalment interest
This is NOT ideal.
⭐ Strategic Move: Reduce the HBP Repayment
Instead of repaying $6,600, what if Doreen only repays the minimum $1,100?
✔ RRSP Contribution: $10,000
$1,100 to HBP
$8,900 becomes her RRSP deduction
✔ Outcome
➡️ Doreen moves from owing $1,069 → to a refund of $1,323 ➡️ Filing late? → NO penalty, because refunds are never penalized ➡️ HBP balance continues to next year (this is fine!)
✨ This is a perfect example of tax planning that saves your client money and avoids stress.
🧮 Pro Tip Box
💙 Rule of Thumb: Always try to put your client in a refund position if they are filing late. A late-filed refund = no penalty.
🛠️ How to Enter This in Intuit ProFile (Beginner Friendly)
Follow these steps:
🟦 Step 1: Enter RRSP Contributions
Open Doreen’s file
Go to RRSP / PRPP Worksheet
Enter:
RRSP contributions: $10,000
Deduction limit from her Notice of Assessment
🟩 Step 2: Go to Schedule 7 (HBP Section)
Inside Schedule 7, locate the HBP repayment area:
Fields to fill:
Minimum required repayment → enter $1,100
Designated HBP Repayment → enter the amount the client chooses
📌 If Doreen repays:
Full amount: enter $6,600
Minimum only: enter $1,100
Any custom amount: enter the chosen figure
ProFile will:
Apply the designated repayment toward the HBP
Automatically adjust the remainder as an RRSP deduction
🟧 Step 3: Watch the Refund/Owing Amount Change in Real Time
ProFile instantly recalculates the tax result.
This lets you:
Adjust the repayment amount
Test outcomes
Find the break-even point
Avoid late-filing penalties
Provide strategic tax advice
🎯 Optimizing the HBP Repayment
Once you understand the software and the tax rules, you can guide your client through different repayment scenarios.
✔ Example Adjustments
Try these inside ProFile’s Schedule 7:
Repay $3,000 → refund drops but still positive
Repay $4,000 → refund becomes small but safe
Repay $4,200 → she begins owing again
Your goal: 💡 Find a repayment amount that keeps the client in a refund or near-zero owing position.
This is exactly how professionals add value.
🛑 What If She Files Late?
1️⃣ If Doreen owes money
➡️ She faces late filing penalties ➡️ Interest on the balance ➡️ Possible instalment interest ➡️ Penalties compounded if she filed late before
2️⃣ If Doreen is in a refund position
➡️ NO penalty ➡️ NO interest ➡️ Safe to file late
⭐ Smart Strategy:
Adjust HBP repayment to get her into a refund position.
📘 Advice You Can Give Clients
✔ HBP is not like a loan — repayment is flexible ✔ Only repay the minimum if cash is tight ✔ Never put yourself into a balance owing if filing late ✔ You are “paying yourself,” not the CRA ✔ Repay more only when it makes sense for cashflow or planning
🎉 Final Thoughts
This case study teaches a powerful lesson: Knowing tax rules + knowing ProFile = better results for your clients.
As a tax preparer, you should always:
Adjust HBP repayment amounts
Test various refund/owing outcomes in ProFile
Discuss options with your client
Protect them from penalties
Optimize their RRSP deductions
This is how you transition from “filling forms” to professional tax planning.
🏥 Medical Expense Tax Credit Overview and Intricacies (Canada)
Understanding medical expenses is one of the most essential skills for any tax preparer in Canada. This credit helps taxpayers get relief for out-of-pocket medical costs that aren’t covered by insurance or provincial health care. However, while it may seem straightforward, there are many small rules and exceptions that can trip up even experienced preparers.
In this guide, we’ll break down the CRA’s rules, eligible expenses, and smart strategies to help you or your clients maximize their medical expense tax credit. 💡
💊 What Is the Medical Expense Tax Credit?
The Medical Expense Tax Credit (METC) is a non-refundable tax credit. It reduces the amount of federal and provincial tax owed but does not provide a refund by itself.
You can claim medical expenses that:
Were paid by you or your spouse/common-law partner;
Were paid for yourself, your spouse/common-law partner, and dependents (such as children or other family members);
Were not reimbursed by any private or public health plan.
🧾 In simple terms: If you paid out-of-pocket for an eligible medical service, product, or treatment — and you didn’t get reimbursed — it may qualify!
📅 What Period Can You Claim?
You can choose any 12-month period that ends in the tax year, as long as:
You didn’t use the same expenses for a previous year’s claim.
👉 Example: If you’re filing your 2025 tax return, you can claim expenses from Feb 15, 2024, to Feb 14, 2025, as long as the period ends in 2025.
🧠 Pro Tip: Pick the 12-month period that gives you the highest total of eligible expenses, especially if major medical costs happened early or late in the year.
💰 How Is the Credit Calculated?
The claimable amount is:
Total eligible expenses − the lesser of:
3% of your net income, or
a fixed threshold set by CRA (updated yearly).
For example, if your 2025 net income is $60,000, and the CRA threshold for that year is $2,759:
3% of income = $1,800
The lesser of $1,800 and $2,759 is $1,800 So, only expenses above $1,800 are eligible for the credit.
📘 Note: You can claim at both federal and provincial levels, so the savings can add up!
🩺 Common Eligible Medical Expenses
Here’s a list of typical expenses that qualify under CRA guidelines:
Optometrists and opticians for eye exams and prescription glasses
✅ Medical devices & aids:
Hearing aids, CPAP machines, insulin pumps
Artificial limbs, braces, and wheelchairs
Medical alert systems (for safety and emergencies)
✅ Prescribed items:
Prescription drugs and medications
Certain prescribed medical supplies (bandages, catheters, etc.)
✅ Travel for medical treatment:
Mileage, meals, and lodging costs (if the nearest required medical service is more than 40 km away)
Keep all receipts and records! 🚗🧾
✅ Premiums:
Premiums for private health services plans (PHSPs) — such as dental or extended medical insurance
🚫 Commonly Disallowed Medical Expenses
❌ Cosmetic surgery for purely aesthetic reasons (unless medically necessary) ❌ Vitamins, supplements, or over-the-counter medications not prescribed by a doctor ❌ Gym memberships, spa treatments, or general wellness programs ❌ Missed-appointment fees or personal care products (like toothpaste, soap, etc.)
💬 Note: If you’re unsure, check CRA’s official list of eligible medical expenses online — it’s updated regularly.
🧩 Special Situations to Watch Out For
1. Dependents
You can also claim medical expenses for:
Children under 18
Other dependents, such as parents or grandparents (who depend on you for support)
➡️ These dependent claims go on line 33199 of the tax return.
2. Medical Expenses Outside Canada
If you received medical treatment abroad:
The expense can still qualify if the service was performed by a licensed medical practitioner.
Keep official receipts and translations (if not in English/French).
✈️ Example: Getting surgery in the U.S. or dental work in Mexico may be claimable if all documentation meets CRA standards.
3. Attendant Care & Nursing Home Expenses
If a person needs ongoing medical assistance due to a serious illness or disability:
Attendant care (home or facility-based) may be claimed;
Nursing home fees may also qualify, depending on care level.
⚠️ Be careful! You cannot double-claim both attendant care and full disability amount for the same person — choose whichever provides more benefit.
🔍 Researching if an Expense Qualifies
Not sure whether something qualifies? CRA provides an official database of medical expenses. You can visit: 🔗 CRA – Medical Expenses 2025 List
🧭 How to check:
Press Ctrl + F to search by keyword (e.g., “laser eye surgery”).
Read the eligibility note and see if it mentions requirements (like needing a prescription).
Document your findings — this helps when clients ask tricky questions later!
🧠 Smart Tips for Tax Preparers
💡 Tip 1: Keep detailed receipts and prescriptions. CRA often requests proof during reviews. 💡 Tip 2: Combine spouse’s medical expenses on the lower-income partner’s return — this often yields a bigger credit. 💡 Tip 3: Consider long 12-month periods strategically — it can help capture large one-time expenses. 💡 Tip 4: Always separate reimbursed vs. non-reimbursed expenses. Only the unpaid portion qualifies.
📦 Quick Reference Summary
Category
Example
Claimable?
Doctor, Dentist, Nurse Fees
Routine checkup
✅
Cosmetic Surgery
Botox for appearance
❌
Prescribed Medication
Insulin, antibiotics
✅
Vitamins or OTC drugs
Without prescription
❌
Medical Travel (40+ km)
Mileage & meals
✅
Gym / Health Club
Weight loss
❌
Private Insurance Premiums
Extended health plan
✅
🧾 Final Thoughts
The Medical Expense Tax Credit is one of the most overlooked opportunities to reduce tax bills. With a clear understanding of what qualifies — and by maintaining proper documentation — you can help clients maximize their claims confidently and compliantly.
Remember: it’s not just about knowing what counts; it’s about using the rules strategically for each taxpayer’s situation. ⚖️
🧾 Summary of Medical Expenses and the Rules (Canada)
When it comes to preparing personal tax returns in Canada, medical expenses often cause confusion — especially for beginners. While the concept sounds simple (“just claim your medical bills!”), the CRA has specific rules for what can be claimed, how to calculate the allowable credit, and how to document it properly.
This guide breaks down everything you need to know — step-by-step — so you can file medical expenses accurately, confidently, and efficiently. 🌟
🏥 Where Medical Expenses Are Claimed
Medical expenses are claimed on your T1 General Return, specifically on Schedule 1, under these key lines:
CRA Line
Description
Line 33099
For yourself, your spouse/common-law partner, and dependent children under 18
Line 33199
For other dependents (like parents or grandparents)
Line 33200
Calculates the final Medical Expense Tax Credit (METC)
📘 Note: Most tax software (like ProFile, UFile, or TaxCycle) will automatically populate these lines when you input the expenses into the medical expense worksheet.
📅 The 12-Month Claim Period Rule
One of the most misunderstood rules in claiming medical expenses is the 12-month period rule.
Unlike many other tax deductions that strictly follow the calendar year (Jan–Dec), medical expenses can be claimed for any continuous 12-month period — as long as that period ends in the tax year you’re filing.
🧮 Example:
If you’re filing your 2025 tax return:
You could claim expenses from Feb 1, 2024 – Jan 31, 2025,
Or May 1, 2024 – Apr 30, 2025, as long as the end date falls within 2025.
💡 Pro Tip: Choose the 12-month period that gives you the highest total medical expenses — this often means combining expenses that fall around the start or end of a year (for example, a long dental procedure split across two years).
💰 The 3% of Net Income Rule
To prevent small medical claims from cluttering returns, CRA requires that only expenses above a certain threshold are eligible for the tax credit.
Here’s the rule:
You can only claim the amount of medical expenses that exceed the lesser of:
3% of your net income, or
a fixed annual amount set by CRA (changes every year).
🧮 Example:
Lisa’s net income = $76,750 3% of $76,750 = $2,302 CRA’s fixed threshold (say, $2,759 for that year) → lesser is $2,302
If Lisa’s total eligible medical expenses are $3,454, then only the portion above $2,302 qualifies:
$3,454 − $2,302 = $1,152 eligible for the credit.
🧠 Key Tip: It’s usually best to claim medical expenses on the spouse with the lower income, since 3% of a smaller income results in a lower threshold, which means more expenses qualify.
🧾 How to Document Medical Expenses Properly
Accurate documentation is crucial — especially if the CRA reviews the claim later.
✅ Best Practices for Recordkeeping:
Keep all receipts, prescriptions, and invoices.
Organize expenses by date — it helps you see which 12-month period gives you the best credit.
Include only unreimbursed expenses (exclude any portion covered by insurance or employer benefits).
Create a summary worksheet (in Excel or your tax software) with totals and brief descriptions.
💡 Pro Tip for Tax Preparers: Use your software’s Medical Expense Worksheet to record totals. This worksheet is an internal document — not submitted to CRA — but it’s valuable if the return gets reviewed.
📦 Why Use a Medical Expense Worksheet?
Many professional tax preparers use a medical expense worksheet for three main reasons:
1️⃣ CRA Review Preparation
If CRA requests verification, you’ll have:
Receipts scanned and organized,
A worksheet summary that ties perfectly to the tax return.
This makes CRA reviews smoother and faster. 📨
2️⃣ Choosing the Best 12-Month Period
If expenses are listed chronologically, you can easily see:
When high-cost medical procedures occurred, and
Which 12-month window yields the highest total claim.
3️⃣ Consistency for Future Returns
Having a worksheet lets you track carryovers, dependent changes, and trends — especially for families with ongoing medical costs.
💡 Optimization Strategies for Medical Expense Claims
If you want to maximize your client’s refund potential, here are a few pro-level strategies every tax preparer should use:
🧩 1. Combine Family Expenses Smartly Combine all eligible family medical costs under the lower-income spouse for better tax savings.
📆 2. Plan Timing for Large Procedures If a costly dental or surgical procedure is scheduled, time it to fall within a single 12-month period to boost claim size.
🧾 3. Track Reimbursements Carefully Only claim the portion not reimbursed by private or provincial insurance.
📋 4. Keep a Digital Folder Encourage clients to scan or photograph all receipts — CRA accepts digital copies if legible.
⚠️ Common Mistakes to Avoid
🚫 Using January–December automatically — you could miss a better 12-month window. 🚫 Claiming for the higher-income spouse — you lose part of the credit due to the 3% rule. 🚫 Forgetting to exclude reimbursed expenses — CRA will disallow double claims. 🚫 Throwing away receipts too early — CRA can request proof up to 6 years later!
📘 Note: Always maintain organized digital records — even if your tax software doesn’t submit them, CRA can ask for verification later.
🧠 Quick Recap Box
✅ Claim medical expenses for any 12-month period ending in the tax year ✅ Only the portion above 3% of net income or the fixed CRA limit counts ✅ Claim under the lower-income spouse for a bigger benefit ✅ Keep detailed records and use a worksheet for CRA review readiness ✅ Organize receipts chronologically to identify the most beneficial 12-month window
🎯 Final Thoughts
The medical expense credit may seem small, but when handled strategically, it can make a significant difference in reducing a taxpayer’s liability. For families or individuals with high medical costs — like dental work, surgery, or ongoing therapy — optimizing this credit is key.
For tax preparers, mastering these rules means two things:
You’ll save your clients hundreds of dollars, and
You’ll gain a reputation for thoroughness and accuracy. 💼
So, keep your calculator handy 🧮, double-check your 12-month period, and make sure your clients get the maximum tax benefit they deserve!
🧍♂️ Medical Expenses for Dependants and Most Common Mistakes
Claiming medical expenses on a tax return can be tricky — especially when it comes to dependants. Understanding who qualifies, where to claim, and how to avoid common mistakes is essential for every new tax preparer.
In this guide, we’ll simplify everything you need to know about medical expenses for dependants — from immediate family to adult dependants like parents or university students — so you can file accurately and confidently. 💼
🏠 Two Main Categories of Medical Expense Claims
When claiming medical expenses, the CRA splits dependants into two categories based on age and relationship.
Line on T1
Who You Can Claim For
Examples
Line 33099
Yourself, spouse/common-law partner, and children under 18
You, your partner, and minor kids
Line 33199
Other dependants (adult dependants)
Adult children in school, parents, grandparents, siblings, nieces, nephews, aunts, uncles (if Canadian residents)
🩺 Remember: The category determines where the medical expenses are entered on the tax return. Entering them on the wrong line can result in CRA adjustments or denial of the claim.
👨👩👧 Line 33099 – Immediate Family
This is the most common category. You can claim medical expenses for:
Yourself 👤
Your spouse or common-law partner 💞
Your dependent children under 18 🧒
If you’re preparing a return for a family of six, all medical expenses for those six family members go under line 33099.
💡 Pro Tip: Always choose the spouse with the lower net income to claim the family’s medical expenses. This results in a higher tax credit because of the 3% of income rule.
🎓 Line 33199 – Other Dependants (Adult Dependants)
This line covers dependants who are not minor children but are still financially dependent on the taxpayer.
You can claim medical expenses for: ✅ Adult children (18+), such as university students who rely on parents financially. ✅ Parents or grandparents who live with you or depend on you for support. ✅ Siblings, aunts, uncles, nieces, or nephews — only if they are Canadian residents and depend financially on the taxpayer.
💵 The 3% Rule for Dependants
Just like with the taxpayer’s own expenses, the CRA applies a 3% threshold to each dependant’s income.
This means:
You can only claim the portion of a dependant’s medical expenses that exceed 3% of that dependant’s net income (line 23600) or the CRA’s fixed maximum amount for the year — whichever is lower.
Example:
Rachel is 20 years old, a university student, and a dependant of her parents, Adam and Lisa.
Her total medical expenses = $1,200
Her income = $7,500
3% of $7,500 = $225
✅ Claimable amount = $1,200 − $225 = $975
If Rachel had no income, Adam and Lisa could claim the full $1,200.
📘 Note: The dependant’s income information must be entered accurately in the tax software. If not, the CRA will adjust the return during review.
🇨🇦 Who Qualifies as a Dependant?
The CRA defines “other dependants” for medical expenses under line 33199 as:
👵 Parents or grandparents (including in-laws) 👨👩🦱 Adult children (18 or older) 👩👦 Brothers, sisters, nieces, nephews, aunts, or uncles
✅ Conditions:
The dependant must be a Canadian resident at any time during the year.
The medical expenses must be paid by the taxpayer claiming the credit.
The dependant must be financially dependent on the taxpayer (for housing, food, or care).
🚫 Not allowed: You cannot claim medical expenses for relatives living outside Canada or for visitors staying temporarily (such as parents visiting from overseas).
🧾 Documentation Tips for Dependants
To ensure accuracy and CRA compliance:
📋 1. Use a Dependant Worksheet
Record the dependant’s full details (DOB, relationship, income).
This helps the software calculate the correct 3% rule automatically.
🧮 2. Organize Receipts by Person
Keep receipts separated by each dependant.
Label them clearly — e.g., “Rachel – 2025 Medical Expenses.”
💾 3. Keep Proof of Payment
Only expenses paid by the taxpayer can be claimed.
If the dependant paid for their own medical costs, the taxpayer cannot claim them.
💡 Example: Claiming for an Elderly Parent
Adam and Lisa’s elderly mother, Rachel, lives with them.
Rachel has an income of $20,000
Her total medical expenses = $2,500
3% of Rachel’s income = $600 ✅ Claimable medical expenses = $2,500 − $600 = $1,900
If Adam or Lisa paid for those expenses, they can claim $1,900 under line 33199.
⚠️ Common Mistakes (and How to Avoid Them)
🚫 Mistake 1: Missing the Dependant’s Income Many preparers forget to input the dependant’s income, causing the CRA to recalculate the 3% threshold incorrectly. ✅ Always complete the dependant worksheet with accurate income information.
🚫 Mistake 2: Claiming for Non-Canadian Residents You can’t claim for relatives who live abroad or are visiting temporarily. ✅ Ensure the dependant is a Canadian resident at some point in the tax year.
🚫 Mistake 3: Claiming the Full Amount Instead of Above-Threshold Portion Claiming all medical expenses without subtracting 3% of the dependant’s income will trigger a CRA adjustment. ✅ Apply the 3% rule before finalizing the claim.
🚫 Mistake 4: Not Transferring Expenses to the Right Person Often, elderly dependants claim their own medical expenses when they should be claimed by their supporting family member. ✅ Ask clients about any dependants living with them and determine who benefits most from the credit.
🚫 Mistake 5: Missing the Split Between Line 33099 and 33199 All dependants’ medical expenses should be categorized correctly. ✅ Use line 33099 for self/spouse/children under 18 and line 33199 for all other dependants.
🧠 Quick Recap Box
✅ Key Rule
Explanation
Claim on correct line
Line 33099 → immediate family; Line 33199 → other dependants
3% rule applies
Subtract 3% of each dependant’s income (or CRA max)
Must be Canadian resident
No claims for non-residents
Must be financially dependent
You must have paid their medical costs
Best claimed by lower-income spouse
Maximizes tax credit benefit
🩺 Pro Tips for Tax Preparers
💡 Ask the Right Questions:
“Do you have any elderly parents, adult children, or relatives who depend on you financially?”
This simple question can uncover missed medical expense credits and increase client refunds.
💡 Coordinate Between Family Returns: If parents and adult children use different accountants, verify who is claiming which expenses — to avoid double claims or missed credits.
💡 Use CRA’s Online Eligibility Tool: CRA provides an online list of eligible medical expenses and dependants. Bookmark it for quick reference.
🎯 Final Thoughts
Mastering the rules for medical expenses and dependants is one of the most valuable skills for a tax preparer. Getting this right can help clients with families, elderly dependants, or students save hundreds of dollars every year.
When in doubt: ✅ Confirm who paid the expense, ✅ Verify the dependant’s income, ✅ Choose the correct claim line — and your client’s return will be CRA-ready and audit-proof. 🧾✨
🧮 Putting Medical Expenses on the Lower-Income Spouse Is NOT a Rule
Medical expenses are one of the most misunderstood tax credits for beginners — especially when it comes to which spouse should claim them. A common myth says: “Always put medical expenses on the lower-income spouse.” ❌ Wrong. That’s not a rule. ✅ It’s merely a general guideline — and often leads to mistakes.
This section will teach you how to properly decide who should claim medical expenses, with examples, tips, and the most common pitfalls to avoid.
🧠 Why Do People Think the Lower-Income Spouse Should Claim Them?
Medical expenses require a reduction called the 3% rule:
👉 You’re only allowed to claim medical expenses minus 3% of net income, or the annual CRA maximum (whichever is lower).
So logically:
Lower income = lower 3% threshold
Lower threshold = bigger claimable portion …so the intuition is: lower-income spouse = better tax credit.
But this works ONLY if the lower-income spouse actually has enough tax payable to use the credit.
🚨 Why the “Lower Income Spouse Rule” Can Backfire
Let’s break it down.
🔍 Non-refundable tax credits can’t create a refund by themselves
Medical expenses are a non-refundable tax credit.
👉 This means you can only reduce tax that someone already owes. 👉 If the taxpayer owes little or no tax, the medical expense credit becomes useless.
📌 Example Scenario:
Imagine two spouses:
👤 Spouse A (Adam)
Net Income: $14,340
Tax Payable: Only $30
👤 Spouse B (Lisa)
Net Income: $113,000
Tax Payable: A lot more
Medical expenses for the year: $3,454
❗ Mistake: Claiming on the lower-income spouse (Adam)
If the medical expenses go on Adam:
His 3% threshold is very low
He appears to get a bigger eligible amount BUT…
💥 He only owes $30 in tax. 👉 So the maximum benefit = $30 Everything else is wasted!
✔ Correct Approach: Claiming on the higher-income spouse (Lisa)
If the medical expenses go on Lisa:
Her 3% threshold is higher
Claimable amount appears smaller BUT…
💰 She owes a lot of tax, so she can use the full credit. 👉 Result: Much bigger tax savings for the family.
💡 Key Rule: Medical Expenses Should Go Where the Tax Benefit Is Highest
There is no rule that medical expenses must go on the lower-income spouse.
The only rule is:
✔ Put medical expenses on the spouse who results in the highest overall tax refund or lowest combined tax payable for the family.
This could be:
The higher-income spouse
The lower-income spouse
Or even switching year to year
📘 How to Decide Who Should Claim the Medical Expenses
Follow this simple decision process:
🟦 Step 1: Calculate 3% of each spouse’s net income
Lower income = lower threshold
Higher income = higher threshold
🟦 Step 2: Check each spouse’s tax payable
Ask:
Does this spouse owe enough tax to actually use the credit?
If their tax payable is near $0, avoid claiming medical expenses on them.
🟦 Step 3: Run a “combined tax result” comparison
This is one of the most important steps professionals take:
👉 Pretend the medical expenses are claimed by Spouse A — check total family tax. 👉 Then pretend they are claimed by Spouse B — check total family tax.
Whichever scenario gives the biggest benefit — that’s the winner.
🧊 ❗ COMMON MISCONCEPTIONS
❌ Myth: Medical expenses must be on the lower-income spouse
✔ Truth: They should be claimed where they create the biggest family benefit
❌ Myth: Medical expenses always give a refund
✔ Truth: They only reduce tax you already owe
❌ Myth: If one spouse has $0 tax payable, the medical credit helps
✔ Truth: Non-refundable credits help only if tax is owed
📦 Pro Tip Box: 💡 When Lower-Income Spouse Does Make Sense
Lower-income spouse IS usually the better choice when:
They still owe a decent amount of tax
Income is modest but not too low
They can fully use the credit
Their 3% threshold is significantly smaller than the higher-income spouse
👉 But ALWAYS test both spouses — never assume.
🚀 Final Advice for New Tax Preparers
As a beginner, always remember:
⭐ There is NO automatic rule.
⭐ Medical expenses MUST be optimized manually.
⭐ Always test both spouses before filing the return.
This simple practice will help you:
Avoid CRA adjustments
Maximize refunds for every client
Build professional confidence
Stand out as a knowledgeable preparer
👵👴 Often Overlooked: Splitting Medical Expenses — Especially for Seniors
Medical expenses are one of the most flexible—and most misunderstood—non-refundable tax credits. Most beginners know you can claim medical expenses for yourself, your spouse, and dependants. But many new tax preparers have no idea that spouses can split medical expenses for a better tax refund.
This is especially powerful for senior couples, where:
Both have low income
Both have high medical expenses
Both owe some tax, but not much
Optimizing every dollar can significantly increase the combined refund
Let’s break down this often-overlooked strategy so you can confidently apply it for clients and maximize their tax savings.
💡 What Most People Don’t Realize: Medical Expenses Can Be Split
There is no rule that all medical expenses must be claimed by one spouse.
Yes — you can split them. Yes — you can optimize them. Yes — CRA fully allows it.
👉 This strategy is most useful for seniors, who often have:
Prescription costs
Dental work
Assistive devices
Physiotherapy
Mobility equipment
Long-term care fees
…and usually both spouses have expenses.
🎯 Why Splitting Medical Expenses Works
Medical expenses are limited by the 3% rule:
✔ You can claim eligible medical expenses minus 3% of your net income (or the annual max).
Now consider:
If both spouses owe tax, both can benefit from claiming a portion of medical expenses.
If one spouse’s income is slightly higher, their 3% threshold is slightly higher too.
Strategic splitting allows each spouse to maximize the amount they can use to reduce their own tax.
🧮 Example simplified:
Spouse
Net Income
3% Threshold
Tax Payable
Adam
$16,800
$504
Owes some tax
Lisa
$17,800
$534
Owes some tax
If medical expenses are high (e.g., $5,400+):
Giving all expenses to one spouse may not yield the best result.
Splitting them (e.g., 75% to Lisa, 25% to Adam) may reduce taxes for BOTH.
The combined refund becomes larger than either spouse claiming 100%.
🔍 The Core Technique: Calculate the Combined Refund
To optimize medical expenses:
Test 100% on Spouse A
Note the combined refund for the couple.
Test 100% on Spouse B
Note the combined refund again.
If both owe tax → Try splitting
e.g., 90/10
Then 80/20
Then 70/30
Continue until you reach the highest combined refund.
This is what professional tax software does — but even without software, you should understand how it works.
📦 PRO TIP BOX: Why This Matters for Seniors 👇
Many senior couples:
Have fixed incomes
Pay small amounts of tax each
Have large medical expenses
Often rely on refunds to help cash flow
👉 Optimizing these credits can result in hundreds of extra dollars.
👉 Many accountants miss this entirely, leaving money on the table.
🔥 Example of How Splitting Helps
If you claim all expenses on one spouse:
Spouse A’s tax may drop to $0
But Spouse B still owes tax
Result = decent refund, but not optimal
If you split:
Part of the expenses reduces Spouse A’s tax to $0
The rest reduces Spouse B’s tax
Result = a higher combined refund than either claiming alone
💰 Real outcome seen in many scenarios:
100% claimed by one spouse → ~$600 refund
75/25 split → ~$770 refund
That’s $170 more — simply by splitting correctly.
📘Common Mistakes to Avoid ❌
❌ Mistake 1: Believing medical expenses must go on one spouse
👉 Wrong — you can legally split them.
❌ Mistake 2: Always putting them on the lower-income spouse
👉 This often leads to lost credits, especially among seniors.
❌ Mistake 3: Ignoring combined tax results
👉 Always view the couple as a single tax unit.
❌ Mistake 4: Not experimenting with splits
👉 You may be missing a bigger refund.
🧊 Key Takeaways (Print This!)
📌 Medical expenses can be split between spouses 📌 Seniors benefit the most from splitting 📌 Always calculate which distribution gives the highest combined refund 📌 Low-income seniors with high medical bills often leave money on the table 📌 There is no rule requiring all expenses to be claimed by one spouse 📌 Optimizing medical expenses is a high-impact skill every tax preparer should master
Where to Find Information on What’s Allowed as a Medical Expense 🩺🧾
Understanding which medical expenses are eligible for a tax credit is one of the most confusing—yet most important—skills for any new tax preparer. Fortunately, the Canada Revenue Agency (CRA) provides a complete and reliable list of all eligible and non-eligible medical expenses.
This section will show you exactly where to find accurate information, how to use it, and what common traps to avoid. This is your go-to reference whenever a client asks: “Can I claim this as a medical expense?”
🌐 CRA’s Official Medical Expense List — Your #1 Source
The CRA maintains a detailed resource called “Eligible Medical Expenses” on their website. This page includes:
✔️ What is eligible
❌ What is not eligible
📝 Items that require a doctor’s prescription
🦽 Items only allowed if the taxpayer qualifies for the Disability Tax Credit (DTC)
🚗 Rules for travel-related medical claims
💊 Rules about medical devices, drugs, equipment, and specialized services
The list is searchable and updated regularly, making it the most reliable source for tax preparers.
🔍 How to Use the CRA List Effectively
The CRA page includes a large A–Z table—often more than 14 pages—covering almost every medical item imaginable.
Here’s how to use it like a pro:
1️⃣ Search for the item
Use your browser’s search function (Ctrl + F) to quickly find the term you’re looking for.
2️⃣ Read the eligibility conditions
Some expenses are eligible but only if:
a doctor provides a written prescription
the taxpayer qualifies for the Disability Tax Credit (DTC)
the medical service is performed by a licensed practitioner
the service meets specific distance or travel rules
3️⃣ Review the “Ineligible Expenses” list
This list is extremely valuable because many commonly assumed medical expenses do NOT qualify.
⚠️ Common Items That People Think Are Eligible (But Are NOT)
⛔ Gym/Fitness Club Fees Even if recommended by a physiotherapist or used for rehab.
⛔ Vitamins & Supplements All vitamins are non-eligible except Vitamin B12, and ONLY if prescribed by a doctor.
⛔ Blood Pressure Monitors Surprisingly, some home devices are not eligible unless tied to specific medical needs.
⛔ Over-the-counter medication Even if medically necessary, they must have a doctor’s prescription to qualify.
⛔ Health club memberships, weight-loss programs, spa treatments Not eligible unless tied to a specific eligible medical condition with documentation.
🟦💡 NOTE BOX: Items That Become Eligible ONLY With a Prescription
Some items are eligible only when accompanied by a prescription. Examples:
Compression stockings
Vitamin B12
Medical devices for certain conditions
Specialized footwear
Certain medical supplies
➡️ Always request supporting documents for high-dollar medical claims.
🧭 Travel-Related Medical Expense Rules
Medical travel is another area with many misconceptions. Here are key highlights:
🚫 Trips less than 40 km (one way) → Not eligible
✔️ Trips 40 km to 80 km → Eligible for travel costs only
✔️ Trips over 80 km → Eligible for travel, meals, and accommodations
Documentation is important, including:
Dates
Purpose of travel
Distance
Receipts
Travel-related medical expenses have many details — always verify them on the CRA page.
🟧📌 PRO TIP BOX: Always Verify — Never Assume
Even experienced tax preparers come across unusual medical claims. If you are unsure:
👉 Look it up on the CRA Eligible Medical Expenses list 👉 Check if a prescription is required 👉 Check if the Disability Tax Credit is needed 👉 Review the “Not Eligible” section for clarity
This is the exact process professional tax preparers use.
🧠 Why This Matters for Tax Preparers
Mastering where to find reliable medical expense information helps you:
Avoid costly mistakes
Maximize refunds for clients
Prevent CRA reassessments
Build credibility as a knowledgeable tax preparer
Confidently answer client questions
This is a core skill in personal tax preparation — and it comes up every single tax season.
🎯 Final Takeaway
The CRA’s Medical Expense List is the ultimate, always-correct, always-updated source for determining medical expense eligibility.
Whenever you’re unsure, do what experts do: 👉 Go directly to the CRA page and look it up.
It’s simple, it’s clear, and it ensures you’re giving clients the most accurate advice.
Example of Research Using Common Questions and Finding Accurate Medical Expense Answers 🔍🩺
When preparing tax returns, clients will constantly ask whether certain medical items, devices, or services qualify for the Medical Expense Tax Credit (METC). As a tax preparer, your job isn’t to memorize thousands of medical items — it’s to research them correctly.
This section teaches you a step-by-step research method using real-world examples and shows you how to confidently answer any medical expense question like a pro.
🧭 Step 1: Go to the CRA’s Medical Expense Resource Page
The CRA maintains a complete A–Z list that explains:
🧠 Step 2: Use the Search Tool to Quickly Find Items
Don’t scroll endlessly — simply press:
Ctrl + F (Windows) or Command + F (Mac) Type the keyword (e.g., “CPAP”, “travel”, “compression stockings”).
This instantly highlights the item and saves you time.
💡 Real Research Example: Is a CPAP Machine Eligible?
A common medical question you may hear:
“Can I claim a CPAP machine as a medical expense?”
Here’s how to research it:
1️⃣ Search the CRA medical expense list
Type “CPAP” in the search bar.
You’ll find the item under “breathing devices”.
2️⃣ Click the item name
Each item opens a dedicated explanation page with:
What the item is
Eligibility rules
Prescription requirements (if any)
Notes specific to that device
3️⃣ Cross-check the main A–Z list
The “Assisted Breathing Devices” entry confirms:
✔️ CPAP machines ARE eligible ✔️ No prescription required in most typical cases ✔️ Eligible as long as it is used for medical treatment (e.g., sleep apnea)
Final Answer: Yes, a CPAP device is eligible for the METC.
🟩💡 PRO TIP BOX:
Always cross-check both pages:
The main A–Z list
The detailed item page
This ensures you don’t miss special conditions like prescriptions, DTC requirements, or exceptions.
Understanding Travel-Related Medical Expenses 🚗🍽️🏥
Medical travel is one of the most confusing topics for taxpayers. Here’s how to research it properly.
🔎 Step-by-Step: Researching Travel Expenses
In the CRA’s list, search for:
“Travel”, “Transportation”, “Meals”, or “Accommodation.”
You’ll land on a section outlining all rules in detail.
🧳 Key Eligibility Rules for Travel
🚫 1. Travel less than 40 km (one way)
Not eligible — no exceptions.
🚗 2. Travel between 40 km and 80 km
Eligible for:
Transportation (car mileage, bus, taxi, etc.) BUT you must meet conditions:
✔️ Substantially equivalent medical services were NOT available closer to home ✔️ Travel was for necessary medical treatment ✔️ Route taken was reasonable
🛏️ 3. Travel over 80 km (one way)
Eligible for:
Transportation
Meals
Accommodation
Same conditions apply as above.
⚠️ CRA’s Most Challenged Travel Claim:
Many clients travel out of Canada for faster treatment (e.g., go to the U.S. to reduce wait times).
The CRA often denies these claims if:
⚠️ Equivalent medical service was available near the taxpayer’s home — even if the wait time was longer.
Speed or convenience ≠ eligibility.
🟥📌 NOTE BOX: Proof is Critical
For travel claims, CRA may ask for documentation such as:
Doctor’s referral
Distance travelled
Logs or records of trips
Receipts (meals, hotels, transportation)
Proof that service wasn’t available locally
Always advise clients to keep detailed records.
How to use this research method on ANY medical item 🧰
No matter what the question is, follow this process:
1️⃣ Identify the exact name of the item
If unsure, ask the client for the packaging, invoice, or description.
2️⃣ Search it on the CRA list (Ctrl + F)
Look for a matching or similar term.
3️⃣ Open the detailed explanation page
Understand:
Eligibility
Requirements
Prescription needs
DTC requirements
4️⃣ Cross-check with related categories
For example:
CPAP → “Breathing devices”
Wheelchairs → “Mobility devices”
Vitamins → “Vitamins and supplements”
5️⃣ Give a confident, documented answer
This ensures accuracy and protects your client during CRA reviews.
🔮 Bonus: Typical Questions You Can Research the Same Way
Here are common real-world questions you’ll encounter:
“Are air purifiers eligible?”
“Can laser eye surgery be claimed?”
“Can I claim my therapy dog?”
“Are fertility treatments eligible?”
“Are dentures covered?”
“Can I claim parking fees for hospital visits?”
Each of these is listed in the CRA A–Z medical expense index.
You don’t need to memorize the answers — 👉 You just need to know how to research them.
🎯 Final Takeaway
Being a great tax preparer doesn’t mean memorizing every medical expense. It means knowing how to find the correct answer in minutes using reliable CRA tools.
Once you master this research technique, you’ll be able to confidently answer almost any medical expense question clients bring to you.
🩺 Two or More Resources That Will Help You With Medical Expense Research
Understanding medical expenses can feel confusing at first — especially for beginner tax preparers. But the good news is that the Canada Revenue Agency (CRA) provides two powerful, trustworthy resources that make medical-expense research simple, accurate, and professional.
This section gives you a beginner-friendly, exam-ready, and practice-ready guide to the top resources used by tax professionals across Canada.
📘 1. CRA Income Tax Folio S1-F1-C1 — Medical Expense Tax Credit (METC)
This is the most detailed and technical guide available for medical expense rules. If you ever get stuck wondering “Is this really a medical expense?”, the folio is your best friend.
⭐ What this folio helps you understand
What qualifies as a medical expense (in full detail)
Special circumstances, exceptions, and rare cases
Travel and transportation rules
Rules for medical devices and equipment
Situations that fall into “grey areas”
Specific examples that help you make correct decisions
📌 Why it’s important for tax preparers
Clients often have unusual medical expenses:
Special wheelchairs
Travel to another city for treatment
Equipment purchased outside Canada
Prescription vs. non-prescription disagreements
Expenses for therapy or medical training
This folio explains exactly what is allowed and why. If you want to be confident and accurate — this is the resource to rely on.
📝 PRO TIP: Use the folio anytime a client’s medical expense is NOT a typical dentist/doctor/pharmacy claim.
📦 NOTE BOX — Why this folio matters This is one of the CRA’s most detailed technical documents. It is updated regularly and is the same resource used by professional accountants, auditors, and CRA agents.
🧑⚕️ 2. CRA List of Authorized Medical Practitioners by Province/Territory
Not every health professional counts as an “authorized medical practitioner.” This is where many beginners make mistakes.
This CRA list shows exactly which practitioners are eligible in each province.
🎯 Why this matters
Just because a practitioner is legit doesn’t mean they qualify for medical expenses. Different provinces have different rules.
🧭 Examples
Acupuncturists — allowed in some provinces (e.g., Alberta & Ontario) but NOT in others.
Traditional Chinese Medicine Practitioners — accepted only in certain provinces.
Massage therapists — may not always qualify.
Naturopaths — varies across Canada.
If the province doesn’t recognize that practitioner → the medical expense claim will be denied.
📝 PRO TIP:
Always check this list when a client submits receipts from:
Acupuncture
Massage therapy
Natural/alternative medicine
Traditional Chinese medical treatments
Specialized therapists
📦 NOTE BOX — Game Changer for New Tax Preparers Many rejected medical expense claims happen because the preparer did NOT check if the practitioner was authorized. Always verify before claiming.
🧭 How These Two Resources Work Together
To determine whether you can claim a medical expense:
Check if the practitioner is authorized in the province
Check the folio to see if the service/product qualifies
Confirm that the client has proper documentation or receipts
This ensures your claim is correct, defensible, and audit-proof.
💡 Final Takeaway for Tax Preparers
These two resources are essential for building confidence with medical expense claims. They help you:
Avoid costly mistakes
Give accurate advice
Handle complex client questions
Build professional-level knowledge while staying beginner-friendly
Using them regularly will make you feel like a seasoned pro — even if you’re just starting out.
🏥 Sorting Through the Maze of Medical Expenses for Nursing Homes
Medical expenses related to caregiving, nursing homes, and assisted living are one of the most complicated areas of Canadian personal tax. If you’re a beginner tax preparer, this section will walk you through everything you need to know — in a simple, friendly way — so you can confidently help clients who are elderly, disabled, or receiving care.
This is your ultimate guide to understanding attendant care, retirement homes, nursing homes, and how these interact with the Disability Tax Credit (DTC). Let’s break it down step-by-step. 💡✨
🧑🦽 What Are Attendant Care Expenses?
Attendant care expenses are fees paid to someone who helps a person with daily personal tasks they cannot do themselves.
Examples of tasks:
Bathing 🛁
Dressing 👕
Feeding 🍽️
Mobility support 🚶
Housekeeping, meal prep, laundry
These services are usually provided to:
Seniors
Individuals with disabilities
People needing help after injury or illness
👥 Who Can Be Paid for Attendant Care?
To qualify as a medical expense: ✔ Must be an adult (18+) ✔ Cannot be the person’s spouse or common-law partner ✔ Must have their SIN (Social Insurance Number) on the receipt ✔ Can be full-time or part-time support
Examples of eligible caregivers:
Nannies
Professional caregivers
Personal support workers
Care agencies issuing T4 slips
🩺 Who Must Certify the Need for Care?
To claim attendant care, one of the following must be true:
1️⃣ The person is approved for the Disability Tax Credit (DTC) (Form T2201) OR 2️⃣ A medical practitioner certifies in writing that the person needs help with day-to-day living due to a physical or mental condition
📦 NOTE BOX — Common Scenario Seniors often do not qualify for the Disability Tax Credit. But if a doctor certifies they need help with daily living (walking, feeding, etc.), their attendant care can still be claimed.
🏡 Nursing Home vs. Retirement Home — Know the Difference
This is where beginners get confused. But knowing this difference is critical because the tax rules depend on it.
🏥 NURSING HOME (24/7 full-time medical care)
A nursing home provides round-the-clock nursing and medical supervision.
✔ You can claim the entire amount paid as medical expenses:
Rent
Meals
Administrative fees
Maintenance
Medical care
Support services
🟩 Everything is eligible because the person is there for medical reasons.
🏠 RETIREMENT HOME / ASSISTED LIVING (part-time support)
A retirement home is for people who are mostly independent but need some support.
❌ You cannot claim the full rent. ✔ You can only claim the medical-related portion.
The annual statement from the retirement home usually breaks expenses into:
Medical staff wages 👩⚕️ (eligible)
Medications 💊 (eligible)
Administrative salaries (not eligible)
Rent, food, utilities (not eligible)
📦 NOTE BOX — Important Tip You must request the year-end statement from the retirement home. It tells you exactly what portion is eligible for medical expenses.
🧓 Claiming Nursing Home or Attendant Care for Dependants
Clients often pay for their parents or grandparents who live in a care facility.
✔ A person can claim these expenses for:
Themselves
Their spouse
Their dependant parent or grandparent
The dependant must:
Rely on them for support
Have medical documentation or DTC approval
Have expenses actually paid by the claimant
💸 What Can Be Claimed as Attendant Care Services?
Examples of eligible expenses:
Housekeeping
Laundry
Meal preparation
Feeding assistance
Bathing and personal hygiene
Transportation for medical purposes
Examples of ineligible expenses:
Rent in a retirement home
Food
Cleaning supplies
Recreational activities
⚖️ Disability Tax Credit vs. Care Expenses — You Often Must Choose
This is the most misunderstood rule!
You usually cannot claim: ❌ Both the Disability Tax Credit and full attendant care ❌ Both the Disability Tax Credit and full nursing home fees
You must choose whichever gives the bigger tax benefit.
🔀 The 3 Main Options for Someone in a Nursing Home
As a tax preparer, you must choose the option that gives the largest deduction:
🟦 OPTION 1 — Claim only the Disability Tax Credit
Best when: ✔ Nursing home fees were small (e.g., person moved in late in the year)
🟩 OPTION 2 — Claim the full nursing home fees
Best when: ✔ The person lived in the home most of the year ✔ The annual cost was high (common for nursing homes)
🟧 OPTION 3 — Claim DTC + up to $10,000 of salaries/wages for attendant care
Best when: ✔ Salaries/wages portion is high ✔ Combining DTC + $10,000 gives a bigger total than full fees
📦 NOTE BOX — Important Rule You can only claim the DTC and the $10,000 attendant care portion if the expense relates only to salaries and wages of care staff.
👨👩👧 Claiming for Parents While They Claim DTC
Another common trap!
If the children claim the nursing home expenses for their parents: ❌ The parents cannot claim the Disability Tax Credit that year.
This rule applies no matter who claims the DTC. It’s always an “either-or” situation.
💡 Final Thoughts for New Tax Preparers
Attendant care and nursing home claims are complex, but they are extremely common with seniors and disabled clients.
To master this area:
✔ Always determine whether the facility is a retirement home or nursing home ✔ Always verify if the person has DTC ✔ Always check what portion of fees is medical vs. non-medical ✔ Always calculate which option gives the largest deduction ✔ Always get receipts and breakdowns from the facility ✔ Always check for doctor certification when needed
This knowledge will make you stand out as a tax preparer and avoid costly mistakes clients often struggle with.