Preparing for the TICO Supervisor/Manager exam means understanding how investigations work and what happens if someone breaks the rules. This chapter will help you learn about proper conduct, investigations, offences, and penalties in a simple, easy-to-follow way.
Conduct: Acting Honestly and Legally
The Travel Industry Act, 2002 and Ontario Regulation 26/05 exist to protect consumers buying travel services from registered travel sellers in Ontario.
As a registrant, you must act with honesty and integrity in everything you do. Proper conduct isn’t just about following some rules—it’s about complying with all the requirements in the legislation. If you follow the law, you’re acting correctly.
The Statutory Director
Known as the Director, appointed by TICO’s Board.
Has special legal powers under the Act.
Not the same as a Registrar or a Board member.
Section 30 of the Act: If the Director sees someone isn’t following the Act or Regulation, they can apply to the Superior Court of Justice for an order to make the person comply. Individuals can appeal these orders to the Divisional Court.
TICO also has inspectors who can check registrants to ensure compliance. If there’s a suspected violation, cases may go to investigators who can officially inquire and possibly lead to charges.
Investigations: How TICO Looks into Violations
Investigators’ Role (Section 19)
The Director can appoint investigators.
Investigators receive a certificate of appointment, which they must show on request.
They are authorized to officially examine potential violations.
Search Warrants (Section 20)
Before entering a non-registrant’s premises, investigators need a search warrant from a Justice of the Peace.
A warrant may allow investigators to:
Enter the premises and examine/seize items listed in the warrant.
Access business computers or data storage.
Use investigative procedures listed in the warrant.
Conditions for Search Warrants
Investigators must believe a person broke the Act or Regulation.
They must also believe evidence is in a building or place.
Special permission is needed to enter private homes.
Key points:
Experts can assist investigators.
Warrants usually allow entry 6 a.m. to 9 p.m. unless otherwise stated.
Warrants expire after 30 days, unless extended.
Police may assist and use reasonable force.
No one can obstruct an investigation or destroy relevant items.
Items in plain view that relate to the violation can be seized.
Seized items must be returned promptly.
Exigent Circumstances (Section 21)
Sometimes investigators may search without a warrant if it’s an emergency.
Police assistance may be used, and reasonable force is allowed.
This does not apply to homes.
Improper Conduct: What Not to Do
The law also lists actions that are considered improper:
Falsifying information or documents related to travel services.
Providing false or deceptive information, or encouraging others to do so.
Making misleading statements in advertisements or publications.
Avoiding these actions is key to staying compliant and protecting consumers.
Penalties for Offences: What Happens if You Break the Law
Section 31 – Offences
A registrant can be guilty of an offence for:
Providing false information on applications or returns.
Failing to comply with orders or directions under the Act.
Breaking any section of the legislation.
Penalties differ for individuals vs. corporations:
Individuals: Up to $50,000 fine, up to 2 years less a day in jail, or both.
Corporations: Up to $250,000 fine.
Corporate officers may also be liable if they didn’t take reasonable care to prevent the offence.
Time Limit:
No prosecution can start more than 2 years after TICO’s Director knew about the violation.
Note: Violating TICO’s Code of Ethics alone is not considered an offence under the Act.
Section 32 – Orders for Compensation or Restitution
Courts may order convicted persons to pay compensation to victims or insurers/Travel Industry Compensation Fund.
Restitution means repairing the loss suffered by another party.
Sections 33 & 34 – Defaulting on Fines
If a fine isn’t paid for 60+ days, the Director can:
Report the default to a consumer reporting agency.
Place a lien on the person’s property.
Once the fine is paid, the lien or report must be removed.
A lien is a legal claim on property until a debt is paid.
Wrapping Up Chapter 10
You’ve now completed Chapter 10 – Investigations and Offences. Understanding investigations, improper conduct, and penalties will help you stay compliant and protect consumers.
Next Steps:
Take the voluntary online quiz on ‘MyTICO’ for this chapter.
Try the voluntary sample exam to test your readiness.
After preparing with quizzes and sample exams, take the final exam to complete your Supervisor/Manager certification.
Good luck! Staying honest, knowing the rules, and understanding penalties will make you a confident and competent TICO Supervisor/Manager.
(TICO Supervisor/Manager Level Study Guide — Chapter 9.1)
When consumers are unhappy with a travel service, TICO (Travel Industry Council of Ontario) ensures there is a fair, transparent process to handle their complaint. This process protects consumers and also gives registrants (travel agencies or wholesalers) a fair chance to resolve issues directly before TICO steps in.
🧭 Overview
TICO’s complaint handling system encourages resolution at the business level first. Only if the issue cannot be resolved between the consumer and the registrant does TICO get directly involved.
Here’s a visual guide to the process:
Step-by-Step Process
Step 1: Consumer Has a Complaint
The consumer experiences a problem or is unhappy with a travel service purchased through a TICO registrant.
Step 2: Complaint to the Registrant
The consumer must first contact the travel agency or tour operator directly to try to resolve the issue.
If the registrant resolves the complaint to the consumer’s satisfaction, the matter is closed.
Step 3: Consumer Approaches TICO
If the consumer is not satisfied with how the registrant handled the complaint, they can contact TICO for help.
TICO will first refer the consumer back to the registrant, giving the business another chance to resolve the issue before TICO intervenes formally.
Step 4: Filing a Complaint with TICO
If the consumer remains dissatisfied, they can file a formal complaint with TICO against the registrant. TICO then starts an official review process.
Step 5: TICO Requests Response from the Registrant
TICO contacts the registrant and requests a written response to the complaint. This letter will reference any applicable laws or regulations under the Travel Industry Act, 2002 or Ontario Regulation 26/05.
The registrant must then provide a detailed, written explanation of their position to TICO.
Step 6: TICO Assesses the Complaint
TICO’s Complaints Staff review all the evidence and correspondence to determine:
Whether the registrant addressed the issue properly
Whether there are any apparent breaches of the Travel Industry Act or its Regulations
Whether the case should be referred to the Compliance Department for further investigation
Step 7: TICO Communicates the Outcome
Once the review is complete, TICO writes to the consumer to explain:
TICO’s findings and position
Any refund or compensation (if applicable)
Whether the file will be referred to the Compliance Department for separate review
After this, the complaint process is complete.
⚖️ Important Notes
TICO’s goal is to ensure that complaints are resolved fairly and consistently.
TICO does not force a registrant to pay compensation unless there’s a proven breach.
TICO may take disciplinary or compliance action if it finds evidence of regulatory violations.
The consumer may still seek civil remedies (e.g., Small Claims Court) if unsatisfied with TICO’s resolution.
📘 Study Tip for the TICO Exam
TICO exam questions about this topic often test your understanding of the order of steps in the complaint process. Memorize the sequence:
TICO’s complaint process gives travel businesses every opportunity to resolve customer problems internally before formal investigation. This ensures fairness for both sides and keeps Ontario’s travel industry accountable and transparent.
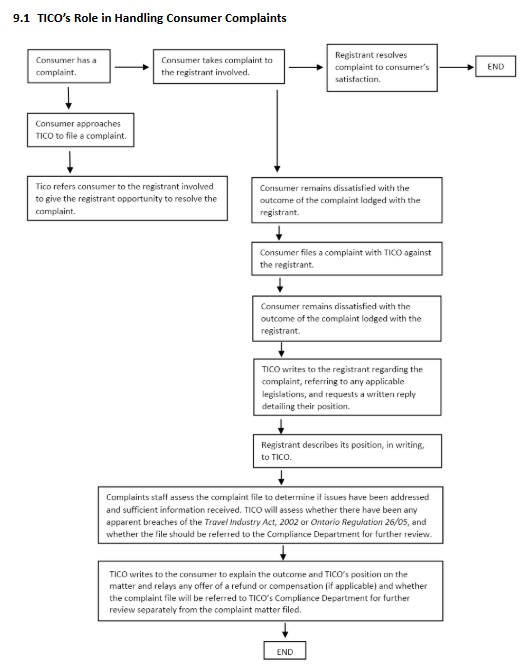
9.1 The Complaint Handling Procedure
TICO has a formal process for handling consumer complaints. Figure 9.1 (below) shows the complaint flow from start to finish. Let’s break it down into clear steps so you can easily remember it for your exam.
Step 1: The Consumer Contacts the Registrant
Before TICO gets involved, the consumer must first contact the travel retailer or wholesaler directly to try to fix the problem.
Consumers are asked to:
Put the complaint in writing.
Explain why they are unhappy.
Suggest how the issue could be resolved.
The complaint must be against an Ontario-registered travel retailer or wholesaler, or someone acting as an unregistered travel retailer in Ontario.
If the registrant resolves the complaint to the consumer’s satisfaction, the process ends here.
Step 2: The Consumer Files a Formal Complaint with TICO
If the problem is not solved, the consumer can then submit a complaint to TICO.
Here’s what happens:
TICO sends the consumer a complaint form.
The consumer fills it out and returns it with supporting documents such as:
Receipts
Tickets
Emails or messages between the consumer and registrant
Photos or other proof
By signing the form, the consumer gives TICO permission to share their information with:
The registrant involved
Other government or non-government sources (if necessary)
Step 3: TICO Requests the Registrant’s Response
Once TICO receives the complaint, it sends a copy to the registrant and asks for a written response. TICO also points out any parts of the Act or Regulation that apply to the issue.
If TICO suspects a possible breach of the law, it may ask the registrant to address specific concerns.
Section 16 of the Act
All registrants who receive a written request for complaint information from the Registrar must respond in writing as soon as possible.
Step 4: TICO Reviews the Complaint
TICO staff carefully review the entire complaint to decide:
Did the registrant respond properly and completely?
Are there any apparent breaches of the Act or Regulation?
Is more information needed (from the registrant or a third party)?
Should the case be referred to Compliance or the Registrar?
Has the registrant offered any compensation or goodwill gesture?
If TICO finds a potential compliance issue, it refers the file to the Compliance Department or Registrar for further review.
⚠️ Important: Even if the Compliance Department gets involved, TICO’s complaint process is separate from compliance actions. TICO does not update the complainant about compliance outcomes.
Step 5: TICO Communicates the Outcome
After TICO finishes its review, the consumer receives a letter outlining:
Confirmation that the registrant responded
A summary of the registrant’s position
Details of any compensation or goodwill offer
Whether the complaint revealed any breaches of the Act or Regulation
References to the specific legal sections that apply
Notice if the file was referred to the Compliance Department
An explanation that compliance reviews aim to fix breaches, not to get extra compensation for the complainant
A reminder that TICO cannot force a registrant to pay compensation or impose a settlement
If the consumer is still unhappy, TICO explains they may choose to:
Pursue legal action (e.g., Small Claims Court)
Consult a lawyer for further advice
TICO also notifies the registrant that the complaint file has been closed.
When Resolution Isn’t Possible
If a complaint cannot be resolved, TICO provides information on other options the consumer can explore, such as pursuing the issue through legal or other dispute resolution channels.
9.2 TICO’s Role in Handling Registrant-to-Registrant Complaints
Usually, TICO does not handle disputes between registrants (such as one agency vs. another). However, there are exceptions — specifically when there are financial or compliance concerns under the Act.
In these cases, TICO’s goal is to protect consumers and the integrity of the industry, not to act as a debt collector.
Example Scenario
Let’s say Registrant A stops working with Registrant B because B issued several bad cheques for travel services.
Registrant A must:
Notify the Registrar in writing
Explain the reason for ending business with Registrant B
TICO may investigate and perform a financial inspection on Registrant B to ensure:
Consumer funds are not at risk
Proper trust accounting is maintained
There is enough working capital
Section 21 of the Regulation
If a registrant stops dealing with another registrant because of apparent financial irresponsibility, they must notify the Registrar in writing and explain the reason.
9.3 Complaints Against TICO
TICO also has a process for handling complaints about TICO itself. These complaints are reviewed by the Governance and Nominations Committee, which is part of the TICO Board.
Committee’s Mandate
The committee ensures that TICO operates with:
Fairness
Transparency
Accountability
Its responsibilities include:
Reviewing and resolving complaints about TICO’s own conduct or service
Recommending improvements to complaint procedures
Setting standards for how complaints are handled
Tracking complaint trends to identify issues
Conduct and Conflicts of Interest
Committee members must act honestly and impartially. If a member has (or may have) a conflict of interest, they must disclose it and withdraw from any related discussions.
Types of Complaints the Committee Handles
The Governance and Nominations Committee looks at complaints such as:
Alleged abuse of process (e.g., unfair targeting or favoritism)
Consumer concerns about TICO not taking proper action against a registrant
Poor service or communication from TICO staff
Alleged breach of TICO’s access-to-information policy
Complaints the Committee Does Not Handle
The committee will not deal with:
Disputes about Compensation Fund decisions
Disputes about Notices of Proposal to Revoke Registration
Claims that the Act or Regulations are unfair or ineffective (unless tied to a specific complaint)
Standard of Review
Each complaint is reviewed based on a set of standards. The committee looks to:
Resolve the issue if possible
Identify broader problems that might need attention
While the committee cannot interfere with the Registrar’s legal duties, it can review how those duties are carried out to ensure fairness and accountability.
🧠 Study Tips for the Exam
Memorize the five main complaint steps (consumer → registrant → TICO → review → outcome).
Remember that TICO cannot force compensation — it ensures compliance, not settlements.
Understand when TICO will or won’t handle registrant-to-registrant complaints.
Know the role of the Governance and Nominations Committee in complaints against TICO.
✅ Summary
TICO’s complaints process is all about protecting consumers and maintaining industry integrity. It encourages direct resolution first, ensures fair review of all complaints, and keeps both consumers and registrants accountable under Ontario law.
Understanding what TICO expects from travel agencies and wholesalers
Managing money and keeping proper records are some of the most important parts of running a travel business in Ontario. TICO wants to make sure every registered travel agency and wholesaler handles their finances honestly and transparently — and that they’re financially stable enough to protect consumers.
This chapter will help you understand:
What financial reports must be submitted
How often they must be filed
Who can prepare them
What happens if the rules aren’t followed
These rules are found under Section 22 of the Regulation.
💼 8.1 Financial Statement and Document Reporting Requirements
Every TICO registrant (that means every travel agency or wholesaler registered with TICO) must file financial statements or a verification statement with TICO at least once a year. The type of document you file depends on how much travel you sell in Ontario each year.
Let’s break this down.
📊 Annual Sales Determine Reporting Type
Annual Ontario Sales
What You Must File
Deadline
Less than $2 million
Verification statement or annual financial statement
Within 3 months (90 days) of year-end
$2 million – less than $10 million
Annual financial statement
Within 3 months (90 days) of year-end
$10 million – less than $20 million (Travel Retailer)
Annual: within 3 months; Quarterly: within 45 days after each quarter
🧾 What’s a Financial Statement?
A financial statement shows how healthy and stable a business is. It must include:
A statement of sales in Ontario
A balance sheet (what the company owns and owes)
An income statement (profit and loss summary)
A cash flow statement (money coming in and going out)
A reconciliation of trust accounts (how customer money is handled)
These statements must be prepared by a Licensed Public Accountant and accompanied by:
A review engagement report, or
An audit report (for larger businesses or as required under the Business Corporations Act)
💡 Review engagement vs. audit: Both are checks done by accountants to make sure the numbers are accurate. An audit provides a higher level of assurance than a review.
🧮 What’s a Verification Statement?
Smaller businesses with less than $2 million in annual sales can file a verification statement instead of full financial statements.
This form (available on the TICO website) must include:
Total assets and liabilities at year-end
Total revenue and expenses for the year
Any other information requested by TICO
The form must be signed and certified as accurate by:
The registrant (if an individual)
A director or officer (if a corporation)
A partner (if a partnership)
By signing, this person is legally confirming that the information is correct.
🕒 Filing Deadlines and Extensions
All financial or verification statements must be filed within 90 days of your fiscal year-end.
The Registrar can grant an extension, but it’s not automatic — it’s at their discretion.
⚠️ Tip for the Exam: The 90-day rule and who signs the verification statement are common test questions!
💵 What Counts as “Sales in Ontario”?
When calculating your sales volume, “Sales in Ontario” means:
For travel retailers: The total amount paid or payable to or through the retailer for all travel services sold in Ontario.
For travel wholesalers: The total amount paid or payable to or through the wholesaler for all travel services sold in Ontario.
This definition is important because your sales volume determines what kind of financial reporting TICO expects.
📘 Key Definitions
Licensed Public Accountant (LPA): A professional licensed under the Public Accounting Act, 2004 who can perform audits or review engagements.
🧠 Summary for Exam Prep
Here’s what you should remember:
All registrants must file either a financial statement or verification statement every year.
$2 million in annual Ontario sales is the main cutoff between verification and financial statement filing.
Deadlines: 90 days after year-end for annual reports; 45 days for quarterly/semi-annual reports.
Prepared by: Licensed Public Accountant (for financial statements).
Verification statements can only be used by smaller agencies under $2 million in sales.
Registrar extensions are possible but not guaranteed.
Financial and Record-Keeping Requirements
Running a travel business in Ontario means keeping your finances organized and transparent. The Travel Industry Council of Ontario (TICO) has specific financial reporting and record-keeping rules that every registrant must follow. These rules help ensure consumer protection and business accountability.
Let’s break down the key financial requirements you’ll need to understand for the TICO Supervisor/Manager Level Exam.
Every TICO-registered travel agency or wholesaler must file financial statements or verification statements every year. The type and frequency of filing depend on your annual sales volume.
Here’s a summary (from Table 8.1):
Sales Volume (Ontario)
Type of Registrant
Reporting Requirements
Filing Deadline
Less than $2 million
Retailer or Wholesaler
Verification Statement or Annual Financial Statements
If the Registrar believes your financial documents don’t give a full picture, they may request additional or consolidated financial documents.
Consolidated financial statements combine the results of:
All the entities under the registrant’s control, and
Any related subsidiary operations.
This helps TICO see the complete financial health of the business.
For example:
If your travel business owns another travel company, both may be combined into one financial report.
If you’re a corporation, you may also need to include financial data from major shareholders.
If TICO Suspects Financial Trouble
If the Registrar believes a business might be in financial difficulty, they can request a written statement of your working capital (or proof that you are exempt from that requirement).
The Registrar may also require that the financial statements or written confirmation be verified under oath (affidavit).
Understanding Working Capital (Section 8.2)
What Is Working Capital?
Working capital shows your business’s ability to pay its short-term debts as they come due. It’s a simple way to measure the financial health of a company.
Here’s the formula: Working Capital=Current Assets−Current Liabilities
In plain words —
Working capital is what’s left after you subtract what your business owes (liabilities) from what it owns (assets) in the short term.
Examples
Current Assets (can be turned into cash within one year): Cash, bank accounts, accounts receivable, and short-term investments like stocks or mutual funds.
Current Liabilities (must be paid within one year): Accounts payable, taxes payable, and short-term loans.
Positive working capital means your business can pay its bills easily — this is what TICO wants to see. Negative working capital means you owe more than you own in the short term — this signals risk.
Section 24 of the Regulation
Under Ontario’s Travel Industry Act, registrants must maintain positive working capital at all times. This ensures your business can meet its financial obligations and protects consumers who book travel through you.
However, not all assets count toward working capital. The following are excluded:
Security deposits from new applicants
Capital belonging to an “interested person” (like shareholders or related companies)
Intercompany receivables or payables (money owed between related businesses)
IATA deposits or credit card processor deposits
Who Is an “Interested Person”?
According to TICO’s definition, an interested person is someone who:
Has a beneficial interest in the business
Controls or influences the business directly or indirectly
Has provided or may provide financing to the business
In short, it’s anyone financially tied to your company who could affect its stability.
Exemptions to the Working Capital Requirement
Some organizations are exempt from maintaining positive working capital if they meet all of the following conditions:
The registrant is a not-for-profit corporation without share capital.
They have a transfer payment or funding agreement with:
The Ontario government (the Crown), or
A municipality.
The agreement is:
For at least one year,
Still in effect, and
Requires the organization to promote tourism in Ontario.
A copy of the agreement is filed with the Registrar.
Any requested additional information is provided within the specified time.
The registrant informs TICO of any changes to the agreement promptly.
These organizations are considered low-risk because they are government-funded and not-for-profit.
Key Takeaways for the Exam
✅ Businesses must file financial or verification statements every year — deadlines depend on sales volume. ✅ TICO can request extra or consolidated financial documents for clarity. ✅ All registrants must maintain positive working capital — assets > liabilities. ✅ Certain government-funded, non-profit organizations are exempt from working capital rules. ✅ The Registrar has the power to demand more documents or verification if financial concerns arise.
Pro Tip: For exam questions, remember this rule of thumb:
“The larger the sales volume, the more frequent and detailed the financial reporting required.”
8.3 Legal Responsibility for Deposits
Reference:Section 25 of the Travel Industry Act
When a travel agency or wholesaler (called a “registrant”) accepts money from a customer, they are legally responsible for that money.
In legal terms, they are “jointly and severally liable.” This means they can be held fully responsible for refunding or repaying customers, even if other parties were involved in handling the money.
However, a registrant does not have to refund the customer if all of these conditions are met:
💰 Money was properly disbursed — The agency paid the correct supplier or another registrant for the travel services.
🤝 Acted in good faith and at arm’s length — The agency acted honestly, fairly, and without close personal or financial ties influencing the decision.
🚫 Did not deal with illegal operators — The other party involved must also be legally registered under the Act.
If all three of these points are satisfied, the registrant is protected from being held liable for a customer refund.
Key Definitions to Remember
Jointly and Severally Liable — You’re legally responsible as both an individual and as part of a group.
Good Faith — Acting honestly and fairly, without the intent to cheat or deceive.
Arm’s Length — Doing business with someone who isn’t personally or financially connected to you.
These terms often appear in TICO exams — make sure you can recognize them and explain what they mean!
8.4 Trust Accounting
Reference:Sections 26 and 27 of the Regulation
Trust accounting is a consumer protection system that ensures customers’ money is kept safe until their travel services are provided.
Under this system, all money received from customers for travel must be placed in a separate bank account called a Trust Account. This money cannot be used for the business’s operating costs — only for paying suppliers, issuing refunds, or transferring earned commissions after the trip is completed.
Purpose of Trust Accounting
✅ Protect customers’ money if a travel agency goes bankrupt or insolvent. ✅ Allow TICO to monitor agencies’ financial health. ✅ Prevent agencies from using customer funds for business expenses.
Requirements for Setting Up a Trust Account
The account must be opened in an approved financial institution in Ontario, such as:
A Schedule I or II bank under the Bank Act (Canada)
A loan or trust corporation
A credit union under the Credit Unions and Caisses Populaires Act, 1994
The account must be in the legal business name of the registrant (for example, “DreamWorld Travel Inc.” and not “John Smith”).
The account must be clearly labeled as a “Travel Industry Act Trust Account.”
Any funds received from customers must be deposited within two banking days of receipt.
All registrants must have at least one trust account, unless exempt under specific conditions.
Two Main Accounts a Travel Agency Operates
🟩 Trust Account
This account holds all customer payments for travel services. Money in the trust account can only be used to:
Pay suppliers of travel services
Refund customers if needed
Transfer earned commission or markup after suppliers are fully paid or services are completed
Important: The money in the trust account cannot be used to pay rent, salaries, or office expenses.
🟦 General Account
This is the business operating account used for expenses like rent, utilities, and wages. Only after the travel services are completed and the supplier has been paid can commissions or markups be transferred from the trust account to the general account.
Clarifying “Money Received from Customers”
Section 26.1 of the Regulation defines what counts as “money received from customers for travel services.”
It includes any payment a registrant directly receives, but excludes:
Payments made through the registrant directly to the supplier’s merchant account (because the agency never handles the funds).
Payments for future services that are not due yet during that reporting period.
Example: If a customer pays a deposit today and their final payment is due next month, only the deposit counts as money “received” right now.
However — if the customer’s credit card payment goes through the agency’s merchant account, then that money is considered received and must be deposited into the trust account.
Quick Recap for Exam Prep
Term
Meaning
Key Point
Jointly and Severally Liable
Legally responsible both individually and as part of a group
Applies when registrants handle customer funds
Trust Account
Special account for holding customer payments
Money must stay there until services are completed
General Account
Business expense account
Used only after commissions can be transferred
Good Faith
Acting honestly and fairly
A key defense in liability cases
Arm’s Length
Unrelated, independent business dealings
Ensures fair transactions
In short: Trust accounting and financial responsibility protect consumers and ensure travel businesses stay compliant under Ontario’s Travel Industry Act, 2002. As a TICO supervisor or manager, you must understand how to handle customer deposits, maintain trust accounts, and meet all regulatory deadlines.
Understanding Security Instead of Trust Accounting
Chapter 8: Financial and Record-Keeping Requirements
When running a travel business, it’s important to protect customer money. Normally, travel agencies must keep customer payments for travel services in a trust account. However, if a business has proven financial stability, it can choose another option — providing a security deposit to TICO.
Let’s go through how this works, step-by-step.
What Does “Security Instead of Trust Accounting” Mean?
According to Section 28 of the Regulation, some registrants (travel agencies or wholesalers) can use a security deposit instead of maintaining a trust account.
Definition
In simple terms, the “money received from customers for travel services” means:
The money that the registrant actually gets from customers during a certain period.
It does not include:
Payments made directly by customers to another company through the registrant.
Travel sales that are made during that period but are paid for after the period ends.
Who Can Use a Security Deposit?
Only registrants who have been continuously in business for at least one fiscal year are allowed to use this option.
Instead of having a trust account, they must file a security deposit with TICO — for example:
A letter of credit
A bank draft
Collateral, like a GIC (Guaranteed Investment Certificate)
How Much Security Is Required?
The deposit amount must be equal to or greater than one-sixth (1/6) of all customer money received for travel services over the last 12 months.
The financial statements submitted to TICO must show:
The total amount of money received from customers for travel services during the reported period.
TICO must receive the security deposit within 30 days after the registrant files financial statements.
Note: The registrant must keep their trust account active until they get an official letter from TICO confirming that the security deposit has been accepted.
New Applicant Security Requirement
According to Section 25 of the Regulation, any new applicant (someone not registered in the past 12 months) must provide a $10,000 security deposit when applying to TICO.
TICO will return this deposit after:
The registrant has filed two complete and consecutive annual financial statements, showing financial stability, and
The Registrar has no concerns about compliance with the Travel Industry Act or its regulations.
If there are concerns, TICO may hold the $10,000 until those issues are resolved. New registrants must also operate both a trust account and a general account.
What If the Business Closes or Goes Bankrupt?
If a registrant with a security deposit becomes bankrupt, insolvent, or closes down, TICO will return the security after at least six months. However, any amount used to pay customer claims will be deducted before the security is returned.
Exemption for Low-Risk Tourism Businesses
Some lower-risk organizations may not need to file a security deposit. To qualify for this exemption, the following must be true:
The registrant is a not-for-profit corporation without share capital.
It has a funding agreement (e.g., transfer payment agreement) with:
The Ontario government, or
A municipality.
The agreement:
Has a term of at least one year.
Has not expired.
States that the registrant’s purpose is to promote tourism in a specific area of Ontario.
A copy of the agreement is provided to the Registrar.
The registrant provides any additional information requested by the Registrar.
The registrant notifies TICO in writing of any changes or amendments to the agreement.
If the agreement is with a municipality, two more conditions apply:
The municipality must have a financial arrangement with TICO (e.g., guarantee or indemnity).
The Registrar must confirm in writing that this condition is satisfied.
If the Registrant Stops Qualifying for the Exemption
If a registrant loses its exemption, what happens depends on timing:
1. Before Two Annual Statements Filed
They must immediately provide $10,000 in security to TICO.
2. After Two Annual Statements Filed
They must notify TICO in writing as soon as possible. After receiving the notice, the Registrar will:
Confirm if there are no compliance concerns, or
Set a deadline to provide the $10,000 security deposit, or
Specify any repayment amounts needed for claims that may be made from the Compensation Fund (up to $10,000).
If the registrant already has an approved municipality financial arrangement with TICO, no further action is needed.
When and How Security Is Returned
Once the registrant has filed two full annual financial statements, and there are no outstanding compliance issues, TICO will return the security.
If TICO has paid out or expects to pay out any claims related to:
Bankruptcy,
Insolvency, or
Business closure,
then those amounts will be deducted from the returned security.
🧠 Key Points to Remember for the TICO Exam
Trust account or security — Registrants must protect customer money either way.
Security amount = 1/6 of last year’s customer payments.
New applicants → Must pay $10,000 security.
Exemptions exist for government-linked not-for-profits.
Security is returned only after two full financial years of compliance.
8.6 Record-Keeping
Reference: Section 29 of the Regulation
Every TICO-registered business must keep accurate and complete business records. These records are important for accounting, audits, and ensuring compliance with the Travel Industry Act.
📘 Key Rules for Record-Keeping
All business records must be kept at the main office (principal place of business) or another location approved in writing by the Registrar.
Records must be kept for at least six years after the date of the transaction.
🧾 Types of Records You Must Keep
Accounting records – These should detail your business income and expenses. You must include all supporting evidence such as:
Invoices
Statements
Receipts (each with a unique serial or reference number)
Banking records – These must show all financial transactions linked to your business.
Payment records – Keep written records of all money paid to or from your business for travel services. Each transaction must be easy to identify by a unique number or code.
Refund or alternative service records – If you offer customers refunds or alternative travel services due to changes in plans, you must keep a file showing:
What happened
What action your business took
Whether the customer accepted the alternative or refund
All these records must be available for inspection by the Registrar at any time.
8.7 Financial Inspection Program
TICO uses a risk-based financial inspection program to make sure all registrants are financially stable and following the law. This helps protect consumers and keeps the travel industry trustworthy.
🔍 Why TICO Inspects Financial Records
TICO staff check whether:
Financial statements are filed on time
Businesses maintain enough working capital
Trust accounts are properly set up and used
If a registrant fails to meet these standards, TICO may issue warning letters or even propose to revoke the registration.
🔹 The Financial Inspection Program Has Two Main Parts:
1. Financial Statement / Document Bench Review
Once a registrant’s financial statements are submitted, a TICO financial inspector (usually a CPA) reviews them.
During this bench review, the inspector looks at:
Sales
Working capital
Profit or loss
The goal is to check if the business meets the working capital and trust account requirements of the Regulation.
2. Site Inspection
If TICO suspects potential problems—like weak financial health, improper trust account use, or repeated losses—a site inspection is conducted.
During this visit, a financial inspector:
Reviews the registrant’s records in detail
Determines if there is a compliance issue
Prepares a full Inspection Report for the Registrar
🚨 Other Reasons for Site Inspections
Site inspections can also happen if:
Consumers or other registrants file complaints
TICO staff notice red flags during reviews
The registrant is a new business (all new registrants are inspected within their first year)
TICO monitors all registrants regularly and follows up on any non-compliance issues.
Registrar’s Requests for Further Information
After reviewing the Inspection Report, the Registrar may ask for more details.
Here’s what might be required:
Written Statement of Current Working Capital
If the Registrar believes a business might be in financial trouble, they can ask for a written and verified (by affidavit) statement of working capital.
Exemption from Working Capital Requirement
Businesses that qualify for an exemption must still provide a written statement confirming that they meet the exemption criteria.
Audited Financial Statements
The Registrar can request audited and consolidated financial statements (including related businesses or shareholders) if needed for a complete review.
Why Compliance Matters
The goal of TICO’s inspection staff is to help registrants comply, not to punish them unnecessarily.
If a business fails to meet working capital or trust account requirements, TICO will:
Notify the registrant
Give them time to fix the problem
However, if the issue isn’t corrected, TICO can take administrative action—including the revocation of registration.
So, registrants should always resolve financial issues quickly to prevent them from escalating into serious problems.
✅ Chapter Summary
By the end of this chapter, you should understand:
How to properly keep and store financial records
How TICO monitors financial compliance through inspections
What happens if your business fails to meet financial standards
The importance of maintaining transparency and cooperation with TICO
📘 Study Tip:
TICO exam questions from this chapter often focus on:
How long records must be kept
What documents are included in record-keeping
What triggers a site inspection
How TICO handles non-compliance
🧠 Quiz Reminder
You’ve completed Chapter 8: Financial and Record-Keeping Requirements! Log into your MyTICO account and try the Chapter 8 quiz to test your understanding. You’ll get instant feedback — and remember, you can take the quiz as many times as you like.
TICO Registration Requirements: A Simple Study Guide
If you want to work in the travel industry in Ontario at a supervisor or manager level, you must understand who needs to register with TICO and who is exempt. This chapter breaks it down so you can easily learn it for your exam.
Let’s go step-by-step.
7.1 Who Must Be Registered
Any travel retailer or travel wholesaler that wants to sell travel services in Ontario must be registered with TICO.
This includes:
Travel agencies (physical offices or online websites)
Travel wholesalers (companies that package travel services and sell them to agencies)
Individuals operating as a travel business (sole proprietors, partnerships, or corporations)
If you sell travel services in Ontario and are not registered with TICO — it’s illegal.
Any services combined with transportation or accommodation (like packaged tours)
Anyone legally registered is called a registrant.
✅ Individual registrants must live in Canada ❌ TICO registration is not transferable
Exemptions — Who Doesn’t Need to Register?
Some groups and companies do not need to register with TICO. These rules come from Section 2 of the Regulation.
Important for exam: If a business is exempt and not registered with TICO, the Travel Industry Compensation Fund DOES NOT protect consumers booking with them.
Here are the main exemptions:
Companies Not Required to Register
Type of Company
Explanation
Travel retailers/wholesalers not located in Ontario
If the company is outside Ontario, they don’t need TICO registration even if Ontarians book with them
Companies advertising to Ontarians (online, toll-free phones) but located elsewhere
Example: Out-of-province online travel agency
End suppliers
Airlines, cruise lines, hotels, car rental companies
End Suppliers Offering Local Services
Exempt Group
Key Points
End supplier offering local services (within 25 km)
Example: a hotel offering accommodation + local theatre tickets + transport
End supplier adding services from another company (not airline/cruise/bus)
Must collect no more than 25% upfront or payment no more than 30 days in advance
Purpose: Help small local tourism businesses operate without heavy regulation.
Public Carriers & Their Agents
Exempt Group
Example
Public carrier selling scheduled transportation
Bus service from New York to Toronto 4 times/day
Agents selling for a public carrier
Ticket booth selling bus tickets
Real Estate Professionals (Short-Term Rentals)
Real estate brokers, salespersons, and brokerages do not need TICO registration IF:
They are registered under the Real Estate and Business Brokers Act, 2002
They ONLY handle short-term rental accommodations through their brokerage
They DO need TICO registration if:
They do it as a side business outside their brokerage
They also sell transportation or tickets to attractions
One-Day Tour Providers
Exempt ONLY IF:
They sell one-day tours ONLY
The tour starts and returns within 24 hours
No accommodation included
Examples: One-day bus trips to 🎭 theatre | 🎰 casino | ⚽ sports game | 🎿 ski hill | 🛍️ shopping mall
NOT exempt if: They also offer overnight tours
Guide or Sightseeing Services
Exempt if:
They only sell guide services
They do NOT provide transportation or accommodation
Example: A tour guide showing visitors around local landmarks on foot.
Educational Institutions
Schools are exempt if:
The teacher arranging the trip works at the school
The trip is approved by the school board or principal
Teacher receives no profit
One-day student field trips (ex: Royal Ontario Museum)
Religious Groups, Amateur Sports Teams, Associations
(Overland Travel Only)
Exempt IF ALL conditions are met:
Only members can join the trip
Purpose is educational, cultural, religious, or athletic
Funds kept in a trust account
No one profits except by participating in the trip
Destination within 2,000 km
Transportation vehicle stays at destination (ensures return)
Not-For-Profit Clubs
(Overland Travel Only — Same rules as above)
These clubs are also exempt under the same conditions — only members, no profit, trust account, within 2,000 km, bus stays at location.
Key Exam Takeaways
✅ Anyone selling travel services in Ontario must register with TICO ✅ Exempt groups are very specific — memorize them ✅ The Travel Compensation Fund only protects bookings through registered companies ✅ One-day tours = exempt (only if zero overnight trips) ✅ Schools, churches, sports teams = exempt under strict rules ✅ Real estate professionals exempt only for short-term rentals through brokerage ✅ End suppliers like airlines never need TICO registration
Final Study Tip
When studying exemptions, always ask yourself:
Does the business sell transportation or accommodation to the public in Ontario?
If YES → likely must register with TICO If NO → check if they fit one of the special exemption cases
TICO Registration Guide: Requirements to Become and Stay Registered
If you want to run or manage a travel business in Ontario, you must be registered with TICO. This chapter explains what you need to qualify and how to keep your registration active.
Think of this as a checklist to help you pass the TICO Supervisor/Manager exam.
7.2 Requirements to Become Registered
Before TICO approves someone to operate as a travel retailer or wholesaler, they must meet certain rules (Section 5 of the Regulation).
✅ Basic Requirements
To become registered:
If you are an individual:
You must be at least 18 years old
You must be a Canadian resident
✅ If You Were Previously Registered With TICO
TICO will check your history. You can only register if:
Requirement
What It Means
You do not owe the Travel Industry Compensation Fund
If you owe money, you must set up a payment plan TICO accepts
TICO has no unpaid judgments against you
If they do, you must settle it or have a payment plan
TICO never had to pay claims for you due to bankruptcy/closing your business
If they paid, you must reimburse TICO for claims & costs or have a repayment plan
✅ Security Requirement
If TICO requires you to provide security money (a financial guarantee), you must do so.
✅ Other People Connected to the Business
Anyone considered an “interested person” (owners, partners, certain directors — see Glossary in the Act) must meet the same rules.
Example: If you and your business partner apply, both of you must meet these conditions.
7.3 Requirements for Registration Renewals
Registration is not a one-time thing — you must renew and continue meeting requirements (Section 6).
To stay registered, a business must:
Be a resident of Canada if it’s an individual
Not owe any Compensation Fund payments (or have an approved payment plan)
Have no unpaid TICO judgments (or have a payment plan)
Have repaid any Compensation Fund claims TICO paid on their behalf (or have a repayment plan)
Provide security if required
You must stay in good standing with TICO at all times.
Forms & Fees — How to Register and Renew
(Section 3 of the Regulation)
To register as a travel retailer or wholesaler, you must:
✅ Fill out the registration form
✅ Submit it to TICO with the required fee
✅ Pay renewal fees every year online
✅ Register each branch office separately
✅ Pay branch fees online
Fee Structure
TICO sets registration and renewal fees
Fees are published in a Fee Schedule
Any fee changes must be:
Discussed with the industry, and
Approved by the TICO Board
Application Rules
Applications and renewals must:
Be submitted on TICO-approved forms
Include all required information
Be sent with correct payment
If anything is missing → TICO will NOT process the application.
Key Exam Takeaways
Topic
Memory Tip
Age & Residency
Individual must be 18+ and live in Canada
Debt to TICO?
Must pay or have a payment plan
Past bankruptcy claims?
Must reimburse TICO
Security deposit?
Provide if required
Renew every year
Online, with proper forms and fees
Branches
Must be registered one-by-one
Study Shortcut
Think of it like getting and keeping a driver’s license for your travel business:
Like Driver’s License
TICO Equivalent
You must meet eligibility rules
Age, residency, no debts/judgments
You must renew it
Annual registration renewal
You must follow rules or lose it
Must remain in good standing with TICO
TICO Registration Fee Guide: What You Need to Pay
To run a travel agency or a travel wholesaler business in Ontario, you must be registered with TICO. This chapter explains the fees you need to pay when registering and renewing your registration.
These rules come from Section 3(1) of Ontario Regulation 26/05.
✅ Fee Schedule effective since July 1, 2011 ✅ All fees cover a 1-year period
Let’s make it simple.
Registration Fees (When You First Sign Up)
When you first register with TICO, you pay a fee based on whether you are registering a head office or a branch office.
Type of Business Location
Fee
Travel Agency or Travel Wholesaler — Head Office
$3,000
Travel Agency or Travel Wholesaler — Branch Office
$800
❗ Registration fees are NOT refundable, even if your application is not approved.
Renewal Fees (Every Year)
Every year, travel agencies and wholesalers must renew their registration.
The renewal fee depends on your Ontario sales volume from the previous fiscal year.
Sales-Based Renewal Fees
Ontario Sales Volume
Renewal Fee
$2,000,000 or less
$300
More than $2,000,000 up to $5,000,000
$600
More than $5,000,000 up to $10,000,000
$900
More than $10,000,000 up to $50,000,000
$1,200
Over $50,000,000
$1,800
Branch Renewal Fee
If you have branch offices, each branch must pay:
Fee Type
Fee
Branch Office Renewal
$300 per branch
Important Renewal Timeline Rules
Renewal fees are due 90 days after the registrant’s year-end
Branch renewal dates match the head office renewal date
This means everything renews at the same time
Head office + all branches in one cycle
✅ Key Points to Remember for Your Exam
$3,000 to register a head office
$800 to register a branch
Renewal fees depend on sales volume
Branch renewal fee = $300 each
Fees must be paid every year
Fees are not refundable
Branches renew at the same time as head office
Renewal payment due 90 days after year-end
🎯 Quick Memory Trick
Term
Trick
Initial registration = Big money
$3,000 = Start-up cost for main office
Branches always cost
$800 to start, $300 yearly
Bigger sales = Bigger renewal fee
The more you sell, the more you pay
Everything aligned
Branches renew with head office
TICO Requirements to Become Registered – Part 2
To operate a travel business in Ontario, you must follow TICO rules. This part of the chapter covers security deposits, office rules, and business name rules.
Study this carefully — questions from this section often appear on the TICO Supervisor/Manager exam.
7.4 Security Deposit for New Applicants
Section 25 of the Regulation
When a business applies to register with TICO and has not been registered in the last 12 months, they must give TICO a security deposit of $10,000.
✅ Key Points
New applicants must provide $10,000 security
This applies only if the business was not registered in the past 12 months
The money is held by TICO
It will not be returned until:
The business submits two years of financial statements
The Registrar decides the business is in good standing and following the rules
The Registrar has the final say on returning the deposit.
🔹 Exemptions
Some low-risk tourism businesses tied to government may not need to pay this deposit. Details are found in Chapter 8 (Financial & Record-Keeping Requirements).
7.5 Requirements for Operating From an Office or Home
Section 6 of the Act + Sections 10 & 11 of the Regulation
All travel registrants must work from the location listed in their TICO registration.
✅ Office Rules
You can only operate from the address on your registration
If you have more than one location:
One must be the head office
All others must be registered branch offices
✅ Home-Based Travel Agencies
You can run a travel business from home, but only if:
Requirement
Meaning
Zoning approval
Local zoning must allow business activity
Separate business phone
Business phone number must be different from personal/home number
Record access
Registrar must be able to see your business records
If the Registrar can’t access your records, you cannot operate from home.
7.6 Business Name Requirements
Section 9 of the Regulation
Every travel agency must have a legally registered business name with ServiceOntario.
✅ Business Name Rules
You must register your business name
You must do business under the same name
Your name cannot pretend to be sponsored or affiliated with another company unless you truly are
❌ Examples of names NOT allowed
“Disney Travel” (unless you are actually approved by Disney)
“Air Canada Vacations Center” (unless you are authorized)
You cannot mislead customers into thinking you are connected to another travel brand.
🧠 Exam Tips
Topic
What to remember
Security deposit
$10,000 for new applicants; held for at least 2 years
Home office
Must follow zoning, have separate phone, and records accessible
Business name
Must be legally registered & not imply fake partnerships
🎯 Quick Memory Trick
Rule
Shortcut
Security
$10K trust test — 2 years, must be in good standing
Home office
Zoning + phone + records
Business name
Register name + no fake partnerships
Requirements to Become and Stay Registered with TICO
When you run or supervise a travel business in Ontario, you must follow TICO rules. These rules protect consumers and make sure only honest and qualified businesses sell travel services.
This chapter covers important rules about TICO registration and how to keep your registration active.
Certificate of Registration (Section 13 of the Regulation)
After you complete the TICO registration process, TICO gives your business a Certificate of Registration.
Key Points to Remember
The certificate must be kept at the office or branch location it belongs to.
Anyone can ask to see it — you must be able to show it.
Best practice: display the certificate in your office for customers to see.
The certificate has an expiry date — make sure it stays valid.
If Your Business Closes or Registration Ends
If your business:
shuts down,
loses registration,
or gets suspended,
you must return the certificate to TICO immediately — either by registered mail or by hand.
Exam Tip ✅
If a TICO-registered business closes, they must return the Registration Certificate right away.
Requirements to Maintain Registered Status
Even after you register, you must continue following all TICO rules. If you don’t, TICO can refuse renewal or cancel your registration.
When TICO Can Refuse Registration or Renewal
TICO may say no if:
The business is not financially responsible.
There is proven dishonesty.
The business breaks the Act or Regulation.
The business does not provide information TICO asks for.
Rules for Selling Travel Services (Section 12 of the Regulation)
Travel retailers must follow these rules when selling travel services:
1. Tell Customers Who You Are
You must give customers:
your business name,
office address,
and phone number.
This helps the customer know exactly who they are dealing with.
2. Disclose Relationships
If your agency is connected to a travel wholesaler (for example, the wholesaler owns the travel agency), you must tell the customer.
3. Only Registered People Can Sell Travel
Travel services can only be sold by:
a registered business, and
individuals employed by or contracted with that business.
4. Everyone Selling Travel Must Pass Exams
Anyone who sells travel or advises the public must:
Pass the Travel Counsellor Exam
If they become a supervisor/manager, they must also pass the Supervisor/Manager Exam within 6 months
Educational Requirements (Sections 15–16 of the Regulation)
Every travel office must have a qualified supervisor/manager.
Supervisor/Manager Requirements
They must:
Pass the Travel Counsellor Exam
Have sufficient experience (usually 3 years of selling travel)
Pass the Supervisor/Manager Exam – Either already passed, or must pass within 6 months of taking the role
Requirements for All Travel Counsellors
Anyone selling travel to the public must:
Pass the Travel Counsellor Exam
Be an employee or contracted person with the agency
Have their training records and certificates kept on file by the registrant
Notification of Changes
Registrants must inform TICO when key business information changes, including:
business ownership
partners or shareholders
office location/address
bank accounts
supervisor/manager
Some changes need advance approval; others just need to be reported on time.
Exam Tip ✅
Any major change to the business must be reported to TICO within required timelines — some changes need pre-approval.
Simple Summary
Requirement
Key Rule
Certificate of Registration
Keep it at the office, show it when asked, return if business closes
Selling Travel
Only by registrants and approved individuals
Education
Travel Counsellor Exam for sellers; Supervisor exam within 6 months
Supervisor/Manager
3 years experience + required exams
Change Reporting
Must notify TICO about major business changes
Final Exam Checklist ✅
Before moving on, make sure you remember:
Where the Registration Certificate must be kept
When it needs to be returned
Who can sell travel services
The exam requirement timelines
Supervisor/manager experience and exam rules
That major business changes must be reported to TICO
If you can explain all of these in simple terms, you’re ready for questions on this chapter!
🧠 Chapter: Requirements to Become (and Stay) Registered with TICO
📜 7.7 Certificate of Registration
Once a business completes the TICO registration process, TICO gives them a Registration Certificate.
Important things to remember:
The certificate must be kept at the office or branch it belongs to
It must be shown to anyone who asks
Best practice: display it clearly where customers can see it
The certificate has an expiry date — registration must be renewed
If the business closes, is suspended, or revoked, the certificate must be returned to TICO immediately (by registered mail or in person)
💡 Exam Tip: TICO encourages consumers to look for this certificate before booking travel — it’s proof the company is legally registered.
🔐 7.8 Requirements to Maintain Registered Status
Even after registration, businesses must follow rules to stay registered.
🚫 When can the Registrar refuse or revoke registration?
The Registrar can refuse or cancel registration if the business or person:
Lacks financial responsibility
Has acted dishonestly
Breaks laws or TICO rules
Refuses to provide required information
In short: you must be financially stable, honest, and cooperative.
Tell customers the business name, address, and phone number
Tell customers if the retailer is connected to another travel business (example: a wholesaler that owns a travel agency)
Only sell through:
A registered travel business, and
People employed by or contracted with that business
Ensure everyone selling travel or giving advice has passed the Travel Counsellor Exam
Ensure new supervisors/managers pass the Supervisor/Manager Exam within 6 months
🎓 Education Requirements (Sections 15–16)
Each travel office must have a supervisor/manager who:
✅ Has passed the Travel Counsellor Exam ✅ Has minimum 3 years travel-selling experience (common interpretation of “sufficient experience”) ✅ Is approved by the Registrar ✅ Has passed the Supervisor/Manager Exam OR will pass it within 6 months of starting
Also:
Everyone selling travel to the public must pass the Travel Counsellor Exam
Travel counsellors must be employees or contracted
The business must keep proof of education certificates
💡 Exam Tip: Remember: 3 years experience + Travel Counsellor Exam + Supervisor/Manager Exam within 6 months.
🔔 Notification of Changes — What to Report & When
Registrants must tell TICO about business changes. Some need approval, some just need notification.
Type of Change
Approval or Notice?
Time to Report
Changes to officers/directors (corporation) or partners
Registrar Approval
Within 5 days
Someone gets 10% or more shares or increases share beyond 10%
Notify Registrar
Within 30 days
Change of business address
Notify Registrar
5 days in advance
Change in supervisor/manager
Notify Registrar
5 days in advance (or immediately if unexpected)
Change in bank account details
Notify Registrar
5 days in advance
Any other change in registration info
Notify Registrar
Within 5 days
Ceases selling travel services
Notify Registrar
ASAP (or at least 10 days in advance if known)
Stops trading with another registrant due to financial concerns
Notify Registrar
Promptly
Change in address for service
Notify Registrar
Within 5 days
💡 Exam Tip: 5 days & 30 days deadlines are common — expect them on the test.
📝 Summary for Exam Success
To stay registered with TICO, a travel business must:
Display its Registration Certificate
Operate honestly and financially responsibly
Ensure all staff selling travel are certified
Have a qualified Supervisor/Manager
Report business changes on time
Requirements to Become Registered — Part 3
Compliance, Inspections, Refusals & Revocations)
When running a travel business in Ontario, being registered with TICO is not a “one-and-done” thing. You must follow rules to protect consumers and keep your license active.
This chapter explains compliance, inspections, and how registrations can be refused, suspended, or revoked.
✅ 7.9 Compliance — What It Means and Why It Matters
When consumers book with a TICO-registered travel agency or website, they are protected. For example, they may be able to claim money from the Travel Industry Compensation Fund if a registered agency or supplier (like an airline or cruise line) goes bankrupt.
What TICO Does to Enforce Compliance
TICO has a Compliance Department that checks if businesses follow the law.
They monitor:
Type
Focus
Financial compliance
Financial statements, trust accounting, working capital
Non-financial compliance
Advertising, invoices, disclosures, and unregistered sellers
TICO reviews ads, websites, brochures, and responds to consumer and industry complaints.
Selling travel without TICO registration is illegal. TICO can charge offenders.
What Happens if a Business Breaks the Rules?
TICO contacts the registrant and asks them to fix the problem
The business must respond fast — not responding = non-compliance
If not corrected, the Registrar may move to revoke registration
Key Exam Reminder
If a registrant ignores TICO or refuses to fix compliance issues, their license is at risk.
🕵️ 7.10 Inspections — What to Expect
Section 17 of the Act
TICO can conduct inspections to make sure rules are being followed.
Inspectors Can:
Enter the business premises at a reasonable time
Ask to see records, documents, and bank info
Copy or take records as long as they give a written list
Investigate complaints
Your Rights
You may ask the inspector to show proof that they are authorized.
Your Obligations
You must NOT:
Block the inspector
Hide, change, or destroy documents
Doing so is an offence.
❌ 7.11 Refusal, Suspension, or Revocation of Registration
If a business does not follow the law, the Registrar can propose to:
Refuse registration
Suspend registration
Revoke registration
Refuse renewal
Add conditions to registration
The business must be notified in writing and has the right to appeal to the Licence Appeal Tribunal.
🚫 Refusal to Register — Common Reasons
Registration may be refused if:
Applicant has a serious criminal record
Applicant is not financially responsible
False information was given in the application
⚠️ Immediate Suspension
In serious cases, where consumers are at risk, the Registrar can suspend immediately.
This usually happens when there are major financial issues that could harm the public.
Suspension takes effect instantly
Must be in the public interest
Expires after 15 days unless extended by the Tribunal
❌ Revocation — Common Reasons
A registration may be revoked if the registrant:
Fails to file financial statements
Has trust account or working capital deficiencies
Does not pay Compensation Fund fees
Uses false or misleading advertising
Has invoicing issues
Has unresolved consumer complaints
Fails to respond to TICO
Shows ongoing dishonesty or non-compliance
Repeated violations can lead to revocation.
🔍 Public Access to Information
TICO can publicly share:
Names of registrants
Registration status
Business contact details
Charges or violations
Tribunal decisions
This makes the system transparent and protects consumers.
🎯 Exam Takeaways
Remember these key points:
💡 TICO enforces both financial and non-financial compliance 💡 Ignoring TICO letters = non-compliance 💡 Inspectors can access records and must not be obstructed 💡 Registration can be refused, suspended, or revoked 💡 Businesses have the right to appeal to the Licence Appeal Tribunal 💡 TICO can publish info about registrants to the public
In this chapter, we’ll cover what happens when there are issues with TICO registration — like appeals, offences, and confidentiality rules. As a future travel industry manager, you must understand how TICO enforces the law and protects consumers.
This info is important for your exam — so read carefully!
🚨 7.12 Appeals to the Licence Appeal Tribunal (LAT)
If TICO refuses, suspends, or revokes a company’s registration, the business has the right to appeal the decision to the Licence Appeal Tribunal (LAT).
What is the Licence Appeal Tribunal?
An independent tribunal (like a court but simpler and faster)
Handles TICO appeals
Members include legal, industry, and consumer experts
When can someone appeal?
New applicants who are refused registration
Current registrants whose registration is suspended or revoked
How to appeal
Must send a Notice of Appeal within 15 days
There is a non-refundable fee
You may represent yourself or hire a lawyer/paralegal (your expense)
If no appeal is requested, the Registrar’s decision stands
What happens in a hearing?
Registrar and applicant/registrant present evidence
Tribunal makes a written decision
They can:
Confirm TICO’s decision
Overturn it
Add conditions to the registration
Can issues be solved before the hearing?
Yes. TICO often works with businesses to fix problems even after the appeal is filed. Example: Agreeing to follow extra rules to keep registration.
🔁 Re-Applying After Being Refused or Revoked
If TICO refuses or revokes a registration:
Must wait at least 30 days before re-applying
Cannot operate during this period
Must prove circumstances have changed and requirements are now met
⚖️ 7.13 Offences Under the Act
Once a business is registered, it must follow all TICO laws. If someone breaks the rules, it’s an offence.
What counts as an offence?
Giving false information
Not following the law or regulations
Who is responsible?
The business
Officers/directors — they must take reasonable care to prevent offences
Penalties
Offence
Maximum Penalty
Individual
$50,000 fine, up to 2 years minus a day in jail, or both
Corporation
$250,000 fine
Other consequences
Court can order restitution (money paid back)
Case must start within 2 years of TICO learning about the offence
🔒 7.14 Confidentiality
TICO handles private business info. This information must stay confidential except when allowed by law.
When can TICO share information?
When needed to enforce the Act
With consumer protection agencies
With law enforcement
With a person’s legal advisor
If the person gives consent
Important note
TICO staff cannot be forced to testify in civil court about confidential info — unless it’s a case under the Travel Industry Act.
✅ Chapter Complete!
You have finished Chapter 7 — Registration Requirements.
💡 Tip for your exam: Focus on appeals timelines, penalties, and confidentiality rules — these often show up in questions.
📌 Go back to your MyTICO portal and take the voluntary Chapter Quiz. You can try as many times as you want — quizzes don’t affect your final exam score but help you practice!
👨👩👧👦 Case Study: The Nicholson Family — Typical Canadian Family with University Kids
Understanding a typical family scenario is crucial for new tax preparers. Families with children in post-secondary education often qualify for multiple tax credits, deductions, and special considerations. This guide walks you through how to prepare a complete tax return for a family like the Nicholsons, including step-by-step instructions in Intuit ProFile, explained for absolute beginners.
🎯 Meet the Nicholson Family
Family Composition:
Parents: Scott (self-employed, dividend income) and Tracy (HR professional)
Children: Four children
Melissa (adult, university student)
David (adult, trades student)
Twins (young children, 6 years old in this scenario)
Key Family Details:
Scott is self-employed and receives dividends instead of a salary.
Tracy lost her corporate job mid-year, received a severance package, and quickly found a new position.
Family has recently become homeowners and may be eligible for first-time homebuyer benefits.
Children are enrolled in post-secondary programs or require childcare and summer camp deductions.
💰 Income & Deductions Overview
Scott (Self-Employed, Dividend Income):
Receives monthly dividends ($8,000/month)
Makes a year-end tax installment ($20,000) instead of monthly
ProFile Tip: Enter dividend income under the T5 slips section → the software will automatically calculate gross-up and dividend tax credit
Tracy (Employment & Severance):
Employment income reported on T4 slips
Severance included in T4 (plus any legal settlement received after year-end)
Professional dues ($585.75) and certification fees are deductible
ProFile Tip:
Enter employment income on T4 slips section
Enter deductions under “Professional Memberships & Dues” and “Employment Expenses” if applicable
🎓 Tuition and Education Credits
Melissa & David (Post-Secondary Students):
Tuition paid: Melissa ($11,252), David (amount based on T2202)
Eligible for tuition tax credits, which can be:
Applied to student’s own tax return
Transferred to parents if the student does not need full credit
ProFile Tip:
Use T2202 section → enter tuition paid for each student
Select the parent who earned income and will claim deduction
🏡 Homeownership Considerations
Family recently purchased their first home
Eligible for First-Time Home Buyers’ Tax Credit (HBTC)
ProFile Tip:
Enter purchase information under Home Buyers’ Amount
Software calculates credit automatically
💡 Notes for New Tax Preparers
Installments vs. regular tax payments:
Scott made a year-end installment, which may generate a small interest adjustment. ProFile handles CRA interest calculation automatically if installment info is entered.
Severance and legal settlements:
Include in income in the year received
If settlement crosses years, enter the date received to ensure proper reporting
Tuition and education credits:
Keep all T2202 slips for CRA verification
Transfer unused credits to parents if students don’t owe enough tax
Childcare & summer camp:
Only the parent with earned income can claim childcare deduction
Ensure receipts and amounts match CRA requirements
💻 How to Prepare in Intuit ProFile (Step-by-Step Beginner Guide)
Enter Personal Information:
Parent and children details, SIN, dates of birth
Enter Income:
Scott’s T5 slips → dividend income
Tracy’s T4 slips → employment and severance
Deductions & Credits:
Professional dues and certification fees
Tuition and education credits (T2202)
Childcare and summer camp expenses
First-Time Home Buyers’ Amount
Apply Transfers:
Tuition transfer to parents if applicable
Finalize Tax Return:
Review all CRA-required slips
ProFile auto-calculates total income, deductions, and credits
Check summary page for refund or balance owing
🌟 Key Takeaways
✅ Families with post-secondary children have multiple tax credits available ✅ First-time homebuyer credit is important to include ✅ Childcare expenses must be claimed by parent with earned income ✅ Tuition can be transferred to parents for maximum benefit ✅ ProFile automates calculations but accurate input is crucial
This case study of the Nicholson family is a perfect beginner-friendly reference for tax preparers handling typical Canadian families, showing how to maximize credits, properly report income, and navigate Intuit ProFile step by step.
💻 Case Study: Entering Income & Deductions for Scott and Tracy Nicholson
When preparing a tax return for a typical family with post-secondary children, understanding how to enter income and deductions correctly is essential. This guide walks through the Nicholson family scenario, showing beginner-friendly steps in Intuit ProFile and explaining key considerations for each type of income and deduction.
🧾 Overview of the Nicholson Family
Scott and Tracy Nicholson are a typical family with:
Two adult children in university (Melissa and David)
Two younger twins requiring child care
Scott is self-employed and receives dividends from his own corporation
Tracy is an HR professional with a job change during the year, including a severance payment
Total family income includes salaries, dividends, and severance payments, along with eligible deductions for legal fees, professional dues, and child care expenses.
📥 Entering Scott’s Income
1. Dividend Income (T5 Slip)
Scott receives dividends from his owner-managed corporation
In ProFile: Go to T5 slip section, enter the dividend amount
Dividends are reported on the T1 slip line for dividends
Enter tax installment payments on the last page of T1 if applicable (e.g., $20,000)
💡 Pro Tip: ProFile automatically tracks dividend income for non-eligible and eligible dividends, calculating the gross-up and dividend tax credit.
📥 Entering Tracy’s Income
1. Employment Income (T4 Slips)
Tracy worked for two employers in the year
Enter each T4 slip individually in ProFile:
Employer name, period, total income
Tax deducted at source
Severance payments reported by the employer
2. Severance Payments
Received $8,500.20 in 2022
Important: Do not manually enter extra severance—the employer reports it on T4
Payments received in the next year are reported in that year’s T4
3. Employment-Related Legal Fees
Tracy paid $550 to a lawyer for severance-related collection
Enter in Other Employment Expenses → Line 22900
No T2200 form needed since it’s a legal fee, not standard employment expenses
💡 SEO Note: These legal fees are fully deductible against employment income and are common for severance-related cases.
4. Professional Dues
Tracy’s annual professional and union dues: $1,014.30
In ProFile: Enter under Other Deductions → Annual Union/Professional Dues → line 21200
Required to maintain her HR certification and employment
👶 Child Care Expenses
Twins (Aaron and Ariel) attended child care and a summer lacrosse camp
Step 1: Enter child care center expenses ($5,580 each) in Child Care Expenses section
Step 2: Enter summer camp expenses ($1,018 each)
Important Rule: Only $200 per week for camp is deductible
Two-week camp → $400 deductible total
ProFile calculates maximum allowable deduction based on weeks attended
💡 Pro Tip: ProFile uses the star system to track weeks for special programs like overnight camps or boarding school; these expenses may not be fully deductible.
✅ Summary of Key Points
Scott’s dividends and installments are straightforward; enter T5 and installments in ProFile
Tracy’s employment income is entered from T4s; do not manually adjust severance
Employment-related legal fees and professional dues are deductible without T2200
Child care expenses must respect CRA limits; summer camps have a per-week maximum
Always check dates of birth for dependents—important for credits and child care claims
💻 ProFile Step-by-Step Recap
Enter personal information for Scott, Tracy, and dependents
Input all T4 and T5 slips accurately
Enter other deductions: legal fees, professional dues
Enter child care expenses, including weeks attended for camp or special programs
Review summary page for line totals: employment income, dividends, deductions, and child care
Save and verify all data before moving to tuition credits for Melissa and David
💡 Beginner Tip: ProFile color codes linked numbers. Blue fields come from worksheets—always double-check entries, especially for deductions and child care.
This guide provides a complete beginner-friendly roadmap to enter income and deductions for a typical family with children in university, ensuring accuracy in Intuit ProFile while following CRA rules.
🎓 Completing Tax Returns for Students: Melissa & David Nicholson
Filing taxes for post-secondary students can seem tricky at first, but it’s a common scenario for tax preparers. This guide walks you through entering tuition, claiming credits, and filing student returns in Intuit ProFile, even if the students have little or no income.
🧾 Why File Tax Returns for Students?
Even if a student has no income, filing a tax return is important:
To claim tuition credits
To carry forward unused tuition for future years
To transfer credits to parents, maximizing family tax savings
💡 Note: Filing student returns ensures proper tracking of carry-forward credits, preventing double counting or lost credits in future years.
📥 Step 1: Setting Up Student Tax Returns in ProFile
Open the Dependent Worksheet in ProFile
Right-click on the student’s name → select “Create Tax Return”
ProFile generates a separate tax return for each student, linked to the family for credit transfers
Review personal information: name, date of birth, address, SIN
💡 Pro Tip: Always double-check birthdates—essential for tuition credit eligibility and child-related benefits.
📚 Step 2: Entering Tuition (T2202 Slip)
Each student receives a T2202 slip from their post-secondary institution
Enter the tuition amount and months attended in ProFile under Schedule 11 → Tuition & Education Credits
Example: Melissa attended 4 full months of the Bachelor of Commerce program → enter $5,108
💡 Important:
Do not enter tuition receipts from parents; only use the official T2202
Tuition receipts may include accommodation, textbooks, or fees that are not eligible for the tax credit
💰 Step 3: Student Income
Melissa earned $24,872 in summer income → enter T4 slips in her tax return
David had no income → no T4 needed, but tuition credit is still claimable
💡 SEO Tip: Filing even for zero-income students ensures proper carry-forward and transfer of credits, which can reduce parental taxes.
🔄 Step 4: Transferring Tuition Credits to Parents
Students can transfer up to $5,000 of unused tuition to a parent or grandparent
Enter transfer in ProFile: Student Tax Return → Schedule 11 → Transfer to Parent
David transfers $5,000 of his $8,055 tuition credit to Tracy
Remaining $3,055 becomes carry-forward for David’s future use
📌 Parent’s Return:
Tracy’s tax return will automatically show the $5,000 tuition transfer
Ensure student signs the T2202 slip confirming the transfer
💡 Pro Tip: Even if tuition is below the $5,000 transfer limit, filing the student return is beneficial for tracking carry-forward credits.
🖥️ Step 5: Final Checks in ProFile
Verify all T2202 slips match official amounts
Ensure all student income and deductions are entered correctly
Confirm that tuition transfers and carry-forwards are properly recorded
Signatures:
Students must sign their own returns and tuition transfer slips
Melissa used her tuition herself → no signature needed on transfer
David’s transfer to Tracy requires his signature
✅ ProFile Tip: The software links the student’s return to the parent’s return, simplifying credit transfers and family tax planning.
📌 Key Takeaways for Tax Preparers
Always use T2202 slips, not tuition receipts from parents
File returns for all post-secondary students, even with zero income
Track tuition carry-forwards carefully
Use ProFile’s dependent linkage for smooth credit transfers
Ensure proper signatures on student returns and transfer forms
💡 Expert Tip: Filing student returns is more than a formality—it maximizes credits for the family and prevents issues with CRA audits or carry-forward miscalculations.
This guide is your ultimate reference for preparing returns for students in university or college, helping new tax preparers handle tuition credits and family tax strategies with confidence.
🧮 The Nicholson Family: Final Review of Tax Returns & Key Discussion Points
In this case study, we’ll pull together everything for Tracy, Scott, Melissa, and David Nicholson — a typical Canadian family with employment income, tuition claims, childcare costs, and homeownership.
By the end of this guide, you’ll understand how to: ✅ Review completed returns in Intuit ProFile ✅ Spot common issues that affect family deductions ✅ Advise clients about strategic changes for future tax years
👩💼 Tracy Nicholson’s Tax Return: Key Items to Review
Tracy’s return includes a mix of employment income, severance, and professional deductions. Let’s break it down:
💵 Employment & Severance Income
All of Tracy’s T4 slips are entered under line 10100 in ProFile.
Severance pay was correctly included on her T4 by the employer — no need for manual entry.
🧾 Employment Deductions
Legal fees of $550 paid to obtain severance are deductible.
In ProFile, go to: T1 → Employment → Other Employment Expenses → Legal Fees (line 22900)
No T2200 is required for this type of deduction.
💼 Union & Professional Dues
Enter professional and union dues shown on the T4 under line 21200.
These are pre-filled automatically if entered via the T4 slip.
🏡 Home Buyers’ Amount
Tracy and Scott purchased their first home, making them eligible for the Home Buyers’ Amount (line 31270).
The maximum combined claim is $10,000.
Either spouse can claim it fully or they can split it.
In ProFile: Double-click the Home Buyers’ Amount line → enter claimant(s) and percentage split.
💡 Note: The claim can be divided any way the couple chooses, as long as the total does not exceed $10,000.
👨💼 Scott Nicholson’s Tax Return: Common Challenge
Scott’s return includes dividend income from his incorporated business, but no T4 or salary income. This creates a problem for claiming childcare expenses.
👶 Childcare Expense Deduction (T778)
The lower-income spouse must claim childcare expenses, but only if they have earned income (employment or self-employment).
In ProFile, enter all childcare costs in Form T778.
The program automatically assigns the claim to the lower-income spouse (Scott).
However, because dividends are not considered “earned income”, Scott cannot claim these expenses.
📌 Result:
The $11,960 in childcare expenses cannot be deducted this year.
The software correctly prevents it from transferring to Tracy because she is the higher-income spouse.
💬 What to Advise the Client
Scott should consider adjusting how he’s paid through his corporation:
Pay himself a reasonable salary next year (e.g., $15,000–$20,000).
This creates “earned income” that allows him to deduct childcare expenses.
💡 Tax Strategy Tip: Dividends may save tax at the corporate level, but they reduce access to certain deductions and benefits. A mix of salary + dividends often works best for family tax optimization.
👩🎓 Melissa & 👨🎓 David Nicholson: Tuition Credits
Melissa
Had employment income and claimed her own tuition credit of $5,108.
Parents cannot transfer this amount because she used it against her income.
David
Had no income, so his tuition credit was transferred to his mother, Tracy.
Transferred $5,000 of tuition; the remaining $3,055 is carried forward.
💡 ProFile Steps:
In David’s return → Schedule 11 → Transfer to Parent
In Tracy’s return → Verify under Federal Non-Refundable Credits section that transfer was received.
💰 CPP & EI Overpayment Refund
Tracy worked two jobs in the same year, leading to an overpayment of CPP and EI.
In ProFile, double-click line 44800 to review:
CPP overpayment: $1,102
EI overpayment: $360.97
The software automatically calculates and adds this to her refund.
💡 Note: This happens often when a taxpayer changes jobs mid-year — ProFile automatically detects and claims these overpayments.
🧠 Key Takeaways for Tax Preparers
Topic
Key Lesson
Severance
Always rely on the T4 slip; employers handle reporting.
Legal Fees
Deductible under line 22900 – no T2200 needed.
Home Buyers’ Amount
Up to $10,000 combined – can be split any way.
Tuition Transfers
Only unused tuition can be transferred.
Childcare Deductions
Must have earned income to claim. Dividends don’t count.
CPP/EI Overpayment
ProFile detects and applies credit automatically.
💬 Discussion Points with the Clients
When reviewing returns with Tracy and Scott, discuss:
✅ Why childcare couldn’t be claimed (earned income rule).
✅ How Scott can restructure pay to access the deduction next year.
✅ Why tuition couldn’t be transferred from Melissa.
✅ Confirmation that the home buyers’ credit has been properly claimed.
✅ The CPP/EI overpayment refund.
🧾 Final ProFile Checks
Before filing:
Ensure all T slips are entered (T4, T5, T2202, etc.).
Verify family linkage for tuition transfers.
Review line-by-line summary for each family member.
Use ProFile’s “Review” tab to catch any warnings or unlinked slips.
💡 Expert Tip: Always print or PDF the summary pages for all family members to confirm that credits, transfers, and deductions are linked correctly before submission.
🌟 Conclusion
Even in a “typical family” case, small details like income type, credit transfers, and claiming rules can significantly affect refunds.
For new tax preparers, this case teaches two golden lessons:
Follow CRA’s earned income and transfer rules strictly — software will not override these.
Think ahead for next year’s planning — help clients adjust income structures to maximize deductions.
Mastering these practical insights in Intuit ProFile prepares you for handling real-world clients with confidence.
Gerard Ratchford — Senior’s return with two property sales: the complete, beginner-friendly knowledge base for tax preparers 🧾🏡🌍
Quick orientation: this guide walks you step-by-step through everything a preparer needs to analyze, calculate and enter Gerard’s (a 67-year-old senior) situation into tax software (Intuit ProFile). It covers pensions & RRIFs, a UK dividend with foreign withholding, a rental property sale with prior CCA claims (and the resulting recapture), and the sale of a principal residence (with an earlier cottage sale that already used up some years of PR designation). Use the checklists, boxed notes and the ProFile walkthroughs while you practise.
At-a-glance summary 🔍
Client: 67, widowed, retired (income from CPP, OAS, RRIF withdrawals).
Transactions this year: sold a rental property (previously claimed CCA); sold principal residence and intends to claim the principal residence exemption; foreign dividend from UK (with UK withholding tax).
Key issues to resolve: RRIF minimums and reporting; calculate capital gain on rental sale, determine any CCA recapture and terminal loss; confirm principal residence exemption (PRE) eligibility given earlier cottage sale; translate foreign income/withholding into CAD and claim a foreign tax credit where appropriate; enter everything correctly in ProFile.
1) Pension & RRIF income — what to know and how to report 🧓💵
Concepts:
CPP & OAS are pension income and reported on their respective slips (CPP = CPP statement / T4A?; OAS = T4A(OAS) or similar).
RRIF distributions are reported on a T4RIF slip. The slip shows the amount received in the year — include the full amount as income.
RRIF minimum: federally there is a legislated minimum percentage after conversion; withdrawals above the minimum are fully taxable (and must be reported).
Seniors may be eligible to split eligible pension income with a spouse (pension income splitting) — useful if spouse exists and it lowers combined tax. As the client is widowed, splitting won’t apply here but keep in mind for other clients.
Practical steps to compute & verify:
Collect T4A(OAS), CPP statement, and T4RIF slips. Use the amounts shown on the slips — do not guess.
If client took more than the RRIF minimum, report the full amount; if taxed at source incorrectly, note for adjustment.
Check whether any pension income credit or age credit applies (age credit available subject to income thresholds).
✅ Note: OAS clawback can apply at higher incomes — always verify net income to determine if OAS recovery tax (clawback) applies.
Foreign dividends (UK) are taxable in Canada as foreign income — report the gross dividend (before foreign withholding) converted to CAD.
If foreign tax was withheld (UK withheld 25% in Gerard’s case), the taxpayer may be eligible for a foreign tax credit (FTC) in Canada to avoid double taxation (Form T2209 calculation).
Use either the actual exchange rate on the date of receipt, or an accepted rate (Bank of Canada daily rate or yearly average if using yearly amounts). Document the rate used.
How to calculate (step example using Gerard’s numbers):
UK gross dividend: £6,250.
UK withholding tax remitted: £1,562.50 (25% assumed).
Net received: £4,687.50 (this is what landed in his account).
Convert both the gross dividend and the foreign tax withheld to CAD using the chosen FX rate (document which rate).
Example: if the rate on date of receipt = 1.7 CAD/GBP, then Gross CAD = 6,250 × 1.7 = $10,625 CAD; foreign tax CAD = 1,562.50 × 1.7 = $2,656.25 CAD.
Report gross CAD amount as foreign income; then compute FTC on T2209 using the foreign tax CAD amount. The FTC is limited to the Canadian tax attributable to that foreign income — software computes the limiting calculation.
Practical rules & tips:
Always keep source documents (foreign slip or company letter, proof of withholding).
If the foreign payer issued a net-of-tax payment, still try to obtain documentation of the gross amount and tax withheld — CRA expects gross amounts.
Use the FX rate choice consistently; record it in workpapers.
3) Rental property sale — CCA history ⇒ UCC, recapture & capital gain 🏚️➡️💰
Concepts explained simply:
When a rental property had CCA (capital cost allowance) claimed in prior years, the Undepreciated Capital Cost (UCC) is reduced.
On disposition (sale), two separate calculations occur:
Recapture of CCA (if proceeds exceed UCC but are less than original cost): recapture is included in income (fully taxable as income).
Terminal loss (if proceeds < UCC and asset class terminated) — deductible (rare in buildings).
Capital gain on land portion or on the property overall is calculated as: Proceeds of disposition − Adjusted Cost Base (ACB) − Selling expenses = Capital gain. Half of the capital gain (50%) is taxable as taxable capital gain.
Important: For buildings/structures split between capital cost and land, CCA applies to the building portion, land is not depreciable and contributes to capital gain.
Step-by-step approach (what you must do):
Gather the sale documentation: sale price, selling costs (commissions), sale date. Example: sale price = $675,000.
Pull prior years’ CCA records and compute UCC at the start of the year and at time of sale (the UCC provided in files is the figure to reconcile). Example UCC end of 2021 ≈ $394,008.87 (use exact file numbers).
Determine ACB (original purchase price + improvements − any cost recoveries). If prior CCA claimed, ensure ACB was correctly recorded.
Calculate recapture: if proceeds allocated to capital cost class (generally building portion) exceed UCC, recapture = lesser of (proceeds allocated to class − UCC) and amount of prior CCA claimed; include recapture on income (Form T776 / income inclusion area).
Calculate capital gain: determine portion attributable to land + any capital gain on sold property after subtracting ACB and selling costs. Report 50% of the capital gain as taxable.
Red flags & notes:
Many preparers forget to allocate sale proceeds between land and building — do this carefully because land yields capital gains (no CCA) and building interacts with UCC/recapture.
Maintain evidence of past CCA claims — recapture can be significant if lots of depreciation was claimed over the years.
4) Principal residence exemption (PRE) — rules & the effect of prior cottage sale 🏡🛟
Core rule (simple):
A taxpayer may designate one property per family unit as a principal residence for each year it was owned, which can exempt all or part of the capital gain for those years. The exemption is calculated with the formula: Exempt portion = Capital gain × ((years designated + 1) / years owned). (The “+1” is the “plus one year rule” CRA allows — remember to include it.)
Important interaction here:
Gerard sold a cottage in 2016 and the file shows years 2014, 2015, 2016 were allocated to that cottage on the T2091 filed in 2016 (which avoided capital gains then). Since those years were already used to designate the cottage as the principal residence, you cannot double-designate the same years for another property. That reduces the years available to designate the later principal residence. That may cause part of the current home sale gain to be taxable.
Steps to determine whether PRE fully applies now:
Determine years of ownership for the principal residence (the property just sold).
Count the number of years already used for a different property (cottage years used = 2014–2016). Those years cannot be re-used.
Apply the PRE formula using only the years you can designate for the sold house. If the result doesn’t eliminate the entire gain, report the taxable portion (Schedule 3 / T2091 entries).
Practical tip: always confirm whether the taxpayer designated the cottage as the principal residence on the earlier return (pull the filed T2091 or client evidence) — the file you have suggests it was already designated.
5) Combining the rental disposition, PRE, and foreign income — workflow checklist ✅
Confirm identity, personal info, and residency status for the tax year.
Enter all slips first: T4A(OAS), CPP slips, T4RIF, T5 (if interest), T3/T5 for investment income (if any), and foreign dividend documentation.
Enter foreign dividend: gross amount, foreign tax withheld, exchange rate used. Document the source.
Enter rental income module (prior years’ CCA and UCC). In the disposition screen input sale price, selling costs, and proceed allocation (land/building). Let software compute recapture and capital gain — verify the figures manually.
Enter principal residence sale on Schedule 3 and complete T2091 (designation) to claim PRE for eligible years; account for previously designated years for the cottage.
Run the foreign tax credit calculation (T2209) and ensure FTC is applied correctly (software will compute the limit).
Review for OAS clawback and for tax on RRIF over-withdrawal.
Prepare workpapers showing calculations, FX rates, and copies of foreign documents and property sale closing statements.
6) How to enter everything in Intuit ProFile — step-by-step (for absolute beginners) 🖥️🧭
These are practical, beginner-level ProFile steps. Menu names can vary slightly by version — the flow and screens described below are what you should look for.
A. Start the client file
Open ProFile → Create new client (or open existing client). Fill basic demographics (name, DOB, marital status: widowed), social insurance number, and address.
Set tax year and residency status.
B. Enter slips (CPP, OAS, RRIF, T5 etc.)
In the client workspace, go to Slips (or the “T-slips” area).
Choose the slip type: e.g., T4A(OAS) or T4A for OAS, CPP (or enter CPP amounts where ProFile asks for CPP), T4RIF for RRIF.
Enter the boxes exactly as shown on the client slips. Save each slip.
For other investment income (interest, T5 dividends), go to T5/T3 slip entry and input amounts.
C. Enter foreign dividend & withholding
In ProFile navigate to Other Income → Foreign Income / Other foreign amounts (sometimes under “Other Information” or a dedicated “Foreign” menu).
Create a new foreign income entry: enter country (United Kingdom), type (dividend), gross amount in foreign currency (£6,250), foreign tax withheld (£1,562.50) and the date of receipt.
Enter the exchange rate used (e.g., 1.70). ProFile will convert foreign amounts into CAD when you save.
Verify that ProFile populates the foreign tax credit worksheet (T2209) — check the T2209 form within ProFile to ensure the foreign tax credit was calculated and applied. If needed, adjust the FX rate or documentation.
D. Enter rental property income and disposition (CCA/recapture)
In ProFile go to Rental / Business (T776 module for rental). Create or open the rental property workpaper.
Enter the rental income and expenses for the year (lines for rent received, management, repair, mortgage interest etc.).
Locate the CCA tab within the rental module. Enter prior years’ CCA history: opening UCC (e.g., $394,008.87) and class information (class for building, class for furniture if applicable). Ensure the UCC brought forward matches your workpapers.
For the disposition: find the disposition area in the rental module, click New disposition, enter sale date, proceeds of disposition ($675,000), selling costs, and allocate proceeds between land and building.
Save — ProFile will calculate any recapture (which will flow to income) and the capital gain (which will flow to Schedule 3). Review the calculated recapture value on the rental summary and confirm it matches your manual calculation.
If the UCC becomes zero and the class is closed, ProFile will also show any terminal loss (rare with buildings).
E. Enter principal residence sale & T2091 designation
Open Schedule 3 (Capital Gains) in ProFile. Add a new disposition line for the principal residence. Enter: date sold, proceeds, A C B, and selling costs.
ProFile should prompt you about principal residence — it will open the T2091 section. Complete the T2091 form: indicate the years of ownership and the years you wish to designate for PRE.
IMPORTANT: In the T2091, do not include years already designated to the cottage (2014–2016). Only designate the allowable years for the current property. ProFile will calculate the exempt portion and carry the taxable portion to Schedule 3.
Save and check the Schedule 3 totals and the T1 summary to ensure capital gains/taxable portion flow correctly.
F. Run foreign tax credit and review
Go to Forms and open T2209 (Federal Foreign Tax Credit) — verify ProFile pulled the foreign tax paid in CAD.
Review the limit calculation to ensure the FTC is not exceeding the allowable limit. ProFile usually computes the allowable limit automatically but always verify.
G. Final checks & produce T1
Use ProFile’s diagnostics / validation tool to find missing slips or inconsistencies.
Run Tax Summary and check for: OAS clawback (if applicable), CPP/OAS reporting, RRIF amounts, recapture included in income, taxable capital gains, and the foreign tax credit.
Print or e-file as required. Save workpapers (FX calculations, property closing statements, foreign receipts, and CCA history) into the client file.
✅ ProFile practical tip: Always attach the scanned or PDF source documents to the client file in ProFile (slips, closings, foreign documentation). This saves re-work and is essential if CRA requests verification.
7) Worked examples — simplified numeric walkthroughs (illustrative) ✏️
These examples are illustrative. Use the client’s exact numbers from their closing statements and slips when preparing the return.
Enter gross CAD on income line; enter foreign tax on T2209; ProFile computes the allowable credit.
B — Rental sale & CCA recapture (illustrative)
Sale proceeds: $675,000
UCC before sale: $394,008.87 (building class UCC)
Proceeds allocated to building portion (for recapture) e.g., $473,000 (as per file allocation)
Recapture = lesser of (proceeds allocated to class − UCC) and prior CCA claimed. If proceeds allocated to building = $473,000 and UCC = $394,008.87 ⇒ recapture ≈ $78,991.13 (this becomes ordinary income).
Separately calculate capital gain on land: Proceeds allocated to land, less ACB of land, less selling costs ⇒ gain; report 50% as taxable.
⚠️ Warning: the allocation between land and building materially changes recapture and capital gain. Use closing statements (often show land vs building breakdown) or a professional appraisal if uncertain.
All T-slips (T4A(OAS), T4RIF, CPP statements, T5/T3 etc.).
RRIF contract documentation (if needed).
Rental property: acquisition documents, past CCA schedules, repair vs capital improvements documentation, disposition statement (sale), solicitor’s statement and land/building allocation.
Principal residence sale: sale contract, settlement statement, proof of previous cottage T2091 designation (2016) — the old T2091 or filed return copy.
Foreign dividend: foreign payor documentation showing gross dividend and withholding; bank statement showing net receipt; FX rate evidence.
Workpapers showing all manual calculations, FX rate chosen, assumptions.
9) Common mistakes new preparers make — and how to avoid them 🚫➡️✅
Using net foreign amounts only. Always enter gross foreign income and record foreign tax withheld separately for FTC.
Forgetting to allocate sale proceeds between land & building. This changes recapture and capital gain. Always find the allocation on closing docs.
Failing to account for prior PRE designations. If a property was claimed as a principal residence in prior years, you can’t re-use those years. Pull older T2091s.
Not reconciling UCC and prior CCA claims. Mistakes here lead to wrong recapture amounts. Reconcile year-by-year CCA history.
Skipping documentation of FX rate. Always record and store the exchange rate used and the source (Bank of Canada, actual received rate, or bank statement).
11) Handy quick reference cards (copy into your workpapers) 🗂️
Quick card — Foreign dividend
Enter gross foreign dividend → convert to CAD → enter foreign tax withheld → run T2209 for FTC.
Quick card — Rental sale with prior CCA
Step 1: Confirm UCC at time of sale. Step 2: Allocate proceeds to building & land. Step 3: Recapture = proceeds to class − UCC (if positive). Step 4: Compute capital gain on the land portion (50% taxable).
Quick card — PRE & previous designations
Pull old T2091s → count years already designated → apply PRE formula.
12) Final checklist before filing Gerard’s return ✅
Rental disposition entered, CCA history reconciled, recapture confirmed.
Principal residence sale entered, T2091 designation done and years validated against the cottage designation.
Workpapers include FX rate, closing statements, proof of withholding, and prior T2091.
Diagnostics run in ProFile and errors resolved.
Client reviewed the return and signed required authorizations or e-file consent.
Final note — mindset for new preparers 🧠✨
Take it step-by-step. When cases combine pension income, foreign income and property disposals, document everything and do the math twice — once manually and once in ProFile — to catch software input errors. Keep excellent workpapers; CRA reviews often focus on property dispositions, foreign income, and CCA history.
Entering foreign dividends received from a UK company — the beginner’s ultimate knowledge base for tax preparers 🇬🇧💷➡️🇨🇦💵
A friendly, step-by-step guide for absolute beginners: what foreign dividends are, how to calculate the Canadian amounts, how Canada avoids double taxation (foreign tax credit vs deduction), and exactly how to enter the numbers in Intuit ProFile like a pro. Packed with checklists, clear worked numbers, ProFile field guidance, and quick-reference boxes you can copy into your workpapers. ✨
Why this matters (TL;DR) Foreign dividends are not entered on Canadian dividend slips (T5/T3). They must be reported as foreign investment income at the gross amount (before foreign withholding), converted to CAD, and the foreign tax withheld is either claimed as a foreign tax credit (T2209) or, to the extent the credit is limited, the leftover tax can be deducted under the appropriate deduction line. Enter them correctly to avoid incorrect gross-ups, wrong dividend tax credits, and potential CRA adjustments.
🔎 Quick glossary (for total beginners)
Gross foreign dividend — the full amount declared by the foreign payer (before any local withholding).
Withholding tax — tax taken by the foreign country on the dividend before it reaches the investor.
Foreign tax credit (FTC) — a Canadian credit intended to avoid double taxation; calculated on T2209.
Exchange rate (FX) — the CAD conversion rate you use to translate foreign amounts into Canadian dollars; document the source (Bank of Canada daily/annual, or bank statement).
🧾 Worked example (use these exact steps with your client numbers)
Client received:
Gross dividend = £6,250
Withholding tax = £1,562.50 (25%)
Net received in bank = £4,687.50
Use the FX rate you choose and document it. Example uses the UK average FX 1.6076 CAD/GBP (we show the arithmetic step-by-step so you can reproduce it exactly).
Step-by-step arithmetic (digit-by-digit so you can double-check):
Gross CAD = £6,250 × 1.6076
6,250 × 1 = 6,250
6,250 × 0.6076 = 3,797.50
Total = $10,047.50 CAD
Withheld CAD = £1,562.50 × 1.6076
1,562.50 × 1 = 1,562.50
1,562.50 × 0.6076 = 949.375
Total = $2,511.88 CAD (rounded to cents)
How it flows on the return (conceptually)
Report $10,047.50 as foreign investment income (not a T5).
Claim the $2,511.88 as foreign tax paid for the T2209 FTC calculation.
Suppose the software computes allowable FTC = $1,507.00; the remaining $1,004.88 (difference) can be claimed as a deduction (line 23100) to avoid double taxation. The net result: CRA sees the gross income taxed in Canada, but you get relief for much of the foreign tax through the credit and the rest via the deduction.
📌 Workpaper note: Always include (a) the foreign payor’s statement showing gross/net/withheld, (b) the bank deposit showing the net received, (c) the FX source and calculation, and (d) the T2209 worksheet printout.
How Canada treats foreign dividends (simple rules)
Do not put them on a Canadian dividend slip (T5/T3). They are NOT eligible for Canadian dividend gross-up or dividend tax credit.
Treat foreign dividends like other investment income (similar to interest) for reporting purposes.
Enter the gross foreign amount and the foreign tax withheld separately so the software can compute T2209.
The FTC cannot normally exceed the Canadian tax attributable to that foreign income — software limits it automatically; leftover foreign tax (if any) can be claimed as a deduction (line 23100 or equivalent), depending on the situation.
Intuit ProFile — exact field-by-field entry (for someone who’s never used tax software)
These steps assume a typical ProFile layout. Exact menu names may vary slightly by ProFile version — I show the practical path and exactly which values to enter.
Open the client file → confirm taxpayer demographics and tax year.
Go to Slips → Foreign employment, pension & investment income (slip 40 / foreign income worksheet)
Choose country: United Kingdom (UK)
Type: Dividend (foreign)
Enter the foreign amounts (in foreign currency):
Gross foreign dividend: £6,250 (put in the gross currency box)
Foreign tax withheld: £1,562.50 (enter in the “foreign tax paid/withheld” box)
Date of receipt: enter the actual date (affects the FX rate if you use date-of-receipt rate).
Enter exchange rate (ProFile will often ask):
FX rate used: type 1.6076 (or your chosen Bank of Canada rate). ProFile will convert the gross & withheld to CAD automatically and show the CAD equivalents (confirm the CAD amounts match your manual workpapers).
Save the foreign income entry.
ProFile will carry the gross CAD amount to the T1 investment income area (not to the T5 dividend lines).
It will also populate the T2209 (Federal Foreign Tax Credit) fields with the CAD amount of foreign tax paid.
Open the T2209 form inside ProFile and verify:
Foreign tax paid (CAD) = should show the converted $2,511.88 (or your calculated CAD).
FTC allowable — ProFile will calculate the federal limit. Confirm the computed amount and keep a copy of the T2209 for the workpaper folder.
Check provincial tax credit — ProFile normally flows the provincial credit automatically; confirm the provincial line shows the matching converted foreign tax amount (subject to provincial limitations).
If FTC < foreign tax paid:
ProFile often posts the excess to a deduction line (e.g., line 23100 — “Other deductions”) if applicable. Verify that the leftover $1,004.88 (in our example) is posted as a deduction. If not, manually enter it under the appropriate deduction field per the software prompts.
Diagnostics & validation
Run ProFile validation/diagnostics. Look for warnings (e.g., “Check whether tax treaty applies”) and document whether the tax treaty affects withholding (note the treaty — UK/Canada — in notes).
Save and print the foreign income worksheet and the T2209 for your client file.
✅ ProFile tip: When the program gives a warning about tax treaties or section references, read it — in real cases treaty relief can change withholding rates or documentation requirements. Always keep the source documents attached to the client in ProFile (scanned dividend statement + bank deposit).
Boxes & notes (copy these into your workpapers) 🗂️
Note — FX selection Choose one of: (a) Bank of Canada daily rate for the date of receipt, (b) bank’s actual conversion rate from the bank statement, or (c) an annual average if you consistently use that method for the year. Document which you used and why.
Caveat — tax treaty Some treaties reduce withholding rates. If your client’s foreign country has a treaty with Canada (e.g., UK), the actual withholding may differ. Record any treaty-related relief and attach foreign payer communications.
Documentation checklist (must attach to client file)
Foreign payer statement showing gross dividend and withholding.
Bank deposit showing net received.
FX evidence (Bank of Canada printout or bank exchange statement).
T2209 worksheet printout and screenshots of ProFile entries.
Common beginner mistakes (avoid these!) 🚫
Entering net foreign amount instead of gross.
Putting foreign dividend amounts on a T5 (results in incorrect gross-up and dividend tax credit).
Forgetting to convert and document the foreign tax paid to CAD.
Not attaching original foreign documentation to the client file.
Quick QA checklist before you finish the file ✅
Did you enter gross foreign dividend in the foreign income worksheet?
Did you enter foreign tax withheld separately (foreign currency) and supply a date?
Did you enter/document the FX rate and confirm the CAD conversion matches your manual calculation?
Is T2209 populated and is the allowed FTC reasonable?
If there’s remaining foreign tax, is the excess shown as a deduction (line 23100) or otherwise accounted for?
Are all supporting documents attached to the ProFile client folder?
Reporting rental income & the disposition of a rental property — the complete beginner’s knowledge base for tax preparers 🏠📁💡
When a rental property is sold in Canada, two different tax events must be reported:
Rental income and expenses up to the date of sale
The sale of the rental property, including capital gain and possible CCA recapture
This guide explains both in a clear, beginner-friendly way, PLUS how to enter everything into Intuit ProFile.
🎯 Scenario Summary
A taxpayer sells their rental property after years of being a landlord. They previously claimed CCA (depreciation) because rental properties qualify for it. Over time the property increased in value — meaning:
• There is a capital gain on sale • There is a recapture of CCA because the property rose in value instead of depreciating
This makes for a high-income year — common in real rental sale cases.
✅ Step 1: Report Rental Income (Form T776)
You must report rental activity only up to the sale closing date.
Key inputs in T776:
• Property address • Start date and end date (end = sale date) • Gross rental income collected before sale • Eligible rental expenses before sale
Common deductible expenses:
• Mortgage interest • Property taxes • Insurance • Utilities • Repairs and maintenance • Advertising • Office & admin • Legal fees related to tenant or rental issues (e.g., tenant damage, eviction letters)
🚫 Important: Legal fees connected to the sale closing are NOT deducted as rental expenses. They go into the property sale calculation instead.
⚠️ Special Tax Note
📌 Tenant-related legal fees are deductible 📌 Sale closing legal fees are NOT deductible — they increase the cost base of the property
🧾 Step 2: Calculate Capital Gain (Schedule 3)
Formula:
Sale price minus Adjusted Cost Base (ACB) minus selling expenses (legal fees, realtor fees, etc.) = Capital Gain
Only 50% of the capital gain is taxable.
What affects ACB?
• Original purchase price • Closing legal fees at purchase • Capital improvements (not regular repairs) • Land transfer tax • Any sale-related legal fees & commissions deducted here, not on T776
🧨 Step 3: Calculate Recapture of CCA (Important!)
The taxpayer previously claimed depreciation (CCA).
If the property sells for more than the remaining UCC balance, the CRA “recaptures” the CCA claimed.
This recapture is fully taxable income — not a capital gain.
Example logic:
UCC (remaining cost after CCA claims) = $394,887 Property cost (ACB) = $472,980 Difference = $78,093 recapture
This amount goes to income on the return — reported on T776.
Reason: You told CRA the property was depreciating, but it actually appreciated.
🧠 Tax Learning Tip
CCA can save tax each year while renting. But claiming CCA often increases tax when selling.
Only claim CCA if you’re sure you won’t sell soon — because recapture can hurt.
🧍 Final Tax Result Components
The tax return includes:
• Rental profit up to sale date • Capital gain (50% taxable) • Recapture of CCA (100% taxable income)
This can create a large taxable income in the year of sale.
💻 How to Enter in Intuit ProFile (Beginner Steps)
Step-by-step like you’ve never used software before:
Open T776 form (Rental Income)
Enter property address
Enter rental start date and end date (sale date as end)
Enter gross rent received
Enter allowable expenses
Do NOT enter sale legal fees here
Scroll to line for “Recaptured CCA” — software will fill once CCA data entered
ProFile pulls these numbers into the recapture section
Go to CCA worksheet (T776 CCA tab)
Enter opening UCC balance for the year
Enter sale proceeds in asset details
Software automatically calculates recapture
Tip: In ProFile, blue fields are pulled from another worksheet. That means values link automatically.
⭐ Quick Recap for New Tax Preparers
Rental sale means:
• Rental income reported to sale date • Deduct only rental-related expenses • Sale legal fees go in capital gain calculation • Capital gain = proceeds – ACB – selling costs • CCA recapture = fully taxable • Both amounts reported in return
📌 Key Takeaways
🚀 Rental sales create multiple tax layers 📈 Capital gains tax applies ♻️ CCA recapture adds taxable income 🛠️ ProFile automates math but YOU must enter correct figures
📝 Pro Tax Prep Tip
Always ask your client for:
• Purchase documents • Sale closing statement • Records of capital improvements • CCA schedules from prior years
Without these, you cannot calculate capital gain or recapture properly.
🏡 Case Study: Reporting the Sale of a Principal Residence in Canada — Beginner’s Guide
Selling a principal residence in Canada can be simple for some, but things get more complex if other properties have previously claimed the Principal Residence Exemption (PRE). This guide explains everything a new tax preparer or individual needs to know about reporting a principal residence sale, calculating capital gains, and using Intuit ProFile step by step.
🎯 Scenario Overview
A taxpayer sold a city home in 2022 for just under $1,000,000. They purchased the property in 2014 for $599,800 and incurred additional legal fees and commissions when selling. Previously, the taxpayer had a cottage that claimed the PRE for the years 2014, 2015, and 2016.
Key Point: When other properties have already claimed the PRE, not all years of ownership of the new property are eligible for the exemption. Only the years not used by other properties can be claimed.
🧾 Step 1: Determine Years Eligible for Principal Residence Exemption
1️⃣ Calculate total years owned
Home owned since 2014 → 9 years
2️⃣ Subtract years previously claimed for other properties
2014, 2015, 2016 were used for the cottage → 6 years remaining
3️⃣ Apply the “+1” rule in the PRE formula
Canada allows an extra year added to the exemption calculation
Eligible years for PRE = 6 + 1 = 7 years
💡 Note: Always check prior PRE claims (T2091) to avoid CRA audits. Misallocating years can lead to capital gains tax penalties.
⚖️ Step 2: Calculate Capital Gain
Formula: Sale Price – Adjusted Cost Base (ACB) – Outlays/Expenses = Capital Gain
Years not covered by PRE = 2 years (9 total – 7 eligible)
CRA calculates capital gain proportional to unshielded years
Example Result:
Net taxable capital gain = $81,005.59
🚨 Note: Even if most years are exempt, any leftover years must be reported and taxed.
📑 Step 3: Reporting in Intuit ProFile
Beginner-Friendly Steps:
Open Schedule 3 → scroll to Principal Residence Section
Enter:
Property address
Year acquired
Sale year
Sale proceeds
ACB
Selling costs (legal fees, commissions)
For Designation Box, select:
“I designate this property as my principal residence for some but not all years owned”
Enter number of eligible years (from Step 1 calculation)
ProFile automatically calculates:
Portion of capital gain exempted
Portion taxable
Double-check T2091 inputs if prior PRE claims exist
💻 Tip: Intuit ProFile links PRE calculations to T2091. Always keep prior PRE records handy for accuracy.
⚠️ Important Notes for New Tax Preparers
PRE protects taxpayers from paying tax on capital gains for most of their principal residence years.
If other properties have claimed the PRE, the formula reduces eligible years.
CRA requires disclosure of all sales, even if fully exempt. Non-disclosure can lead to penalties.
Always review T2091 from previous years to avoid double-counting exemptions.
🌟 Quick Takeaways
✅ Always calculate total ownership years ✅ Subtract years used for other properties ✅ Add 1 extra year for the PRE formula ✅ Enter exact eligible years in Intuit ProFile ✅ Only the non-exempt portion of the capital gain is taxable ✅ Keep prior T2091 forms and closing documents
📝 Pro Tax Prep Tip
Create a simple spreadsheet for every principal residence sale:
Column 1: Year owned
Column 2: Property claiming PRE
Column 3: Years available for current PRE
This helps prevent errors and makes Intuit ProFile entry straightforward.
This guide gives a complete beginner-friendly roadmap for reporting principal residence sales, calculating capital gains, and using ProFile like a pro, even if other properties have previously used the PRE.
💼 Case Study: Gerard Ratchford — Review of Senior Tax Return & What to Expect After Filing
Filing a senior’s tax return with foreign income, pensions, and property sales can be complex, but understanding the process is key for any tax preparer. This guide breaks down Gerard Ratchford’s tax scenario, explains what he can expect after filing, and shows step-by-step how to enter everything in Intuit ProFile, beginner-style.
🎯 Overview of Gerard’s Tax Situation
Gerard is a senior with multiple income sources and asset sales during the year:
Pensions: CPP, OAS, and other private pensions
Foreign Dividend Income: From a UK company, eligible for foreign tax credits
Property Sales: Two properties, including a rental property and a principal residence (some years exempt under the PRE formula)
Other Income Adjustments: Recapture of CCA on rental property and capital gains from unshielded years of the principal residence
Total income for the year: $255,000+, with complexities due to senior status and prior CCA claims.
📈 Key Tax Components
1. Pension Income & OAS Repayment
Seniors with high income may have to repay part of their Old Age Security (OAS)
Repayment is calculated at line 235 in the tax return
Example: Gerard owes $7,930 in OAS repayment due to income above the threshold
ProFile Tip:
Enter all pension slips (T4A, OAS)
ProFile will automatically calculate OAS clawback based on total income
2. Foreign Dividends & Credits
Dividends from UK sources go on line 121
Eligible foreign tax paid can be claimed as a foreign tax credit
Subsection 231 deductions may also apply for certain foreign investment income
ProFile Tip:
Enter foreign dividends under the T5 / Foreign Income section
Enter foreign taxes paid and deductions → software calculates foreign tax credit
3. Property Sales
Rental Property: Capital gain + recapture of CCA
Principal Residence: Capital gain on unshielded years
ProFile Tip:
Enter property sales under Schedule 3
Include adjusted cost base, selling expenses, and recaptured CCA
ProFile automatically calculates taxable portion and adds it to total income
💡 What Gerard Can Expect After Filing
1. Installment Notices from CRA
CRA may send notices assuming the high income continues
Example: Installments of ~$25,000 per quarter for next year
Solution: Estimate next year’s normal income (excluding property sales) and adjust payments accordingly
2. OAS Withholding
CRA may withhold OAS payments due to high income in the prior year
Gerard may see his OAS payments withheld entirely each month
Solution: File Form T1213 to request a reduction in withholding, showing projected income below the OAS clawback threshold
3. Potential CRA Review
CRA may review foreign dividend income, tax credits, or subsection 231 deductions
Always keep supporting documentation for foreign income, foreign taxes paid, and prior filings
💻 Step-by-Step in Intuit ProFile (Beginner Guide)
Enter Personal Information
Gerard’s name, SIN, birth date, and marital status
Enter Income Sources
T4 slips for pensions
T5 slips for domestic & foreign dividends
Schedule 3 entries for rental property and principal residence
Enter Deductions & Credits
OAS repayment (line 235)
Foreign tax credits & subsection 231 deductions
Professional or investment-related deductions if applicable
Schedule Installments & T1213 Form
If total tax owing is unusually high, calculate next year’s estimated income
File T1213 in ProFile → CRA will adjust withholding of OAS
Review & Finalize
ProFile calculates total income, deductions, credits, and taxes owing
Confirm taxable capital gains, CCA recapture, and foreign tax credit calculations
💡 ProFile Tip: Blue fields are linked from other worksheets. Always double-check figures from prior years, property sales, and foreign income to ensure accuracy.
🌟 Key Takeaways for Tax Preparers
✅ Seniors with property sales may have unusually high income in a single year ✅ OAS repayment must be calculated if income exceeds threshold ✅ Foreign dividends require accurate foreign tax credit and deduction entries ✅ CRA may issue installment notices or withhold OAS payments — proactive planning is essential ✅ Keep all supporting documents for property sales, pensions, and foreign income ✅ ProFile automates calculations, but correct input is critical
This review of Gerard Ratchford’s tax return provides a complete knowledgebase for new tax preparers, illustrating senior tax nuances, foreign income, property sales, and how to manage CRA expectations, all while using Intuit ProFile efficiently.
💰 RRSP Deductions: How to Claim Them Properly & Avoid Common Traps
RRSPs (Registered Retirement Savings Plans) are one of the most powerful tax planning tools in Canada — but they’re also one of the most commonly misunderstood areas for beginners in tax preparation.
Incorrect reporting can trigger unnecessary CRA reviews, penalties, or missed deductions for your client. This guide makes RRSP deduction rules simple, so you can confidently prepare returns and spot traps before they cause trouble ✅
🎯 What You Must Understand First
RRSP contributions affect taxes in two separate ways:
Concept
Meaning
RRSP Contribution
Money put into the RRSP (must be reported in the correct year)
RRSP Deduction
The amount the taxpayer chooses to deduct this year (or carry forward)
🧠 Key principle A contribution must always be reported in the year it was made — even if the taxpayer chooses to deduct it later.
📆 RRSP Contribution Timing Rules
✔️ Contributions made Jan 1 – Dec 31 → reported in that tax year ✔️ Contributions made first 60 days of next year → can be applied to prior year or carried forward
📝 Example: Contribution made Feb 10, 2024 → can be reported on 2023 tax return (and deducted now or later)
⚠️ Common RRSP Trap #1: Not Reporting Contributions When Made
Clients may say:
“I don’t want to use that RRSP deduction this year — save it for next year.”
✅ They can delay the deduction ❌ They cannot delay reporting the contribution
📌 Correct Way to Handle It in Tax Software
When a client contributes but doesn’t want to deduct it yet:
Enter the full RRSP contribution
Choose only a portion to deduct for the current year
Carry forward the rest as “undeducted contributions”
This ensures CRA sees accurate Schedule 7 info.
🧠 Always verify the filed form (Schedule 7), not just software worksheets — CRA sees the form, not your internal worksheets.
📊 Undeducted Contributions vs Over-Contributions
These two are often confused by students — but they are very different.
Term
What it means
Tax issue?
Undeducted Contribution
Contribution made within limit but deduction deferred
✅ Allowed — no penalty
Over-Contribution
Contribution exceeds limit by more than $2,000
❌ Penalty applies
✨ Real-Life Examples
✅ Example: Undeducted (No Penalty)
RRSP limit: $60,000 Contribution: $60,000 Deduction taken this year: $35,000 → Carry $25,000 to next year
If a taxpayer contributes in first 60 days of the year, they may not be over-contributed if:
Their new year’s RRSP room covers it
They choose to deduct in that year instead
✅ Always consider new contribution room as of January 1
📌 If an Over-Contribution Happens
Client can:
✔️ File Form T1-OVP (RRSP Excess Contributions Return) ✔️ Withdraw excess ✔️ Request penalty relief (CRA may waive for first-timers)
🚀 RRSP Best-Practice Tips for Beginners
✔️ Always get the client’s latest Notice of Assessment ✔️ Confirm contribution slips and dates ✔️ Review Schedule 7 before filing ✔️ Track carry-forward room and undeducted amounts ✔️ Ask clients about contributions in first 60 days
🧠 Memory Hack
Contributions must be reported. Deductions are optional.
💡 Tax-Pro Tip Box
🟦 TIP: Smart Tax Planning Strategy High-income year coming? Carry forward contribution to deduct in higher-income year = larger tax savings
🟨 TIP: Avoid Auto Trust in Software Tax software is helpful — but not perfect → Always verify final schedules before filing
🎁 Quick Reference Summary
Rule
Remember
Report contributions
Always — in year they were made
Deduct contributions
Anytime — now or future
Penalty triggers
Over $2,000 above limit
CRA Form for excess
T1-OVP
Best practice
Review Schedule 7 manually
✅ You Can Now…
Correctly report RRSP contributions
Avoid costly over-contribution penalties
Explain RRSP carry-forward strategy to clients
Handle first-60-day contributions confidently
Review Schedule 7 like a pro
💔 Spousal & Child Support Payments in Canadian Taxes — The Ultimate Guide
Support payments are common in separation and divorce situations — but tax treatment can be confusing and costly if misunderstood. This guide breaks down exactly how spousal support and child support work for tax purposes in Canada so you avoid CRA traps ✅
🔑 Key Tax Rule Summary
Type of Support
Taxable to Recipient?
Deductible to Payer?
Spousal Support
✅ Yes
✅ Yes
Child Support
❌ No
❌ No
🧠 Remember: These rules apply only when there is a valid written agreement or court order.
📝 You MUST Have a Written Separation/Divorce Agreement
CRA will not allow spousal support deductions without a written agreement specifying the payment terms.
✔️ Court order ✔️ Written separation agreement ✔️ Divorce agreement
⚠️ CRA often reviews spousal support claims every year, so keep copies on file.
📅 Periodic Payments vs. Lump-Sum Payments
✅ Deductible & taxable only when payments are:
Periodic (e.g., monthly)
Specified in the agreement
Paid directly to the spouse (unless approved exception)
❌ NOT deductible / taxable when payments are:
Lump-sum
Voluntary payments not in the agreement
Gifts, debt payments, car purchases, etc.
💡 If it isn’t written in the agreement, assume it’s not deductible.
👩⚖️ Third-Party Payments
Most payments to third parties are not deductible, unless:
✔️ The agreement states they are support ✔️ They are paid on a regular periodic basis ✔️ They benefit the supported spouse
Example Exception:
Paying rent directly to a landlord instead of the spouse (if written in agreement)
🎒 Child vs. Spousal Support — Ordering Matters
If both exist, child support must be paid first before spousal support counts for tax purposes.
🔁 Retroactive & Catch-Up Payments
Catch-up payments for missed support must be written in the agreement to be deductible.
If someone pays “extra” without it being written in the document ⇒ ❌ not deductible
👀 Special Case: No Formal Agreement
If there’s no lawyer-drafted agreement or court order:
✅ Parties must create a written agreement ✅ Must specify spousal support vs child support ✅ Must follow that agreement consistently
Otherwise → no deduction allowed
🚫 Common CRA Traps — Avoid These
Mistake
Result
Paying lump-sum spousal support
❌ No deduction
Paying expenses for spouse not in agreement
❌ No deduction
No written agreement
❌ No deduction
Payments not labelled as support
❌ No deduction
Paying child’s expenses thinking it’s support
❌ Always non-deductible
🛑 “But I paid their bills / rent / tuition” doesn’t matter unless in agreement.
🧾 Tax Filing Tips
✅ Keep agreement and receipts in file ✅ Ensure payments match agreement terms ✅ Confirm amounts annually ✅ Use correct line on return (Federal: Line 22000 deduction / Line 12800 income)
📂 Best practice: Store all agreements permanently — CRA may ask even years later.
📌 Quick Definitions Box
🟦 Spousal Support
Paid to help former spouse financially
Tax-deductible & taxable income
🟨 Child Support
For children’s financial needs
No tax deduction & not taxable
🧠 Pro Tip for Tax Preparers
✅ If a client says they paid support, always ask for the written agreement before claiming deductions.
Ask questions like:
“Is it periodic?”
“Is it written in the court agreement?”
“Was any part lump-sum?”
“Did you pay third-party expenses instead?”
Document your notes — CRA reviews these often.
🎯 Final Takeaway
Spousal support = taxable & deductible Child support = not taxable & not deductible Only valid when written & periodic When in doubt — if it’s not in the agreement, it doesn’t count.
👨👩👧 Claiming Personal Tax Credits for Dependants in Canada — Tips, Hacks & CRA Traps
Claiming dependant tax credits is one of the most valuable (and misunderstood) areas in personal tax preparation. Whether you’re supporting a child, parent, or another family member, knowing the rules ensures you maximize credits and avoid CRA reassessments ✅
This guide gives you the beginner-friendly, tax-pro secrets 👇
🧾 What Are Dependant Tax Credits?
Dependants can include:
👶 Children 🧓 Parents & grandparents 👨🦽 Individuals with disabilities 👩🧑 Siblings, aunts, uncles, nieces, nephews (special situations)
The most common dependant-related credits include:
Eligible Dependant Credit (Equivalent to Spouse) — Line 30400
Canada Caregiver Credit — Lines 30425 & 30450
Disability Tax Credit Transfer — Line 31800
Transfer of unused tuition/age/pension credits (where applicable)
🥇 Pro Strategy: Always Gather Complete Dependants’ Income Info
📌 The #1 reason CRA reassesses dependant credit claims Wrong or missing income reported for the dependant.
Always collect:
Dependants’ SIN
Date of birth
Net income (Line 23600 from their tax return)
✅ Best practice: File dependants’ returns too — ensures accuracy and automatic linking of data.
👶 Claiming Children as Dependants — Key Tips
✅ Single parents may claim the Eligible Dependant Credit
Only one parent can claim this credit for a child — never both.
🎯 Hack: Claim the Child With the Lowest Income
Older kids often start working → reduces or eliminates the credit.
🧠 Tip: Each year, check which child gives the highest credit
⚠️ Common Pitfall
Carrying forward last year’s choice in tax software without checking — missed savings!
🧒 Dependants With Disabilities
Children (or adults) with disabilities may unlock:
Canada Caregiver Credit
Disability Tax Credit (DTC)
Disability Amount Transfer (if dependant qualifies)
🌟 Always ask if dependant has a disability certificate (T2201).
This can dramatically increase refundable & non-refundable credits.
🧓 Claiming Elderly Parents or Relatives
Parents, grandparents, and sometimes other relatives may qualify if:
✅ They live with you ✅ They rely on you for support ✅ They are mentally or physically infirm
📅 Important change: Since 2017, elderly parents must be infirm to claim caregiver amounts.
📎 Documentation Checklist
Document
Why It Matters
SIN for dependant
Required to claim
Date of birth
Determines credit type eligibility
Proof of disability (if any)
Required for disability-related credits
Net income / tax return copy
CRA cross-checks
Proof of residency/relationship
If questioned by CRA
💡 Keep digital copies — CRA may ask years later.
⚙️ Use Tax Software Smartly
✅ Always complete the Dependant Worksheet ✅ Enter all dependants and answer every question ✅ Software identifies the best credit — don’t guess ✅ Review Schedule 5 to confirm correctness
🎯 Complex households (kids + disabled + elderly) = use software, not manual calculation
🚨 CRA Red Flags — Avoid These!
❌ Two parents claiming same child ❌ Claiming credit without dependant income info ❌ Claiming elderly parents who are not infirm ❌ Assuming no income — guessing ❌ Not updating records when child starts working
🚫 When CRA data doesn’t match your schedule, reassessment is guaranteed.
💡 Pro Tips Box
✅ File tax returns for every family member — creates clean CRA matching ✅ Review dependants yearly — life changes change credits ✅ Young working teens? Report income to avoid credit clawback surprise ✅ For disabled dependants, explore transfer & caregiver combinations
🚗 Capital Cost Allowance (CCA) on Vehicles in Canada — The Ultimate Beginner Guide
Understanding Capital Cost Allowance (CCA) on vehicles is essential for Canadian tax preparers and self-employed taxpayers. Vehicles are one of the most commonly claimed business assets — and one of the most commonly audited by the CRA.
This guide gives you everything you need to know in simple language.
🧠 What is CCA?
Capital Cost Allowance (CCA) is the tax method for deducting the cost of business assets over time.
A vehicle used for business is not deducted in one year — you depreciate it gradually.
Think of CCA as spreading the cost of a car over multiple tax years.
🚙 Why Understanding Vehicle CCA Matters
CRA carefully reviews vehicle claims. As a tax preparer, you must:
✅ Classify the vehicle correctly ✅ Determine business-use % ✅ Apply correct CCA rules ✅ Maintain proper records and mileage logs
Incorrect claims can result in denied deductions and penalties.
🚗 Two Types of Vehicle Categories
Category
CCA Class
Examples
Notes
Motor Vehicles
Class 10
Work trucks, delivery vans, cargo vans
Standard CCA rules
Passenger Vehicles
Class 10.1
Cars, SUVs, rideshare vehicles
Special restrictions & caps
Your role is to determine whether the vehicle is Class 10 or Class 10.1.
🧾 How to Classify the Vehicle
Ask these questions:
Is the primary purpose to transport passengers? Yes → Passenger vehicle (Class 10.1) No → Motor vehicle (Class 10)
Seating capacity 1–3 seats → often Class 10 4+ seats → often Class 10.1
Design and use Cargo, work trucks, and vans used mainly for tools/equipment → Class 10 Sedans, SUVs → Class 10.1
💡 Practical Examples
Scenario
Likely Class
Uber driver uses Toyota Camry
Class 10.1
Construction worker uses pickup 90% for tools
Class 10
Cargo van used for delivery, no rear seats
Class 10
Delivery driver using personal car
Class 10.1
Most gig-economy drivers fall under Class 10.1.
📦 CCA Rules Summary
Class 10 — Motor Vehicles
30% declining balance rate
Pooling allowed (multiple vehicles in same class)
Class 10.1 — Passenger Vehicles
30% declining balance rate
No pooling (each vehicle tracked separately)
Cost limit for depreciation (luxury vehicle cap)
CCA cannot create or increase a loss
Passenger vehicles have limits — Class 10 usually allows more deduction flexibility.
📊 Business-Use Percentage
You must claim only the business portion of CCA.
Business km divided by total km equals business-use percentage.
Mileage log is mandatory — CRA audits this frequently.
💬 Half-Year Rule
In the first year you buy the vehicle, you can only claim half of the normal CCA.
😱 Common Mistakes to Avoid
❌ Claiming 100% business use without logs ❌ Treating passenger vehicle as Class 10 ❌ Forgetting CCA cost limit for Class 10.1 ❌ No receipts or mileage log ❌ Applying full CCA first year (half-year rule ignored)
🧾 Documentation Clients Must Keep
✅ Mileage log (daily or app-based) ✅ Odometer readings at year-start and year-end ✅ Vehicle purchase or lease agreement ✅ Fuel, repairs, insurance, maintenance receipts ✅ Proof of business purpose
Good documentation protects deductions.
🟦 Pro Tip Box
CRA now looks closely at vehicle expenses — especially rideshare, delivery drivers, and small contractors.
Strong logbooks + correct classification = best audit protection.
📐 Simple Illustration (No Code)
Example: Passenger vehicle costing $40,000, business use 80%
CRA depreciation limit applies (approx. $36,000) CCA rate: 30% Half-year rule first year: 15% Deduction applies only to 80% business use
🎯 Key Takeaways
Determine class: 10 vs 10.1
Apply business-use %
Use half-year rule first year
Luxury vehicle limit applies to Class 10.1
Maintain records & mileage logs
Mastering vehicle CCA will be one of your most valuable skills in personal tax practice.
🚚 Understanding Class 10 vs Class 10.1 Vehicles for CCA — How to Avoid Costly Classification Mistakes
When claiming Capital Cost Allowance (CCA) on vehicles in Canada, one of the biggest challenges tax preparers face is correctly classifying a vehicle as either Class 10 or Class 10.1. Misclassification can lead to disallowed deductions, audits, and frustrated clients 😬
This guide breaks down the complexities, rules, and decision process so you can confidently determine the correct class every time — even for tricky cases like SUVs, pickup trucks, and vans.
🚗 Quick Summary: Class 10 vs Class 10.1
Category
Class
CCA Rate
Notes
Motor Vehicle
Class 10
30%
Normal CCA rules, no purchase price cap
Passenger Vehicle
Class 10.1
30%
Purchase limit applies (~$30,000 + taxes), each vehicle tracked separately
✅ Both use 30% declining balance ❗ Major difference = Class 10.1 has a price cap & restrictions
🎯 Why This Matters
Classifying a vehicle incorrectly may:
Reduce allowable depreciation claims
Trigger CRA review or audit
Lead to adjustments & penalties
Impact business-use calculation
Most confusion happens with SUVs, pickup trucks, vans, and mixed-use vehicles — not regular cars.
🧠 The 3 Key Questions to Determine Class
When a client buys a vehicle for business, ask:
1️⃣ What type of vehicle is it?
Sedans, coupes, hatchbacks → usually Class 10.1
Pickup trucks, cargo vans → could be Class 10if business-focused
SUVs & minivans → depends on usage & seating
2️⃣ What is the primary use?
Is it used to transport:
✅ Goods?
✅ Tools & equipment?
✅ Materials for business?
❓ Or mainly people?
Passenger transportation doesn’t automatically mean business vehicle — personal commuting is not business use.
Use judgment: A painter carrying supplies daily? ✅ A consultant driving alone to meetings? ❓ (Likely passenger vehicle)
3️⃣ How much business use?
This is critical:
90%+ business use → treated as motor vehicle (Class 10) if used for equipment/transport
Less than 90% → often Class 10.1
The 90% rule is key for trucks & vans.
📦 CRA Classification Logic
CRA looks at:
Factor
Why It Matters
Number of seats
Vehicles seating 1–3 often Class 10 if used for cargo
Purpose of vehicle
Transport of goods vs passengers
Business-use %
90%+ may qualify as Class 10
Vehicle design
Cargo van vs family SUV
🟨 Handy Interpretation Table (Simplified)
Vehicle Type
Business Use
Seats
Likely Class
Cargo van used by contractor
>50% transporting tools
1–3
Class 10
Pickup truck used 90%+ for work
Hauls equipment daily
1–3 or extended cab
Class 10
SUV used for client meetings only
Mostly transporting the driver
4+
Class 10.1
Minivan used for deliveries
>50% transporting goods
1–3
Class 10
Personal car used for Uber
Passenger transport
4+
Class 10.1
🔍 Real-World Scenarios
✅ Example: Work Van for a Painter
Seats: 2
Used to carry supplies + ladders daily
Business use: 95%
Result: Class 10 (motor vehicle)
⚠️ Example: Family SUV Used for Real Estate Business
Seats: 5
Mostly driving agent to listings
Business use: 70%
Result: Class 10.1 (passenger vehicle)
🚕 Example: Uber Driver With Toyota Camry
Passenger transportation
Used to carry people, not equipment
Result: Class 10.1
🧾 CRA’s Focus on Vans & Pickups
Vans, minivans, and pickup trucks can fall into either class. You must consider:
Seating capacity
Cargo area vs passenger seating
Whether the business truly requires equipment transport
Documented usage and mileage logs
CRA may challenge claims if a vehicle could be personal but is claimed as business-oriented.
💬 Professional Judgment Required
There is no one-size-fits-all rule for vans & trucks.
Strong tax preparation involves:
Asking the right questions
Documenting business purpose
Evaluating vehicle design & function
Applying CRA criteria correctly
📎 Note Box — CRA Red Flags 🚨
CRA may question classification if:
Vehicle has family seating
Business type doesn’t require heavy tools
Mileage logs are missing
Business use below 90%
Vehicle price near luxury range
Keep supporting documents & mileage logs ready.
✅ Final Tips for Tax Preparers
⭐ Always ask how the vehicle is used in the business, not just what it is ⭐ Confirm whether equipment or goods are transported ⭐ Check seating capacity ⭐ Determine business-use percentage ⭐ When unsure — document reasoning & keep CRA classification table handy
🚚 Class 10 Vehicles — General CCA Rules, Examples & How to Calculate Deductions
When a business owner purchases a work vehicle like a truck or van, the cost isn’t deducted all at once. Instead, Canada’s tax system uses Capital Cost Allowance (CCA) to claim depreciation over time.
This section explains Class 10 vehicles, how to categorize them, and how to correctly calculate their CCA. Perfect for beginner tax preparers ✅
🚗 What Are Class 10 Vehicles?
Class 10 applies to general motor vehicles used for business, typically including:
🚚 Pickup trucks used to transport equipment
🚐 Vans used for work and business transportation
🚗 Company cars used substantially for business
These vehicles are not luxury passenger vehicles (those fall under Class 10.1 — covered later).
✅ The 3-Question Test to Confirm Class 10
Before claiming CCA, verify:
Question
Requirement
Meaning
1️⃣ What type of vehicle is it?
Must be a motor vehicle
Pickup truck, van, work truck
2️⃣ What is its use?
Used to transport goods/equipment/people for work
Business purpose proven
3️⃣ Business-use %?
Over 90% for business
Can treat as 100% business
💡 Rule of Thumb: If business use is 90%+, CRA lets you claim 100% of the cost for CCA (no proration required).
🧾 Where to Claim It
You report vehicle CCA on:
📄 Form T2125: Statement of Business or Professional Activities
Navigate to the CCA section and list the asset under Class 10 | Rate 30%
CCA Rate @ 30%: $23,500 × 30% = $7,050 CCA deduction
✅ Claim $7,050 depreciation in Year 1
🔄 When a Class 10 Vehicle is Traded in or Sold
Class 10 assets are pooled, meaning vehicles in this class are grouped.
📦 Pool Rules
Situation
Result
Proceeds < UCC AND last asset
Terminal loss (deductible 📉)
Proceeds > UCC AND last asset
Recapture (taxable income 📈)
Still other vehicles in pool
No recapture or terminal loss — balance rolls forward 🔁
📝 UCC = Undepreciated Capital Cost (book value for tax)
🌟 Sale Example — Recapture
UCC: $14,850
Vehicle sold for: $16,000
No other vehicles in pool
Since proceeds > UCC and it’s the last asset:
📈 Recapture = $1,150 (taxable business income)
🚐 Trade-In + New Purchase Example
Opening UCC: $14,850
Trade-in received: $11,500
New vehicle added: $57,000
Since a new vehicle remains in the pool: ✅ No recapture or terminal loss
New UCC: $14,850 + $57,000 − $11,500 = $60,350
CCA then applies normally:
Half-year rule only on new purchase portion
Remaining amount depreciates at 30%
📦 Quick Cheat Sheet
Feature
Class 10
Vehicle type
Work trucks, vans, business vehicles
Business use threshold
>90% = Full claim
CCA rate
30%
Half-year rule
✅ Yes
Pooling rules
✅ Yes
Recapture/Terminal loss
Only when last asset is disposed
📘 🟦 Important Note
Keep vehicle logs to support business-use claims. CRA expects proof for % of business use. Mileage apps or manual logs both work!
💡 Pro Tax Tip
If a client parks the vehicle at the business and only uses it for work:
✅ Strong evidence of >90% business use ✅ Full CCA claim allowed ❗ Still recommend maintaining a mileage log
🎯 Final Takeaway
Class 10 CCA is straightforward:
Used primarily for business ✅
Declining balance @30% ✅
Half-year rule in purchase year ✅
Recapture/terminal loss only when last vehicle in pool ✅
Once you understand these mechanics, vehicle CCA becomes one of the easiest areas of tax prep 💪
Special CCA Rules for Class 10.1 Vehicles (Passenger Vehicles 🚗)
When it comes to claiming Capital Cost Allowance (CCA) on vehicles in Canada, Class 10.1 vehicles have unique rules that every new tax preparer must understand. These rules commonly apply to passenger vehicles, especially those used for ride-sharing, sales jobs, or small business operations.
This guide breaks down the special treatment of Class 10.1 vehicles—simply, clearly, and with all the essential CRA rules you’ll need. ✅
📌 What Is a Class 10.1 Vehicle?
A Class 10.1 vehicle is a passenger vehicle used for business where:
The cost exceeds $30,000 (before taxes)
It’s mainly designed to carry passengers, not goods
It typically seats up to 9 people (including driver)
Examples 🚗 BMW, Mercedes, Audi, Tesla, Lexus, etc. 🚙 Many personal-use SUVs & sedans if above the cost threshold
🛑 Heavy trucks, vans designed to haul goods, and taxis/limos may fall under Class 10.
💰 Capital Cost Limit — Max $30,000 + Tax
The CRA caps the depreciable amount of Class 10.1 passenger vehicles at:
$30,000 + GST/HST + PST (if applicable)
Even if someone buys an $85,000 luxury car, only the first $30,000 + taxes goes into the CCA calculation.
✅ Helps prevent claiming large tax deductions for luxury cars ❗ This limit has been around since ~2001 and has not increased despite inflation
🧾 Each Vehicle Has Its Own Class (No Pooling!)
Unlike Class 10 vehicles, Class 10.1 assets are not pooled.
✔️ Each vehicle gets its own separate line / UCC class ✔️ Track the CCA per specific vehicle ❌ Cannot mix with other vehicles
This makes record-keeping important. In tax software, you’ll enter each Class 10.1 vehicle as its own asset entry.
📉 CCA Rate & Half-Year Rule
CCA rules for Class 10.1 include:
Rule
Applies?
CCA rate
30% declining balance
Half-year rule (first year)
✅ Yes
Half-year rule in year of sale
✅ Unique exception!
Special twist: Unlike most assets, you still get half-year rule deduction in the year you sell the car.
💥 No Recapture on Sale (Big Difference!)
The CRA does not charge recapture on Class 10.1 vehicles.
Why? Because you were only allowed to claim CCA on $30,000, not the full value. If a luxury vehicle still has value when sold, it wouldn’t be fair to tax recapture.
Example:
Vehicle cost: $80,000
CCA allowed: $30,000
UCC after years: ~$5,000
Sale price: $25,000
In Class 10.1 → ✅ No recapture
❗ Terminal Loss Rules
Terminal loss on Class 10.1: Rare and usually not applicable
Why? Because resale values are typically higher than the small remaining UCC.
👔 Difference for Employment vs Business Use
Scenario
Terminal Loss
Recapture
Business (T2125)
Possible (rare)
❌ None
Employment expenses (T777)
❌ Not allowed
❌ None
So for employees deducting vehicle expenses with a T2200/T777, even if UCC hits zero and sold lower, no terminal loss deduction.
🚨 Key Reminders
💡 Only business-use percentage applies CCA must be prorated if the vehicle is also used personally.
📒 Logbook required Keep mileage records to support business-use calculation.
✅ Quick Summary Table
Rule
Class 10.1 Passenger Vehicles
Max capital cost
$30,000 + taxes
Separate class per vehicle
✅ Yes
CCA Rate
30%
Half-year rule (purchase year)
✅ Yes
Half-year rule (sale year)
✅ Yes — special rule
Recapture on sale
❌ None
Terminal loss
Very rare (not allowed for employment)
🚀 Pro Tax-Preparer Tips
📝 Always verify:
Vehicle type fits Class 10.1 rules
Purchase price exceeds cap
Business-use percentage
Logbook & expense receipts
💼 Explain to clients: Buying a luxury car does not equal a large tax deduction — CCA cap applies.
💬 Final Thoughts
Mastering Class 10.1 rules is crucial for any tax preparer working with small businesses, self-employed individuals, and rideshare drivers.
Understanding these nuances helps you:
Avoid CRA issues 🚨
Maximize allowable deductions 💵
Correctly classify vehicles ✅
You’re now equipped to confidently handle Class 10.1 vehicle scenarios!
Factoring GST/HST Input Tax Credits (ITCs) Into Vehicle CCA 🚗💰
When calculating Capital Cost Allowance (CCA) for vehicles used in a business in Canada, one crucial step is properly accounting for GST/HST Input Tax Credits (ITCs). This step is often misunderstood, but mastering it ensures your CCA claim is accurate and CRA-compliant ✅.
This guide explains how GST/HST interacts with CCA when a client purchases a business vehicle.
🧠 Understanding the Relationship: CCA vs GST/HST
Canada has two different sets of rules at play:
Concept
Governing Law
What It Impacts
Income tax rules (CCA)
Income Tax Act
How much depreciation (CCA) you claim
GST/HST input tax credit rules
Excise Tax Act
How much GST/HST you get refunded
When claiming CCA, you cannot depreciate an amount you were reimbursed for via GST/HST ITCs.
📌 So you must subtract any GST/HST ITCs from the vehicle cost before calculating CCA.
🚗 Example: Vehicle Purchase With HST
Let’s say a business owner buys a car in Ontario:
Vehicle price: $57,000
HST (13%): $7,410
Total invoice: $64,410
If they qualify to claim the full HST as an ITC, then:
Capital cost for CCA = $57,000 (Not $64,410)
✅ They can claim CCA on $57,000 ❌ They cannot claim CCA on tax refunded by CRA
💡 IMPORTANT RULE
Capital cost for CCA = Total cost − Input tax credits claimed
if full HST ITC is claimed → subtract full HST if partial HST ITC is claimed → subtract only the portion refunded if no ITC is allowed → include full invoice price
🚨 Common Mistake to Avoid
🔻 Wrong: Using the full bill of sale price for CCA ✅ Correct: Deduct the ITC portion first
This mistake is frequently seen with beginners — always check if GST/HST ITCs were or will be claimed!
📊 Special Rules for Passenger Vehicles (Class 10.1)
Passenger vehicles costing over $30,000 (before taxes) fall into Class 10.1.
💵 CCA limit = $30,000 + applicable sales tax (GST/HST/PST)
If the business qualifies to recover GST/HST:
Capital cost includes only the portion not recovered
PST is included because PST is never refunded
GST/HST portion included only when ITCs are restricted
🎯 Rules Based on Business-Use Percentage
For GST/HST ITCs on passenger vehicles:
Business Use %
ITC Eligibility
Under 10%
❌ No ITC allowed
10%–90%
⚖️ Partial ITC based on CCA claimed
Over 90%
✅ Full ITC allowed
That means your CCA schedule also guides ITC calculation — the tax acts interact here!
📦 Quick Reference Note Box
🔍 Key Tips for Tax Preparers
Always ask: “Did you claim or will you claim GST/HST ITCs?”
Never depreciate tax refunded by CRA
Watch for partial ITC situations (common with mixed-use vehicles)
Remember Class 10.1 has a cap and special treatment for sales tax
Keep purchase documents and logbooks for audit protection
🧾 Final Formula Cheat Sheet
**Vehicle capital cost for CCA = Purchase price
PST
GST/HST not recoverable − GST/HST ITCs claimed**
✅ Summary
Understanding GST/HST ITCs ensures:
✔️ Correct vehicle CCA deductions ✔️ CRA-approved record keeping ✔️ Accurate tax reporting for business clients
Mastering this step helps you avoid costly errors and positions you as a knowledgeable tax professional.
Entering Vehicle CCA Correctly in Tax Software for Accurate Results 🧾🚗✨
Entering Capital Cost Allowance (CCA) for vehicles in tax software can feel intimidating when you’re new — especially with rules like half-year rule, passenger-vehicle limits, GST/HST ITCs, and personal-use adjustments.
This guide walks you through how to correctly enter vehicle CCA in tax software (e.g., Profile, TurboTax Pro, TaxCycle, Cantax) to ensure accurate results and avoid CRA issues ✅
🎯 Goal of This Section
By the end, you’ll understand:
✅ Where and how to enter vehicle information ✅ How tax software prorates CCA for personal vs business use ✅ Handling Class 10 vs Class 10.1 vehicles ✅ Avoiding duplicate entries & common mistakes ✅ Best practices for documentation
🚙 Step 1: Identify Vehicle Class (10 vs 10.1)
Before entering anything into software, determine the CCA class:
Vehicle Type
Class
Key Rule
Passenger vehicle ≤ $30,000 before tax
10
Normal CCA (30%)
Passenger vehicle > $30,000 before tax
10.1
CCA limited to $30,000 + tax
Motor vehicle (cargo vans, trucks for goods)
10
No passenger vehicle cap
💡 If you’re unsure whether a vehicle is Class 10 or 10.1, default to Class 10.1 for luxury sedans & common passenger vehicles unless proven otherwise.
💻 Step 2: Enter Vehicle Purchase Details
Tax software will ask you for:
🟦 Purchase date 🟦 Purchase price 🟦 Sales taxes (GST/HST/PST) 🟦 ITCs claimed (if registered for GST/HST) 🟦 Vehicle class (10 or 10.1)
💡 Reminder: For Class 10.1, software automatically caps CCA on $30,000 + applicable taxes.
🚦 Step 3: Enter Business-Use Percentage
Most software gives you a Motor Vehicle Expense Worksheet or similar tool.
Enter:
Total kilometres 🚗
Business kilometres 📍
Other vehicle expenses (fuel, insurance, repairs, etc.)
Software will automatically calculate your business-use % Example: 8,000 business km ÷ 10,000 total km = 80% business use
📌 This % applies to BOTH operating expenses & CCA
⚙️ Step 4: CCA Calculation Behind the Scenes
For a first-year Class 10.1 vehicle:
Capitalized cost = after deducting HST ITC
Limit = $30,000 + sales tax
Half-year rule applies: only 50% of base available year 1
Vehicle operating expenses show in the motor-vehicle expense section
CCA shows separately — never lump into expenses
✅ Always show CCA as a separate deduction line
🛑 Common Mistakes to Avoid
❌ Entering vehicle in both vehicle worksheet AND CCA screen (double counting) ❌ Using full purchase price instead of capped amount for Class 10.1 ❌ Forgetting to remove GST/HST ITCs from capital cost ❌ Applying business-use % to fuel but not CCA ❌ Failing to adjust % when km change year-to-year
✅ Best Practice Checklist
Task
✅
Enter full vehicle details once
✔️
Attach invoice copy to client file
✔️
Use vehicle worksheet if available
✔️
Document km log or % justification
✔️
Print/save worksheet for records
✔️
Confirm ITC treatment
✔️
💾 Save a PDF of the vehicle worksheet each year — helps during CRA reviews & future filings
🧠 Quick Tip Box
📌 Before entering CCA, answer:
What is the vehicle class? 10 or 10.1?
What portion is business use?
Was GST/HST refunded? How much?
Is this first year? (half-year rule applies)
Master these and vehicle CCA becomes easy 👌
⭐ Final Takeaway
Accurate vehicle CCA entry in tax software requires:
Correct classification
Proper ITC adjustments
Business-use proration
Separate reporting from operating expenses
Once mastered, this becomes one of the most high-value skills for a tax preparer — and your clients will trust your professionalism.
✅ Proper Documentation & Records for Vehicle Additions (CCA & Tax Compliance)
When clients purchase vehicles for business use, proper documentation is absolutely critical — especially as the CRA increasingly scrutinizes motor vehicle expenses and CCA claims. Whether you’re preparing a T2125 (sole proprietors) or handling corporate files, a strong paper trail protects both you and your client.
This guide gives you a bullet-proof documentation process so you always stay audit-ready.
🚗 Why Documentation Matters
Vehicle claims are one of the highest-risk audit areas for Canadian tax returns. CRA frequently reviews:
Business-use % of the vehicle
Claim classification (Class 10 vs. 10.1)
GST/HST Input Tax Credits (ITCs)
Accuracy of CCA schedules
Whether proof exists for business use
🔐 Good documentation = peace of mind + avoided reassessments
📝 Essential Documentation Checklist
Whenever a client buys a business vehicle, always collect and file:
📄 Bill of Sale / Purchase Agreement
Make, model, year
Total cost
Taxes paid
Financing details (if any)
🚙 Vehicle description notes
Type (SUV, sedan, pickup, van)
Seating capacity
Cargo capability (for business equipment/materials)
📦 Proof of business use
Statement of how the vehicle is used
Whether it transports equipment, employees, or clients
🧾 GST/HST treatment notes
ITC claimed? Full or prorated?
Supporting calculation
📆 CCA Classification Decision
Document whether vehicle is Class 10 or Class 10.1
Explain classification basis (e.g., passenger vs. motor vehicle)
🖊️ Client confirmation
Signed memo/discussion summary to confirm business use details
💡 Pro Tip: Verify Vehicle Type Online
Not sure if a client’s vehicle is a passenger vehicle or qualifies as a motor vehicle (Class 10) used for transporting tools/equipment?
✅ Search model online ✅ Look at manufacturer website ✅ Review cargo & seating specs
This ensures you’re applying the correct CCA rules and ITC limits.
📂 Your File Should Include
Required Item
Why It Matters
Bill of sale
Confirms type & cost
Vehicle classification memo
Justifies Class 10 vs 10.1
CRA-compliant ITC calculation
Avoids GST/HST adjustments
Client-signed business-use statement
protects you in a review
Logbook or mileage details
Required for business use claims
⭐ Pro Tip: Save a PDF copy AND keep a digital note in your tax software explaining your classification decision.
🚨 Common Mistakes to Avoid
❌ Not verifying vehicle classification ❌ Claiming full ITC on a Class 10.1 passenger vehicle ❌ No record of business vs. personal use split ❌ Vehicle claimed without mileage detail or logbook ❌ No proof or note about vehicle purpose (equipment/passenger transport)
📎 CRA Audit-Ready File Example Notes
Client: John Doe — Consulting Business Vehicle: 2023 BMW 3-Series Sedan Bill of Sale: Received ✅ Class: 10.1 — passenger vehicle Cost base for CCA: $30,000 limit applies ITC: Client claimed full — adjusted to allowable % Business use: 80% — logbook reviewed Equipment transported: Laptop & files only — not qualifying as work vehicle Client signature: Yes ✅
🛠️ Best Practice Workflow
Collect invoice + proof of payment
Identify vehicle class (10 or 10.1)
Calculate allowable CCA amount
Confirm GST/HST ITC eligibility & adjust
Document business-use percentage
Save memo & client sign-off in file
📌 Takeaway for New Tax Preparers
Building strong habits now will save headaches later. Always:
Ask questions
Collect proofs
Document your reasoning
Confirm with client
File everything
This not only keeps you compliant — it reinforces your professionalism and helps you stand out in practice.
🧠 Remember
If CRA asks, “How did you determine this?” — you should have the answer ready in your file.
Proper documentation isn’t just admin — it’s audit protection.
Introduction to Deepak Singh — investor with stock portfolio & two rental properties 🧾🏘️📈
Welcome — this is your ultimate beginner-friendly knowledgebase for preparing a tax return for an investor like Deepak Singh: a self-employed incorporated owner who pays himself dividends, owns two rental condos (one long-term, one short-term/Airbnb), holds taxable investment accounts (T3/T5), has an investment loan, carries mutual fund management fees, made an RRSP contribution via a loan, and supports elderly parents (one with DTC eligibility). Below you’ll find clear, practical guidance, checklists, ProFile steps, tax traps to watch for, and short-cuts for quality review. Use this as a one-page reference every time you prepare a similar client file. ✅
Quick at-a-glance checklist 📋
Client type: Shareholder of a private corporation; compensation via dividends (no salary).
Business: Owner/operator of incorporation (Skylar Global Solutions Ltd) — corporation tax handled separately.
Investment income: T3 (trust), T5 (investment dividends/interest) slips and brokerage statements.
Investment loan: $250,000; interest paid — likely deductible as carrying charges if funds used to earn investment income.
Mutual fund management fees (MER) — note these are not directly deductible on T1; but some management fees for investment advice and administrative fees may be deductible as carrying charges (check slip details).
RRSP: $22,000 RRSP contribution from an RRSP loan; interest on RRSP loan $1,850 (usually not deductible; interest on RRSP loans is generally not deductible — only interest on money borrowed to buy investments that generate income is deductible).
Rentals: 2 condo properties — one long-term rental, one Airbnb (short-term). Client elects NOT to claim CCA. Use Form T776 to report each property’s income & expenses.
Dependants: Parents living with client. Mother has a Disability Tax Credit (DTC) certificate; father has a doctor’s note of infirmity. Client paid their medical expenses — these may be claimable.
Instalments: Tax instalments paid for personal tax owing; confirm amounts & dates.
Core tax concepts you must understand (simple, practical) 🧠
1. Rental income vs business income
Long-term condo → normally rental income (use T776) where you report gross rent and deductible expenses.
Short-term (Airbnb) → could be rental orbusiness income depending on services, frequency, and organization (e.g., daily cleaning, concierge, hotel-like services → business). Classification affects which forms you use, whether GST/HST applies, and how expenses are treated. When in doubt, document the facts and use professional judgment.
Always prepare one T776 per property (or one T776 with separate property sub-sections), showing income and expenses per property. CRA T776 guidance is the authoritative resource. Canada+1
2. Capital Cost Allowance (CCA) — claim or not?
Claiming CCA reduces taxable rental income now but can trigger recapture (taxable) on sale if proceeds exceed undepreciated capital cost. Many investors choose not to claim CCA to avoid future recapture. If the client refuses CCA, record the asset cost and set CCA to $0 on the T776. (Document client’s instructions.) Canada
3. Investment loan interest and carrying charges
Interest on money borrowed to earn investment income (dividends/interest) is generally deductible as carrying charges/interest expenses, but not deductible if the only expected return is capital gains. Keep supporting statements showing the loan was used to earn income. CRA guidance on carrying charges explains where to claim them. Canada+1
4. Mutual fund MERs and management fees
The embedded MER in mutual funds is not a T1 deductible expense. However, specific management/advisory fees or separate invoices for investment advice may be deductible as carrying charges if they meet the test. Keep the breakdowns and brokerage confirmations.
5. RRSP contributions & RRSP loan interest
RRSP contributions reduce RRSP contribution room and can produce a deduction (if within limit). Interest on an RRSP loan is not typically deductible. Confirm RRSP contribution limit and enter the contribution to produce an RRSP Deduction Schedule. (Keep RRSP confirmation slips for proof.)
6. Medical expenses & supporting dependants
Medical expenses paid for dependants (including parents) may be claimed on the filer’s return (subject to 12-month timing and threshold rules) and could be more beneficial on the filer’s return than on the parent’s if the parent has low income. The CRA has precise rules and lists of eligible medical expenses and the 12-month window. If a parent is eligible for DTC, other transfer/credit rules may apply. Canada+1
7. Disability Tax Credit (DTC)
The DTC is a non-refundable tax credit requiring Form T2201 and supporting medical practitioner certification. If approved, unused portion can often be transferred to a supporting family member (e.g., the child who paid their medical costs), and it enables access to other programs. Retain the DTC approval letter. Canada+1
Documents you MUST collect and organize (download checklist) 🗂️
T5 slips (investment dividends/interest) and summaries from brokerage (TD Waterhouse, TD Wealth).
T3 slips (trust income, mutual fund distributions).
Statements showing the $250,000 investment loan and interest paid.
RRSP contribution slip/confirmation and RRSP loan agreement showing interest paid.
Rental income records (rent rolls, Airbnb totals), all rental expense receipts (insurance, property taxes, condo fees, utilities, repairs, advertising, management fees).
Property purchase documents (original cost, improvements) — for CCA tracking even if client declines CCA.
Medical receipts for parents, doctor letters, and DTC/T2201 documentation.
Corporate dividend documentation (T5 from corporation to shareholder) and instalment payment notices/receipts.
Step-by-step: How to enter this client in Intuit ProFile (for absolute beginners) 🖥️🧭
Note: UI text might vary with ProFile version. Below are practical, reproducible steps. Always save the client file often.
1) Create the client file
Open ProFile → File → New → Client.
Enter client identification: Name, SIN, address, tax year. Save.
2) Enter personal / identification details
Client > Identification: enter marital status (single), dependants (parents) — enter their names and SINs (if available) or “No SIN” if not provided. Include relationship and whether they lived with client all year.
3) Enter Investment Income (T3/T5)
In ProFile sidebar: Income → Investment Income.
Choose T5 or T3 slip form. Click “Add new T5” → fill issuer, box numbers, amounts exactly as on slip. Repeat for each slip.
For broker summary totals, reconcile the sum of T5/T3 slips with year-end statements; attach electronic copies in client file.
4) Enter Carrying charges / Investment loan interest
In ProFile: Deductions → Carrying Charges & Interest (sometimes under “Other Deductions” or “Investment expenses”).
Enter the interest amount for the $250,000 investment loan and describe (e.g., “TD Wealth investment loan — used to purchase dividend paying stocks”). This will feed into the T1 line for carrying charges. Attach loan statement.
Pro tip: add a client note in ProFile (Notes tab) explaining purpose of loan and receipts location — helpful in audit.
5) Enter Mutual fund management fees (if separately invoiced)
If you have a separate invoice for management/fee for advice, enter under Deductions → Carrying Charges (describe it). If it’s only embedded MER, do not enter as deductible.
6) Enter RRSP contribution & RRSP loan interest
In ProFile: RRSP → RRSP Deduction Schedule: enter the $22,000 contribution; ProFile will compute allowable deduction based on contribution room.
For RRSP loan interest: do not enter as deductible unless you’ve confirmed CRA allows it (generally not). Document the loan interest in Notes for client record.
7) Enter Rental properties (T776) — one entry per property
In ProFile: Forms → T776 (Statement of Real Estate Rentals). Click “Add new property” (or “Insert T776”).
For Long-term rental:
Enter gross rents received (from rent rolls).
Enter deductible expenses (insurance, repairs, condo fees, property taxes, mortgage interest for property loan — interest on mortgage for rental is entered on T776, not on carrying charges).
For CCA: since client opts not to claim CCA, leave CCA lines blank/zero. Document client instruction in the notes field of the T776 form.
For Airbnb/Short-term: assess whether it’s rental or business. If rental: enter on second property in T776. If business: use Business/Form T2125 instead, and enter revenues & expenses as business income — consider GST/HST registration if supplies exceed small supplier threshold.
Save each T776 and attach backup spreadsheet (ProFile supports attachments).
Reference: CRA T776 guidance for completing rental form. Canada+1
8) Enter Medical expenses you paid for parents
In ProFile: Deductions → Medical Expenses. Choose the person (client is claiming for parents).
Enter total medical receipts (aggregate by 12-month period; ProFile will calculate the allowable credit after threshold rules). Attach receipt summary and indicate the 12-month period used. See CRA rules for eligible items and the 12-month window. Canada
9) Enter Disability Tax Credit (DTC) details
If parent has DTC approval: in ProFile, go to Deductions → Disability Amounts or Credits, indicate the DTC amount and whether it’s being transferred to the supporting family member (client). Attach T2201 approval letter. If T2201 is pending, document that application is filed and attach submission copy. Canada+1
10) Enter Installments paid and tax payments
In ProFile: Payments/Instalments section: enter the four instalment payments (amounts & dates). These will reduce tax owing.
11) Final review & validation
Run Validate (ProFile has a validation/diagnostics function). Fix errors/warnings.
Produce T1 Summary and review: rental net income, carrying charges, investment income totals, RRSP deduction, medical credit, DTC transfer, instalments applied. Save and generate PDF for client review.
Practical examples & mini-workflows (copy/paste into your workflow) ✂️
Recording investment loan interest in ProFile
Deductions → Carrying Charges & Interest → Add new entry.
Description: “TD Wealth investment margin loan — used to purchase income-producing securities.”
Gross rental income: X. Expenses: cleaning (repair?), insurance, utilities, condo fees. If you provide substantial services (breakfast, daily cleaning included) consider T2125 business. Document reasoning.
Red flags, common errors & how to avoid them 🚩
Misclassifying Airbnb: Treat short-term rentals as business if services or frequency are high — this affects GST/HST and expense claims. Document your classification rationale.
Claiming interest incorrectly: Don’t mix up rental mortgage interest (rental expense on T776) with investment loan interest (carrying charges on T1). They go in different places. Canada+1
Trying to deduct RRSP loan interest: Usually not deductible — double-check before entering.
Missing receipts & 12-month rule for medicals: Medicals must be tracked across the chosen 12-month period and not claimed twice. Canada
Claiming CCA without note: If client later sells and CRA assesses recapture, you’ll need clear instructions; always get client to sign/confirm decision about CCA.
Professional-judgment moments — what you must document 📝
Why Airbnb was classified rental vs business (list of facts).
Client decision not to claim CCA (signed client instruction).
Source and use of investment loan funds (prove used to generate income).
DTC application status and transfer decisions.
Any positions that may attract CRA review (large carrying charges, high medical claims, rental losses).
Useful CRA references (read & save) 🔎
CRA Form T776 – Statement of Real Estate Rentals (how to complete T776). Canada+1
CRA guidance on carrying charges & interest (line for carrying charges). Canada
CRA pages on medical expenses (eligible items & 12-month period). Canada
CRA Disability Tax Credit (T2201) information and eligibility. Canada+1
Final checklist before you file (quick QA) ✅
All slips entered (T5, T3, brokerage)?
Investment loan interest entered under carrying charges with supporting docs?
Each rental property has a T776 (income & expenses) and CCA correctly set to zero if client declined?
Medical expenses aggregated within 12-month period and entered for the correct person?
DTC status recorded & appropriate transfers applied?
Instalments recorded?
ProFile validation run and all warnings resolved or noted with client-approved positions?
Rental mortgage interest → Rental expense on T776. Canada
MER (embedded) → not deductible; separate advisory fees may be deductible if invoiced.
RRSP loan interest → generally not deductible.
Medicals for parents → use 12-month rule; claim where most beneficial. Canada
Notes & pro tips 💡
NOTE (client instruction required): Always record a signed instruction if client declines CCA or takes a tax position that may increase audit risk. TIP: Keep a one-page “workpaper” that links each ProFile input (form + page) to the supporting PDF filename — it saves time during review and audit. WARNING: Large carrying charges with minimal investment income can trigger CRA review — maintain strong documentation that borrowed funds generated income (dividends/interest). TurboTax Canada
Starting to enter investment income & deductions — Deepak Singh (Investor) 🧾📈🇨🇦
This is your complete beginner-friendly knowledgebase for entering an investor’s investment income and deductions into a Canadian personal tax return — written so someone with zero prior tax software experience (and practicing in Intuit ProFile) can follow, understand the “why”, and confidently prepare the return. Save this as a step-by-step reference when you work on clients who hold taxable investment accounts, foreign-currency slips, mutual funds, and investment loans. ✅
Quick summary — what we’ll cover
Required documents & what each slip means 📂
How to enter slips (T3 / T5) in ProFile — step-by-step 👩💻
Records of commissions, management invoices, and account fees.
Investment loan statement showing principal & interest paid.
RRSP contribution slips (and HBP repayment notices if applicable).
Any foreign (USD) slips or statements showing currency notation.
🔎 Why: The CRA expects amounts to reconcile back to issuer slips. Always attach electronic copies of slips and the broker’s realized gain/loss report to your working file.
Tax concept cheat sheet (short)
T5 / T3 → report income shown on those slips (don’t double-count items from broker reports).
Investment loan interest (if borrowed to earn income from investments) → deductible as carrying charges.
Commissions on trades → outlays & expenses for capital transactions (affect ACB & capital gain, not carrying charges).
Mutual fund MER (embedded) → not deductible on personal T1 (these are reflected in the T3).
RRSP loan interest → not deductible (interest on money borrowed to contribute to an RRSP is not deductible).
Foreign currency slips → convert using commonly accepted exchange rate (Bank of Canada average or software-selected rate) and note the rate used.
Step-by-step: entering slips and amounts in Intuit ProFile (for absolute beginners) 🖥️
Note: menu names may slightly differ by ProFile version — follow logically equivalent menu options if wording varies.
1. Create & open client file
ProFile → File → Open (or New → Client) → enter client ID (name, SIN, tax year). Save.
2. Enter personal/dependent info (so credits compute correctly)
Client → Identification: enter dependents’ names, dates of birth, SINs and net incomes (do this first — credits rely on it).
3. Enter T5 (investment dividends / interest)
In the left panel or Forms Explorer: go Income → Investment income → T5.
Click Add or New T5.
Fill all issuer fields exactly (issuer, box numbers, amounts). If slip indicates foreign currency (USD), check the box or field for foreign and choose exchange rate (see next section).
Save and attach the scanned PDF/T5 in ProFile’s attachments.
4. Enter T3 (mutual fund / trust income)
Forms Explorer → Income → T3.
Add T3 slip, enter box amounts exactly. If slip indicates USD, mark as foreign and choose the exchange method. Attach T3 PDF.
5. How to handle foreign (USD) slips in ProFile
ProFile gives a choice to enter the slip in foreign currency and select an exchange rate (often: “US average” for calendar year).
Best practice: Use Bank of Canada annual average (or the rate provided on the slip). Document the exchange rate used in client notes.
Example: T5 shows USD 1,000 and software’s US average = 1.3013 → ProFile will multiply USD amount × 1.3013 = CAD equivalent and put CAD figure onto the return.
Tip: Put the exchange rate and source in ProFile Notes (e.g., “Used BoC annual average 1.3013”) — saves headaches on review.
6. Enter carrying charges & interest (investment loan interest)
Forms Explorer → Deductions → Carrying charges & interest (line 22100).
Add a new entry: description “TD Investment loan interest – $250,000 margin” and amount (e.g., $17,004.52).
Attach loan statement proving interest paid and evidence funds were used to purchase income-producing securities.
7. Enter management fees (when deductible)
Only management/advisory fees for non-registered accounts may be deductible if invoiced separately.
Enter under Carrying charges with description and attach invoice.
Do not enter MERs embedded in mutual funds — these are not deductible.
8. Enter commissions & transaction outlays
Commissions paid to buy/sell securities are outlays & expenses that affect capital gain ACB calculation — they are not entered under carrying charges.
In ProFile: Schedule 3 → Dispositions → Add a disposition or use the dedicated fields for “outlays & expenses” associated with dispositions.
If you summarize trades from the broker’s realized gain/loss report, show how commissions were allocated in your workpaper.
9. Enter Schedule 3 — Capital gains & losses
Two main approaches:
Line-by-line: enter each disposition (date acquired, date sold, proceeds, ACB, commission) — precise but time consuming.
Summary per account (common practice): enter totals from the broker’s realized gain/loss report for each account and attach the supporting report. This is acceptable if detailed backup is retained and available on CRA request.
ProFile: Forms → Schedule 3 → choose appropriate section (Canadian securities, foreign securities, etc.) → enter proceeds and ACB totals (remember to include/allocate commissions as outlays if not already netted).
For USD securities, enter CAD equivalents (use same exchange rate used for slips, or convert per disposition if you track that way).
✅ Practical rule: use the broker’s realized gains report for totals. Keep the transactional report attached as backup. CRA can ask for details — provide them then.
10. RRSP contribution & RRSP loan interest
RRSP contribution: Forms → RRSP Deduction → enter $22,000. ProFile will calculate allowable deduction using contribution room. Attach RRSP receipt.
RRSP loan interest: normally not deductible — do not enter as carrying charges. Note it in client file if the client asks.
11. Validate & reconcile
Run ProFile Validate / Diagnostics. Fix errors. Reconcile total investment income to slip totals and to brokerage statements. Confirm Schedule 3 net capital gain matches broker summary (or detailed entries).
Common mistakes & red flags (avoid these!) 🚩
Entering mutual fund MER as a deductible personal expense (not allowed).
Claiming RRSP loan interest as deductible.
Forgetting to convert USD slips to CAD or using inconsistent exchange rates across slips & dispositions.
Putting trade commissions under carrying charges instead of outlays — this misstates capital gains.
Not attaching broker realized gain/loss reports when summarizing dispositions — always attach backup.
Workpaper & audit-proof checklist (copy into client file) 📎
Attach all T3/T5/T5008 slips (PDF).
Attach broker realized gain/loss report and mark which Schedule 3 lines it supports.
Attach investment loan statement showing interest paid and loan purpose.
Note exchange rates used and the source (Bank of Canada or slip-provided).
Note any client instructions (e.g., “Client declines to claim CCA” or “Client requests summary entry of dispositions”).
Save ProFile validation report and include it in the working papers.
💡 Pro tip: create a one-page “Investment Summary” in the workfile showing T5 total, T3 total, carrying charges total, investment loan interest, and Schedule 3 totals. Put it at front of the file.
Example quick walkthrough (numbers)
T5 (TD Wealth): USD 2,000 box 10 (eligible dividends) → ProFile convert with US average 1.3013 → CAD $2,602.60. Enter T5 with foreign currency checked and chosen rate.
Investment loan interest: $17,004.52 → Deductions → Carrying charges → Enter and attach loan statement.
Broker realized gains (Canadian account): Proceeds $50,000; ACB $30,000; commissions $500 → Schedule 3: Proceeds $50,000; ACB $30,500 (if you add commissions to ACB) → capital gain $19,500 (50% taxable). Attach broker report.
Final reminder before you file ✅
Make sure nothing is double-counted (e.g., amounts on Schedule 3 that are also shown on T3/T5).
Maintain clear backup for summaries — CRA expects you can substantiate any summarized amounts.
Document exchange rates and rationale for summarizing dispositions.
Run ProFile validation and resolve warnings (or document reasons to keep a non-error item).
Do you still have work after entering slips? — Yes — watch for Form T1135 & other disclosures 🛑🌍💼
Entering all T3/T5 slips and carrying charges is necessary — but it’s not always sufficient. If the client owned specified foreign property with a cost amount over CAD $100,000 at any time during the year, you must complete Form T1135 (Foreign Income Verification Statement). Missing it can trigger daily penalties. Below is the practical, beginner-friendly guide every new tax preparer needs — with ProFile steps, examples, checklists, and audit-safe workpaper tips. ✅
TL;DR (quick SEO-friendly bullets) 📌
If the total cost of specified foreign property (all accounts combined) exceeded CAD $100,000 at any point in the year → file T1135. Canada
If total cost was > $100,000 but < $250,000 you may use the Simplified reporting (Part A); otherwise you must use the detailed schedule (Part B). Canada
Failure to file can draw a penalty of $25/day up to $2,500 (minimum $100) — larger penalties apply for gross negligence. Don’t skip it. Canada
Mutual funds: foreign assets inside a mutual fund/trust are usually not treated as your specified foreign property (the fund/trust reports instead) — still confirm with the issuer’s report. CIBC+1
T1135 can be filed electronically (EFILE/NETFILE) and many tax packages let you e-submit the T1135 separately or with the return — keep the electronic confirmation number. Canada+1
What is “specified foreign property”? (in plain English) 🌎
Specified foreign property includes things like:
Funds or securities held outside Canada (e.g., U.S. stocks in a non-registered account),
Funds held in foreign bank accounts,
Shares of non-resident corporations, interests in foreign trusts, certain debt owed by non-residents, and some foreign real estate (other than personal-use).
Important: property held inside registered accounts (RRSP, TFSA) often does not trigger T1135 for the taxpayer — check each report and slip. Always confirm with the institution’s specified-foreign-property report. CIBC
How to decide if you must file T1135 — step-by-step ✅
Gather monthly or year-end specified-foreign-property reports from every broker or institution (these usually show “cost amount” or “high cost” values by month).
Aggregate across all accounts: add up the cost amounts for all specified foreign property owned by the taxpayer (non-registered accounts and other reportable categories). Don’t look at accounts separately — the rule is combined total. Canada
Check if the combined cost exceeded CAD $100,000 at any time during the tax year (not only at Dec 31). If yes → T1135 required. Example: two accounts with monthly highs can sum to >$100k in June even if Dec 31 totals are below $100k. (Common trap.) Canada
💡 Note box (must-read): CRA expects you to consider any time during the year. Using only the Dec 31 balance can cause a missed T1135 and penalties.
Which reporting method? Part A (simplified) vs Part B (detailed) 🔄
Part A (Simplified): available if total cost amount of all specified foreign property was more than $100,000 but less than $250,000 throughout the year — you check boxes for property types and list up to three countries by maximum cost. Simpler to complete. Canada
Part B (Detailed): required when the cost amount is $250,000 or more (or if you prefer to file detailed information). Part B asks for per-property details, monthly balances, income, gains/losses, etc. Canada
What numbers go on the T1135? (how to compute & what to report) 🧾
Maximum cost amount: use the highest cost during the year for each property/account (broker reports often include monthly high-cost values). For Part A you typically report the highest cost by country (or totals by category).
Income from specified foreign property: report foreign-source income and realized gains/losses tied to specified foreign property (the broker’s specified-foreign-property report usually gives these totals). Use CAD amounts and note the exchange rate/method used. Canada+1
Common traps & practical examples 🚩
Trap: Two accounts each under $100k at Dec 31 but combined exceeded $100k mid-year → T1135 required. Example from practice: monthly highs combined were >$100k in June/July → file T1135. Canada
Trap: Counting mutual-fund underlying foreign holdings as your specified foreign property. If foreign exposure is inside a mutual fund (trust), the fund/trust usually files; you report the T3/T5 and not the underlying holdings as specified foreign property — confirm with the investment report. CIBC+1
Penalties — why you must take this seriously ⚖️
Late filing penalty: $25/day up to $2,500 (minimum $100). Penalties for gross negligence or repeated failures are much larger (monthly higher penalties and possible percentage surcharges). If the CRA discovers an omission, penalties and interest quickly multiply. Document your workpapers and attach proofs. Canada+1
How to complete T1135 in Intuit ProFile — step-by-step for beginners 🖥️ (copy-paste workflow)
These steps use typical ProFile UI labels — your version might have slight wording differences. Save often.
Collect the broker’s specified foreign property report (monthly highs, gross income, gains/losses). Save it as a PDF to attach.
Open client in ProFile.
Forms → Filing menu → T1135 (Foreign Income Verification Statement) (or search “T1135” in the forms list).
Choose taxpayer type: Select Individual and the correct individual code (e.g., code 2 for individuals who are not self-employed — this affects filing due date). Canada
Select reporting method: Part A (Simplified) if aggregated cost > $100k but < $250k; otherwise Part B. (Pro tip: if you’re borderline, Part A simplifies data entry.) Canada
Enter countries and the maximum cost amounts for each country (or per property if in Part B). Use the broker’s monthly “high cost” or “cost amount” values. Enter gross income and realized gains/losses as indicated on the institution report.
Validate the T1135 input against your workpaper totals and the broker’s report. Keep a one-line reconciliation showing totals used and exchange rates.
E-file: ProFile and other certified packages can transmit the T1135 electronically (EFILE/NETFILE). You can normally submit the T1135 as a standalone e-document if needed — keep the CRA confirmation number and add it to your working paper. Canada+1
🔔 Important ProFile note: some software workflows let you transmit the T1135 separately from the T1 (useful to avoid late T1135 penalties if the T1 timeline is borderline). Use the EFILE → Submit e-Documents or T1135 e-submission flow in your software. QuickBooks+1
Practical workpaper & audit-proof checklist (copy into the client file) 🗂️
Save the broker’s specified foreign property monthly high-cost report (PDF).
Create a one-line reconciliation worksheet: monthly max values added by account → monthly totals → show month(s) where combined total exceeded $100k.
Document the exchange rate used to convert USD to CAD (and source e.g., Bank of Canada or broker).
Indicate whether you used Part A (simplified) or Part B (detailed) and why.
Save CRA e-file confirmation number for T1135 transmission.
Get client sign-off or written instruction if you summarized transactional details rather than entering each disposition. (Good audit defense.)
Red flags to flag to the client (explain simply) 📣
Large mid-year swings in the cost amount — may trigger T1135.
Multiple foreign accounts held with different institutions — must aggregate across institutions.
If client says “I only had mutual funds” — confirm whether funds are Canadian-trust funds (usually not reportable by the investor) or non-Canadian funds (may be reportable). CIBC
Quick sample mini-case (copy this into your blog as an example)
Account A highest cost in the year (US stocks): CAD $88,002.16
Account B highest cost (managed wealth account): CAD $12,500.00
Combined high cost during June = $100,502.16 → T1135 required. Use Part A if total remained below $250,000 for the year. Attach the monthly cost report and enter country = USA, income/gains per report.
Final call-to-action & SEO-friendly closers 🧭✨
Always run a T1135 check after entering slips: export a quick spreadsheet of monthly high-cost values and sum across accounts — this simple step prevents costly penalties.
When in doubt, collect the specified-foreign-property reports from each broker and document the math. Good documentation is your best audit defence.
Want a ready-to-print T1135 workpaper template (Excel) + a ProFile mini-checklist you can drop into your client folder? I can generate both now — choose A: Excel T1135 workpaper, B: ProFile T1135 checklist, or C: both and I’ll create them for download. 📥
References (official CRA reads — save these)
CRA: Questions & answers about Form T1135 — why and when to file. Canada
CRA: Foreign Income Verification Statement — Part A / Part B simplified reporting details. Canada
CRA: Guidance on filing electronically (EFILE/NETFILE) for T1135. Canada+1
Review & Decision-Making for Rental Properties — The Ultimate Beginner’s Knowledgebase for Tax Preparers 🏠💼
Welcome — this is your complete, beginner-friendly reference for reviewing rental properties and making defensible tax decisions. Use it as a checklist and how-to guide while preparing rental returns (T776 style) — and as step-by-step help when you’re entering everything in ProFile (Intuit ProFile). 🚀
Quick summary (TL;DR)
Use separate T776 statements per rental if you want clearer comparisons year-to-year — CRA only cares that the correct net is reported, not the number of forms. ✅
Only interest on loans is deductible; principal repayments are not. ❌
Imputed time (owner’s hours) is not deductible. ❌
Vehicle & travel must be supported by logs and reasonably apportioned. 🧾
Personal use days reduce deductible expenses by (personal days ÷ 365). 📆
CCA (depreciation) is optional; weigh future sale/recapture risk before claiming. ⚖️
Why structure matters: 1 form vs multiple forms
One T776 for each property = easier year-to-year comparisons, clearer audit trail, quicker property-level profitability checks. ✅
Single combined T776 = acceptable to CRA, but can make analysis harder. Best practice: prepare property-level T776s in your working papers and optionally file separate T776s in ProFile for clarity.
📌 Note (Audit friendliness): Separate statements show you tracked each property carefully — useful if CRA asks questions.
Deductible vs Non-deductible — cheat sheet
Deductible (common):
Mortgage interest and bank charges on the rental loan.
Advertising, professional fees, cleaning fees (Airbnb), supplies.
Reasonable vehicle/travel used for the rental (supported by logbook).
Capital Cost Allowance (CCA) — optional.
Non-deductible (common pitfalls):
Principal portion of mortgage payments. ❌
Imputed wages or “owner time” (hours you spent managing/cleaning). ❌
Personal items or expenses that are clearly personal use. ❌
❗ Pro tip: When in doubt, document. If you allow an expense that could be borderline, keep receipts, logs, screenshots and a short memo explaining the business purpose.
Personal use & availability adjustments
If owner used the property personally (e.g., stayed 27 days), reduce deductible expenses proportionally:
Personal-use % = personal days ÷ 365
Non-deductible amount = total expenses × personal-use %
Record the personal-use % on the property T776 under the “personal portion” column.
Vehicle & travel rules — how to be safe
Keep a detailed logbook: date, purpose, start/end odometer, business km, total km.
Apportion expenses by business km % (e.g., 25%). If only one property exists, CRA could question high travel claims — ensure trips were necessary (tools/materials/inspections).
For short, mixed-use travel, collect supporting proof (photos, booking, invoices).
Office equipment / iPad / phone — allocation & CCA
If an item (e.g., iPad) is only partly used for the rental business, apportion it: percentage used for rental vs personal. Claim that portion as expense or CCA.
Typical approach: claim a reasonable portion (e.g., 30–50%) only if you can justify it. Otherwise, conservative preparers may exclude it to avoid scrutiny.
CCA class note: computers/tablets commonly fall into a computer equipment class (e.g., Class 50) — entry done via capital assets/CCA schedules.
CCA (depreciation) — to claim or not?
Claiming CCA reduces current tax but creates recapture risk when you sell (if proceeds exceed undepreciated capital cost).
If client plans to sell soon or expects large capital gains, consider not claiming CCA (or claim minimally).
Document the client’s decision (signed note or client email) explaining rationale.
Documentation & professional judgement: audit-proofing
Keep:
Receipts and invoices for all claimed expenses.
Loan statements showing interest vs principal portions.
Vehicle logbook and travel receipts.
A short justification memo for any subjective apportionments (iPad %, vehicle %, owner-use %).
Notes that client declined to claim CCA (if that was chosen).
🗂️ Checklist box
Mortgage statements (interest) ✔️
Repair invoices ✔️
Management/cleaning receipts ✔️
Vehicle logbook ✔️
Proof of personal days ✔️
Client directive on CCA ✔️
Step-by-step: Entering rental properties in Intuit ProFile (for absolute beginners)
Below are practical steps that mirror how ProFile typically structures forms and workflow. Treat this as a tutorial you can follow while sitting at the software.
1) Start the client file & open the Form Explorer
Open the client in ProFile → go to Form Explorer (often a left-hand panel).
Select Income tab (or search) → locate T776 – Statement of Real Estate Rentals.
2) Add one T776 per property (recommended)
With the first T776 open, fill property identification (address, unit).
To add another property, go to Form → New Form and choose T776 again — this creates T776 #2. (You can also duplicate the form if similar.)
Fill each T776 with the property-specific details.
3) Populate Part 3 (expenses & income)
Income: enter total rental income for the property (including Airbnb gross receipts).
Expenses: enter line-by-line:
Mortgage interest → enter exact interest paid (do not include principal).
Repairs & maintenance → total with supporting receipts.
Management fees, utilities, insurance, condo fees, advertising, bank charges.
Travel and vehicle → enter vehicle expenses in the vehicle/travel section and enter the percentage used for business (or the specific amounts). ProFile commonly has fields for “motor vehicle expenses” plus a separate field for “business %” — ensure both are filled.
Blue vs Red fields: ProFile will usually compute totals; ensure manual entries go to the correct labeled fields.
4) Handling principal payments
Do not enter principal repayments as rental expenses in the T776. If you want to record them for cashflow analysis, keep them in your working papers or in a client memo — not on the T776 expense lines.
5) Enter personal-use days & apportionment
On the T776 there is a personal portion or availability column (Part 3 or a dedicated area). Enter the number of personal days and ProFile will compute the percentage (personal days ÷ 365) and the non-deductible portion.
Example: 27 days → 27/365 = 7.4% → enter 7.4% in the personal portion column
6) iPad / Computer — Capital cost & CCA
In ProFile go to Capital Properties / CCA area for the client → add the iPad under the appropriate CCA class (e.g., computer equipment).
Enter cost, date placed in service, and business % (apportion). ProFile will calculate CCA available for the year.
If client chooses not to claim CCA, leave it in the worksheet but do not flow the CCA into the T776.
7) Vehicle expenses in ProFile
Find the motor vehicle or travel section under the T776 or in an expenses tab.
Enter totals for: fuel, insurance, maintenance, lease payments, capital cost, etc., then enter the business use %. ProFile will compute the deductible portion.
Attach or reference a vehicle log in your file for support.
8) Summary page & cross-check
Use ProFile’s Summary (or Review) page to see property-level net income/loss. It should automatically roll up to the T776 totals and to the client’s T1 return.
Cross-check: Interest (entered) + other expenses = total expenses; ensure principal not included; confirm personal-use reduction applied.
9) Flagging / notes for review
Use ProFile notes or the workpaper area to record judgments: e.g., “25% vehicle use accepted based on client log; client declined CCA on property to avoid recapture.”
Keep a signed client instruction for important choices (no CCA, apportionment decisions).
Practical calculations — small examples
Personal-use adjustment:
Personal days = 27 → 27 ÷ 365 = 0.0740 (7.4%)
If total mortgage interest + utilities + condo fees = $22,500 → non-deductible portion = 22,500 × 7.4% = $1,665.
Vehicle claim:
Total vehicle expenses = $11,582; business km% claimed = 25% → deductible = 11,582 × 0.25 = $2,895.50.
Keep logbook proving 25% business use.
Professional judgment & audit risk — what to document
Why a % was chosen (e.g., 25% vehicle use): store client log + brief memo.
Why you accepted or rejected iPad claim: store a client memo and show business-use calculation.
Why client declined CCA: signed client instruction noting future sale concerns.
⚖️ Decision box (How to choose)
High chance of sale in near future → consider not claiming CCA.
Long-term hold and want current tax relief → consider claiming CCA, but keep note on recapture risk.
Ready-to-use review checklist (printable)
Is mortgage interest entered separately from principal?
Are repairs vs capital expenditures classified correctly?
Are personal days accounted for and % applied?
Is vehicle business use supported with a logbook?
Has client decision on CCA been documented?
Are receipts & bank statements saved in the workpapers?
Are separate T776s created per property (recommended)?
Are ProFile notes/workpapers updated with professional judgments?
FAQs (short)
Q: Can I deduct my own time spent managing a rental? A: No — imputed wages or owner time are not deductible. If you paid someone else, that payment may be deductible.
Q: Can I claim the whole iPad cost as an expense? A: Only the business portion. If it’s clearly used for personal reasons too, apportion or avoid the claim.
Q: Should I split properties into separate T776s? A: Yes — for clarity and easier analysis. CRA accepts either method.
Final tips for new tax preparers 🧠✨
Be conservative and document everything — documentation is your best defense.
Use ProFile’s notes/workpapers liberally; they’re part of your audit trail.
Explain CCA implications to clients in plain language (current tax savings vs future recapture).
Always get client confirmation for subjective choices (signed or emailed instruction).
Overview of tax credits for Deepak and his parents — what to claim, how to document it, and exactly what to enter in ProFile 🧾👨👩👦
This is a practical, beginner-friendly guide you can use as your one-stop reference when preparing credits for a client who supports elderly parents. It covers the Disability Tax Credit (DTC), the Canada Caregiver Amount, claiming medical expenses for dependants, transferring unused credits, and clear Intuit ProFile steps so someone who’s never used tax software can follow along.
Quick snapshot — why this matters (TL;DR) 🚦
If a parent has an approved DTC (Form T2201), the family can claim the disability amount or transfer unused portions to a supporting person. The T2201 must be submitted and approved by CRA to claim the DTC. Canada+1
The Canada Caregiver Amount can be claimed for an infirm dependant 18+ and the amount is income-tested (enter dependant net income to get the correct figure). (See line 30450 guidance.) Canada
Medical expenses paid for parents are claimed on line 33199 (not the taxpayer’s self line 33099). Use the 12-month period that gives the largest claim and document everything. Canada+1
1) Disability Tax Credit (DTC) — what it is & what you need 🔵
What it does: Non-refundable credit for persons with severe and prolonged impairment. If the dependant isn’t using all their DTC, the unused portion can be transferred to a supporting family member. Canada
What you must collect: Completed Form T2201 signed by an authorized medical practitioner, plus any CRA approval letter once available. Do not claim a DTC transfer until the T2201 has been approved (or at least submitted with reasonable evidence and documented). Canada+1
ProFile entry (simple):
Forms Explorer → Credits / Disability section.
If DTC approved: tick the DTC box for the dependant, attach T2201 and CRA approval.
If pending: attach the signed T2201 and a note “DTC pending — T2201 submitted” in client notes.
📎 Note: keep the original signed T2201 and any CRA correspondence in the client file.
2) Canada Caregiver Amount (Line 30450) — who qualifies & how it’s reduced 📉
Who: You can claim for an infirm dependant 18+ (parents, grandparents, etc.) if they are dependent on the taxpayer because of impairment. The amount is reduced by the dependant’s net income. See CRA guidance for the detailed eligibility and calculation. Canada
Why net income matters: If you don’t enter the dependant’s net income, the software will assume the maximum caregiver amount and your client may be reassessed later — always collect the dependant’s line 23600 (net income) or NOA. Canada
ProFile entry (simple):
Add dependant in Dependants worksheet (name, DOB, relationship, net income).
ProFile auto-populates Schedule 5 → review line 30450 entries and confirm the caregiver amounts shown for each dependant.
Attach a short workpaper that lists the dependant incomes used and source documents.
3) Medical expenses — where to enter parents’ expenses (lines 33099 / 33199) 💊
Two different lines:
Line 33099 — medical expenses for the taxpayer, spouse, and children under 18.
Line 33199 — medical expenses for other dependants (parents, grandparents, adult children). Always put parent medicals on 33199. Canada+1
12-month rule: Choose the 12-month period that produces the largest claim — document the period and keep receipts. Canada
Threshold: The claim equals eligible medical expenses minus 3% of the claimant’s net income (or the yearly maximum threshold if that applies) — for dependant medicals, use the dependant’s net income when calculating the portion relevant to them. Canada
ProFile entry (simple):
Forms Explorer → Medical expenses worksheet.
Enter Deepak’s own medicals under line 33099.
Enter each parent’s medicals under line 33199, with dates & totals and the dependant’s net income. Attach full receipts.
🔍 Tip: keep a separate “Medical Receipts Summary” (PDF or Excel) showing each receipt, the date, the payee, amount, and which person it’s for — saves time on CRA requests.
4) Disability amount transferred from a dependant (Line 31800) — how transfers work ↩️
If a dependant qualifies for the DTC but does not need the full credit, the unused portion may be transferred to a supporting person — entered on line 31800 of the supporting person’s return. Ensure the dependant’s return reflects the DTC claim first. Canada+1
ProFile entry (simple): once the dependant’s DTC is recorded, ProFile shows the available transferable amount and provides the field to enter the transferred amount on the supporter’s return. Attach evidence of the dependant’s DTC claim/approval and a note indicating the transfer amount.
5) Practical documentation & audit-proof workpapers — what to save 🗂️
Always attach and save in the client file:
Signed T2201 and CRA approval (or proof of submission). Canada
Doctor’s letters for infirmity (if DTC pending).
Dependants’ Notice(s) of Assessment or last filed return (to prove net income).
Receipts and proofs of payment for all medical expenses (bank/credit card statements). Canada
A short “Dependants & Medical Workpaper” showing: dependant name, DOB, net income used, medical totals, DTC status, caregiver claim amount, supporting attachment filenames.
6) Common mistakes to avoid (and how to fix them) ⚠️
Mistake: Entering parents’ medicals on the taxpayer’s line (33099). Fix: Use 33199 for other dependants. Canada
Mistake: Not entering dependant net income → software assumes maximum caregiver amount and client gets reassessed. Fix: Obtain and enter the dependant’s 23600/net income (or NOA). Canada
Mistake: Claiming DTC transfer without a filed/signed T2201. Fix: Attach the signed T2201 and indicate CRA approval status; wait for approval if feasible. Canada+1
7) Short ProFile checklist — copy into the client notes ✅
Dependants added with SIN/DOB/relationship and net income.
T2201 attached (if applicable) and DTC status noted.
Medical receipt summary attached; parental medicals entered on 33199.
Transfers (DTC) entered on line 31800 with dependant support docs.
Client sign-off (email or signed worksheet) saved.
Final quick examples (so you can see it in practice) ✍️
Grace: approved DTC, low income → Deepak claims caregiver amount and most of her unused DTC transfer. (Attach T2201 and NOA.) Canada+1
Suresh: doctor letter for infirmity but DTC pending → Deepak claims caregiver amount now (supported by doctor letter) and will claim DTC transfer only after T2201 approval. Document the letter and the pending T2201 submission. Canada
Reviewing the Finished Return — flow of information & final checks for an investor with rentals 📄🔁🏦
This is your ultimate beginner-friendly reference for reviewing a completed personal tax return for an investor who has: a private corporation that pays dividends, taxable investment accounts (T3/T5/T5008), realized capital gains/losses, and two rental properties. It shows where each dollar came from, how numbers flow through the return, what to verify in Intuit ProFile, and a final pre-transmit checklist so you won’t miss anything. Use this as your go-to closing procedure whenever you finish a return.
Why a structured review matters ✅
Small input mistakes (wrong slip amounts, missing instalments, incorrect conversions, or mis-classified rental items) often become audit triggers or reassessments. A methodical review saves the client money and your time later.
High-level flow of information — understand where things originate 🔎
T-slips (T5, T3, T5008) → feed Investment income lines (interest, eligible & ineligible dividends, mutual fund distributions, foreign investment income).
T5 → dividends/interest (box mapping).
T3 → trust / mutual fund distributions (flows to schedule 4 / investment income).
T5008 and broker reports → dispositions used to build Schedule 3 (capital gains/losses).
Broker realized gain/loss reports → used to compile Schedule 3 totals (proceeds, ACB, commissions, taxable capital gains).
Investment loan statements & fee invoices → supporting docs for carrying charges (Line 22100) and allowable management fees.
T776 (per rental property) → gross rents/Airbnb revenue and itemized rental expenses; net of personal-use adjustments → totals roll to T1 rental income (net combined).
RRSP receipts & T-slip confirmations → RRSP deduction schedule → Line for RRSP deduction; HBP repayments entered if applicable.
Dependants worksheet & medical worksheet → feed Schedule 5 and medical claim lines (33099 / 33199).
T1135 (if needed) → separate disclosure built from broker specified-foreign-property reports (monthly highs / highest cost during year).
Instalments / tax payments → entered into Payments section to reduce balance owing.
Typical lines on the tax summary & their sources (easy map) 🗺️
Non-refundable credits (Schedule 1 & Schedule 5) ← basic personal amount, caregiver amounts, DTC transfers, medical expense credit calculations.
Balance owing / refund ← total tax computed minus instalments & remittances.
Key reconciliation steps you must do before filing (do these every time) 🔁
Slips → Software
Verify each T5/T3/T5008 amount exactly matches the PDF slips. Check issuer name and box numbers.
For foreign slips, confirm the exchange rate used (document source: Bank of Canada annual average or slip-provided rate).
Schedule 3 (capital gains)
Reconcile Schedule 3 totals to the broker’s realized gain/loss summary. Ensure commissions/outlays are treated consistently (reduce proceeds or increase ACB as appropriate).
For US securities, use consistent CAD conversions (note rate used).
T776 (rentals)
Confirm each rental’s gross receipts match bank deposits / platform statements.
Interest: only interest deductible; principal excluded. Ensure principal payments were not entered.
Personal-use days: confirm days claimed and the calculated non-deductible portion.
If client declined CCA, confirm a signed instruction is saved.
Carrying charges & management fees
Only include advisory/management fees for non-registered accounts if invoiced separately. MERs (embedded mutual fund fees) are not deductible.
RRSPs & HBP
RRSP contribution receipts entered and RRSP deduction does not exceed room. HBP repayments recorded and reconciled to notices.
Dependants, DTC & medicals
Dependants’ net incomes entered (line 23600) — required for accurate caregiver amounts and medical thresholds.
Attach T2201 (if DTC) or doctor’s letters if DTC pending; enter transfers only when supported.
T1135 check
Sum the highest cost of ALL specified foreign property across institutions for each month (or use monthly highs from reports). If > $100,000 at any time → prepare T1135.
Payments & instalments
Verify all instalments & prepayments show in the Payments section, with correct dates/amounts.
Tax credits & calculations
Review Schedule 1, Schedule 5, and non-refundable credits summary. Ensure caregiver / DTC transfers look sensible relative to dependants’ incomes.
Final mailbox check
Make sure all supporting PDFs are attached to the client file and filenames cross-reference your workpaper list.
Intuit ProFile finalization — step-by-step for beginners 🖥️
Run Validate (F8) — fix all errors (red). Document warnings you intentionally accept.
Open T1 Summary → visually scan major lines: total income, deductions, taxable income, tax payable, total credits, balance owing. Click into any line to jump to source forms.
Check Forms Explorer:
Income → T5/T3/T5008: click each slip and open attachments to confirm.
Income → Schedule 3: open dispositions and reconcile to broker report.
Income → T776: open each T776 and review personal-use %, interest, and major expense lines.
Payments → ensure instalments are entered correctly (dates match CRA instalment dates).
Attachments → use ProFile’s Attachments pane to attach PDFs; ensure all are visible in client file.
Workpapers → add a “Return Flow Reconciliation” one-page PDF that shows source → line mappings (example below). Attach this as the front page.
E-File → set up EFILE credentials, generate the transmission package preview, and save the pre-transmit report. Do not transmit until client approval obtained.
Client Package PDF → produce a single combined PDF of T1 + key schedules + attachments summary for client review.
Example: Return Flow Reconciliation (one-page you can copy into the file) ✂️
T5 (Skylar Global Solutions Ltd) — ineligible dividends → Line 12010 (enter exact box 10)
T5 (Broker) — interest USD converted using BoC avg 1.3013 → Line 12100
T5008 / Broker realized gains → Schedule 3: Proceeds $X / ACB $Y → taxable capital gain = (Proceeds − ACB − commissions) × 50% → Line 12700
T776 (Condo A) → Gross rent $A, Expenses $B → Net rental income $C → combined rental net → Line 16000
Carrying charges (investment loan interest) $17,004.52 → Line 22100