
Whether you are learning to become a tax preparer or you simply want to file your own return using Intuit ProFile, this guide will show you—step by step—how a basic Canadian tax return is actually prepared.
We will use a typical real-life style example:
- One T4 employment slip
- RRSP contributions
- Medical expenses
- Charitable donations
- No business income and no dependants
This is exactly the kind of client a new tax preparer will see every day—and it’s also the perfect situation for someone filing their own taxes for the first time.
Table of Contents
- 1. Start With the Documents – Tax Preparation Is 90% Organization
- 2. Create the File in Intuit ProFile
- 3. Enter the T4 Slip – The Heart of Most Returns
- 4. RRSP Contributions – Where Many Beginners Make Mistakes
- 5. Medical Expenses – Use the Worksheet
- 6. Charitable Donations
- 7. Review the Result
- 8. Check Next Year RRSP Room
- 9. Quality Check – Think Like a Professional
- 10. What This Teaches You
- Summary Review — Understanding the Forms ProFile Generated
- Final Thoughts
1. Start With the Documents – Tax Preparation Is 90% Organization
Before opening any software, collect the paperwork. Good tax habits start here.
For our example client you need:
- T4 slip from employer
- RRSP receipts
- $3,000 for March–December
- $600 for January–February (first 60 days)
- Notice of Assessment showing RRSP limit $88,700
- Dental receipt $3,620
- Donation receipts $420
Client facts:
- Single, no dependants
- Date of birth used for training: 1991-03-05
- Employment income: $78,500
💡 Tip for new preparers: Always ask for the Notice of Assessment. Without the RRSP limit you can accidentally create an over-contribution.
2. Create the File in Intuit ProFile
Open Intuit ProFile T1 and choose:
New → T1 Return
Enter the identification:
- Name and SIN
- Address
- Date of birth
- Marital status: Single
For people filing their own return, this screen is simply your personal profile.
For future tax preparers, this is where accuracy is critical—one wrong SIN can reject an entire filing.
3. Enter the T4 Slip – The Heart of Most Returns
Open the T4 entry screen and type the main boxes exactly as shown on the slip:
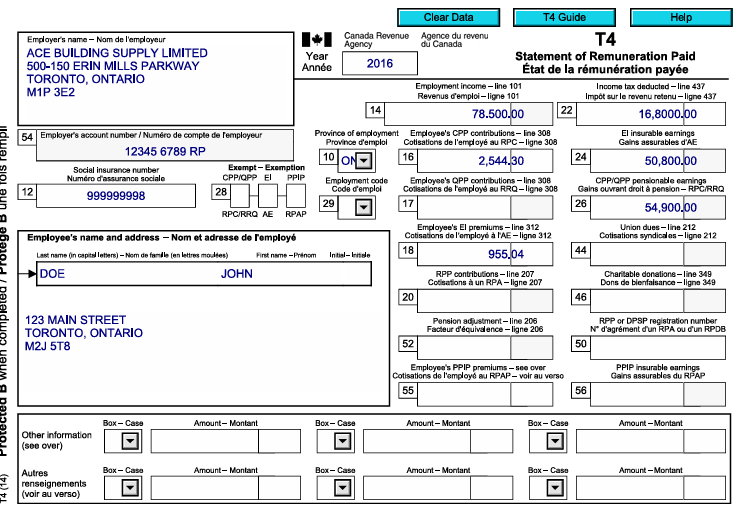
- Box 14 – Employment income: 78,500
- Box 16 – CPP: 2,544.30 (Tax software will show the correct value; based on CRA formula)
- Box 18 – EI: 955.04 (Tax software will show the correct value; based on CRA formula)
- Box 22 – Tax deducted: 16,800
Let ProFile calculate the rest.
Professional Tip: Do not override CPP/EI insurable earnings unless you truly know why. The software follows CRA rules automatically.
After saving, check the T1 Summary:
- Employment income appears on line 10100
- CPP & EI credits are created
- Canada Employment Amount shows automatically
This single step builds most of the return.
4. RRSP Contributions – Where Many Beginners Make Mistakes
Step 1 – Enter the RRSP Limit First
Go to the RRSP section and enter:
- Limit from NOA: $88,700
If you skip this, ProFile assumes zero room and will refuse the deduction.
Step 2 – Enter the Receipts
On Schedule 7 record:
- $3,000 (Mar–Dec)
- $600 (Jan–Feb)
Total deduction = $3,600
Now line 20800 of the return shows the RRSP claim.
For self-filers: this is how you legally reduce your taxable income.
For preparers: this is one of the biggest refund drivers.
5. Medical Expenses – Use the Worksheet
Open Medical Expenses Worksheet:
- Patient: John
- Type: Dental
- Amount: $3,620
ProFile automatically applies the CRA rule:
Medical expenses – lesser of
• 3% of income
• CRA minimum threshold
The allowable amount flows to Schedule 1 without you doing math.
6. Charitable Donations
Open the Donations Worksheet:
- United Way – $300
- Make-A-Wish – $120
Total = $420
The software calculates:
- First $200 at lower credit rate
- Balance at higher rate
For new preparers: never add donations directly on the T1—always use the worksheet so carry-forwards are tracked.
7. Review the Result
Open the Comparative Summary:
You should see:
- Total income: $78,500
- Net income after RRSP: $74,900
- Credits for CPP, EI, employment amount
- Medical and donations applied
➡ Refund: $1,543.16
This is the moment both preparers and self-filers love 😊.
8. Check Next Year RRSP Room
The RRSP worksheet shows:
- New contribution limit: $99,230
A good preparer will always tell the client this number.
A self-filer should keep it for next year’s planning.
9. Quality Check – Think Like a Professional
Before hitting EFILE:
- Is the DOB correct?
- RRSP limit entered?
- Receipts listed properly?
- Marital status accurate?
- No duplicate entries?
Tax preparation is less about typing and more about reviewing like an auditor.
10. What This Teaches You
If You Are Training to Be a Tax Preparer
You just practiced:
- Reading a T4 slip
- Claiming RRSP correctly
- Calculating medical credits
- Entering donations
- Navigating ProFile screens
- Explaining results to a client
This is the foundation for 70% of real clients.
If You Are Filing for Yourself
You learned:
- Where your refund actually comes from
- How RRSP lowers tax
- Why medical and donations matter
- How ProFile mirrors CRA forms
Summary Review — Understanding the Forms ProFile Generated
At this point you have already entered the slips and receipts in Intuit ProFile and received a refund result.
But a real tax preparer must understand something deeper:
Where exactly did every number go — and why did the refund happen?
ProFile does not invent numbers.
It simply places your entries into the CRA calculation system in a specific order:
Income → Deductions → Net Income → Tax → Credits → Refund
Below is a guided walk-through connecting what you typed to what CRA calculated.
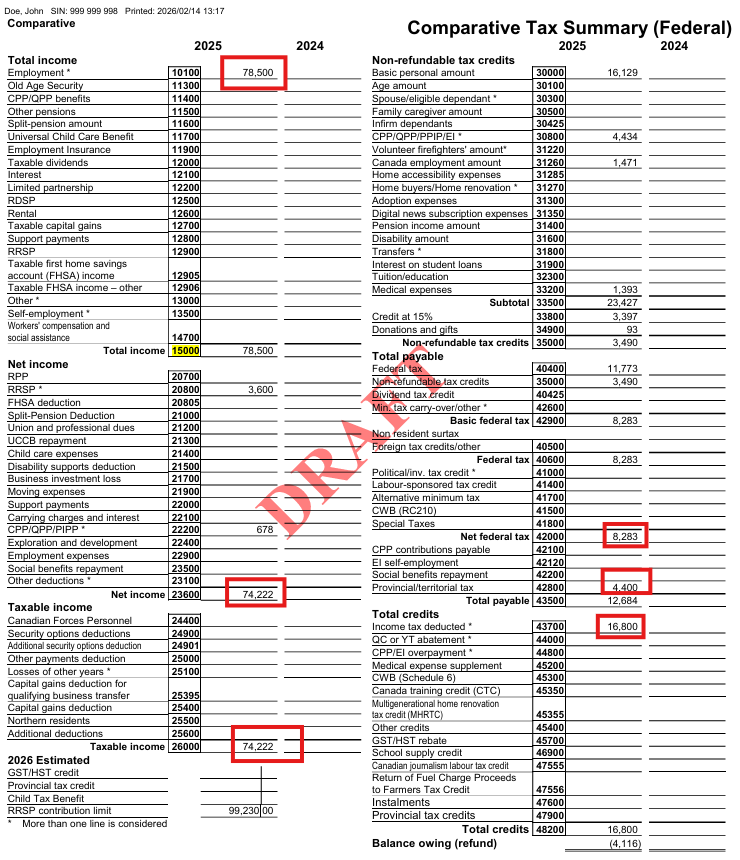
1) Income — Where the Return Begins
You entered one T4 slip:
Employment income = $78,500
That single entry populated:
- T1 Line 10100 → Employment income
- Total income Line 15000 → 78,500
- T1 Summary total income → 78,500
What CRA is doing:
Before any planning or deductions, CRA asks:
“How much money did the taxpayer earn?”
Because there are no investments, business, or rental income, total income equals employment income.
2) Deductions — Reducing Taxable Income
Now we move to the first tax-planning stage.
RRSP deduction
$3,600 → Line 20800
CPP enhanced deduction
$678 → Line 22215
Net Income Calculation
Total income: 78,500
Minus deductions: 4,278
Net income = 74,222
Line 23600
This is one of the most important numbers in a tax return.
It controls benefits, credits, and thresholds.
3) Taxable Income
There were no additional adjustments.
So:
Taxable income = Net income = 74,222
Line 26000
4) Federal Tax Before Credits
CRA now applies tax brackets to taxable income.
Result:
Federal tax = 11,773
This is the tax owed before applying credits.
5) Non-Refundable Credits — Reducing the Tax
Credits do NOT reduce income.
They directly reduce the tax bill.
Automatic credits from employment
- Basic personal amount → Line 30000
- CPP contributions → Line 30800
- EI contributions → Line 31200
- Canada employment amount → Line 31260
Medical expenses (you entered $3,620)
CRA rule: subtract 3% of income
3% of 74,222 = 2,226.66
Eligible medical = 3,620 − 2,226.66 = 1,393.34
Line 33200
Donations (you entered $420)
Credit calculated automatically:
92.80
Total federal credits
3,489.70
6) Final Tax After Credits
Federal tax before credits: 11,773
Minus credits: 3,489
Net federal tax = 8,283
Add Ontario tax:
4,400
Total tax payable = 12,683
7) Refund Calculation — The Real Meaning of a Refund
Tax already deducted by employer (T4 Box 22):
16,800
Actual tax owing:
12,683
Refund:
4,116
8) Next Year RRSP Room
ProFile also calculated next year planning value:
New RRSP limit = 99,230
What These Three Forms Each Teach You
T1 Return
The legal CRA calculation — how tax law works.
T1 Summary
The explanation sheet — helps clients understand refund drivers.
Comparative Summary
The preparer diagnostic tool — used to review accuracy and changes.
Key Takeaway
The most important lesson from this case:
Refunds are not created by deductions — they are created by overpaid tax.
The return followed the exact CRA logic:
- Report income
- Deduct RRSP
- Calculate tax
- Apply credits
- Compare with tax withheld
The difference became the refund.
Once you understand this flow, you are no longer just entering numbers — you are reading the story of a tax return like a professional.
Final Thoughts
A simple employee return like this may look easy, but it teaches the core workflow of Canadian tax filing:
- Gather documents
- Enter slips
- Add deductions
- Review summaries
- Understand the story behind the refund
Master this case and you are ready for more advanced returns—investments, rentals, and business income.
Happy filing! 🚀
Leave a Reply